• Hey Guest!
    British Car Forum has been supporting enthusiasts for over 25 years by providing a great place to share our love for British cars. You can support our efforts by upgrading your membership for less than the dues of most car clubs. There are some perks with a member upgrade!

    **Upgrade Now**
    (PS: Upgraded members don't see this banner, nor will you see the Google ads that appear on the site.)
Tips
Tips

oops... too far?

TexasKnucklehead

Jedi Knight
Country flag
Offline
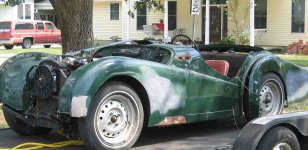
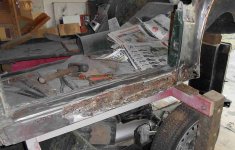
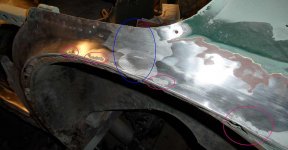
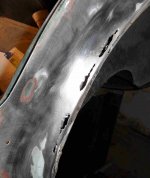
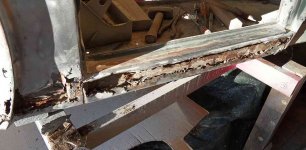
When I got this TR3, some of the body looked OK. Everyone kept telling me that I had to get the paint off before I really knew. Well, I took the paint and filler off the drivers rocker panel, and look what's left. Have I gone too far? The bottom few inches of the dog leg has very little metal -thin and held together by filler (it looks like paper was stuffed into the cavity, then filler to solid it up). I guess I know why the stone guards didn't fit.

I thought this car had seen body work some time ago, but I didn't expect this.
 

Attachments

  • 24239.jpg
    24239.jpg
    65 KB · Views: 461
  • 24240.jpg
    24240.jpg
    67.3 KB · Views: 458
Not sure I understand the question, but TS13571L was in worse shape than that, only underneath the stone guards. Body shop fixed it up with some fiberglass and Bondo, seems to be OK so far ...

And the dang stoneguards never fit the way people seem to think they should. I believe that even when new, they had to be shaped to fit the car.
 
I just meant that maybe I should have left well enough alone. The 'before' picture doesn't look bad. Even as I started removing the paint, and went past the 2nd layer of primer, it looked ok. Nothing seemed unusual until I hit the filler, and couldn't find any metal. More than 80% of the surface of that panel was metal screen and bondo (or some type of filler). The face of that panel is almost completely gone, except for the section near the front fender.

The other side is showing cracks and rust coming through, so it's probably no better.

I'm not sure my body reworking skills are going to have it looking any better than it did to begin with. I'm guessing I should weld in a new rocker. I'm not sure what to do with the dog leg.
 
The good news is now you can see the rocker and the dogleg need to be rebuilt with new metal to be good as new. Or you can use Evercoats duraglass and carve out the rocker and dogleg with that and finish with plastc. It will look good until you really want to fix it right. Don't fret , I'm sure the rest of the car is fine... by the way, most of em are like that. Kevin
 
There are repair panals available for the doglegs, just like the rockers. the best thing is to get good metal in there. Eventually bondo and fibergalss filled holes will give out and you'll get cracks and rust or even big holes.
What you've found is very common to TR2-3s At the top of the rear fenders on the tub is a typically nasty spot as well.
you're doing it the right way.
 
Look at the bright side...........it appears your floors are still in good shape, they are usually one of the first areas the tin worm attacks. You have VERY typical issues. Cut out the bad and put fresh metal in. Do it right this time if you can and you'll not have to worry about again. My car had putty in the dogleg the size of a softball! You are not alone
Gordon
 
Tex,

I know what you are going through, although yours looks a little worse than mine. I would be concerned that the inner sill is just as rusty as the outer is especially with that rust through at the dogleg. Depending on what you decide to do, you will be able to see the extent of the damage if you decide to cut out that metal at the bottom of the dog leg. Behind it you might find the bottom of the B post attached to a bunch of rust and air like mine was.

Can you weld? If you can, than the outer sill by itself is not too bad to replace. The inner is much much more of an issue and creates a whole bunch more complexity.

Question for banjo. Are there repair panels available just for the lower portion of the doglegs are do you have to buy the whole panel that runs up to the rear deck?

Tex, if you need any pics of the area, please let me know.

Cheers,
David
 
David,
Moss lists the doglegs as part # 855-720 (RH quarter panel) and 855-730 (LH quarter panel). they list for $157.95 each. looks like they go from the rocker to the seam at the top of the fender arch where the cockpit opening turns to go across the rear deck.
I gotta get a pair myself. It's the only bad spots on the TR2. There were mouse nests in each of the dogleg cavities behind the interior panels, and they held enough moisture to rot a hole in each side.
 
Looking at the "before" picture, I personally think the "after" looks great. All that stuff is just part of the game. Don't be tempted to bondo over holes...and the repair panels are easier in the long run than the patch panels by the time you blend them all in.

I have relatives in Houston...I'll have to come check out the project as you go!!

John
 
Marvin Gruber said:
Thats not bad at all.
When sand dumped out of the engine as I removed the starter, I said that. When the pistons were rusted to the liners, I didn't loose faith. When the distributor refused to come apart, I didn't fret. But body work is a place I didn't want to be.

M_Pied_Lourd said:
Tex, Can you weld?
I welded a little back when I was in college and my neighbor has promised me his MIG welder and help learning again. I have a pre60k car, so the rocker panel will need modified. The B pillar is exposed. I hit it hard enough at the bottom to punch a hole with a screw driver and it instantly became a hour glass: sand ran out the slit for several minutes. Wish I had the camera ready. The sills are rusty and a little rotted at the ends, but solid where the body supports attach. If I were to replace everything not perfect, I'd have to start from the battery box.

This picture doesn't show the difference in color of these patches. The seam circled in blue in the center doesn't seem to be plastic or filler. How could I tell if it's lead or solder? The others (pink) are filler.

There's no turning back, but I can see why projects get abandoned.
 

Attachments

  • 24243.jpg
    24243.jpg
    64.5 KB · Views: 277
Wow Tex - I wish I was caught up to your point of progress, we could help each other better. As it is now I'm riding on your coat tales (or however that expression goes).

The pink circles, are they patching rust holes, or just filling in imperfections? If they aren't hiding rust I'd have no problem doing exactly the same thing again.
 
Ride on, or right on (however that expression goes). I think we are both progressing well.

I have a few holes on the floor where I'll get to practice welding.

The pink circles are patches on rust holes. I have about 7 of them (on this dog leg), none more than a 1/4" or so wide or longer than an inch or two. There is no signs of 'new' rust around them -though I can't see the under side. I also need to do something about the missing (4 of 9) caged nuts.
 

Attachments

  • 24247.jpg
    24247.jpg
    66.3 KB · Views: 247
For areas with limited access I have weld nuts I'm intending to use to replace some cage nuts, based on a previous BCFer recommendation - they look simple to use, and I have a bunch from McMaster Carr - you are welcome to them next time I see you.
 
The gray filler may be AllMetal epoxy filler. Much superior to Bondo, IMO, but certainly not good as structural repair material. Metal is the only real way to do it.
If you have access to a welder and an instructor too, you're golden! :thumbsup:
 
the blue circle of silver filler is likely lead. Randall can probably tell you when the break was where they stopped filling that seam at the factory. the early cars had it smoothed over, later ones it was an exposed seam. that's where the Moss replacement quarter panel ends. that's probably factory filler.
 
Banjo said:
the early cars had it smoothed over, later ones it was an exposed seam.

Funny, under the top coat of BRG, there was a layer of filler, with the 'seam' carved into it, above another shade of green paint, above red primer, above yellow paint/primer, and finally over red primer. Both rear quarter panel seams were like that.

I spent another hour in the garage making dust and plastic rocks with screen attached to them, out of a rocker panel. It goes a lot faster when you know what to expect and just use a hammer to break out the filler. The dog leg has no holes fixed on the passenger side, aside from the bottom few inches. I hope this is the worst of it, but I'm still afraid to look at the back end.
 

Attachments

  • 24248.jpg
    24248.jpg
    65.9 KB · Views: 191
Tex,

If I were you, I would (just a suggestion) continue to clean up the outer sill and try and remove it completly. Should be spot welds to drill out along the top and bottom edge. I drilled mine out and then used an air chisel on the seam to seperate the other sill from the inner.

Here is a shot of mine looking at the bottom of the car. You can see the spot welds on the edge.

P1070707.jpg


P1070709.jpg


P1070711.jpg


After you remove the outer sill, you may find more damage that needs to be repaired....

P1070714.jpg


Don't get discouraged! It can be fixed.

Cheers,
David
 
Back
Top