• Hey Guest!
    British Car Forum has been supporting enthusiasts for over 25 years by providing a great place to share our love for British cars. You can support our efforts by upgrading your membership for less than the dues of most car clubs. There are some perks with a member upgrade!

    **Upgrade Now**
    (PS: Upgraded members don't see this banner, nor will you see the Google ads that appear on the site.)
Tips
Tips

One head off, one to go

Darrell_Walker

Jedi Knight
Offline
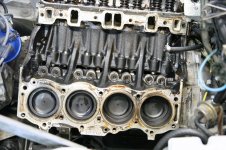
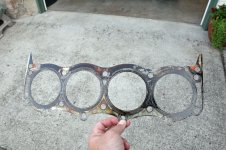
I got one head off. So far, so good. No sign of water into the cylinders on this side, and there is evidence of the head gasket leaking, so hopefully that explains the problem.

I also found that one of the exhaust manifold bolts was half way out, and most of the rest were very loose. Are the original locking plates still the way to go here? I suppose the torque is too low for lock washers? Also, the ROM procedure has you pull the head with the exhaust manifold attached. That was a bit problematic, as the 4 "extra" bolts along the bottom can't be completely removed with a socket because of the manifold, and are fairly hard to get out by hand even.

Checking with a straight edge (metal ruler), I don't see any warpage in the head or block. But I supposed I should have the head surfaced. Is that the correct term for the procedure? Want to make sure it looks like I know what I'm talking about at the machine shop!
 

Attachments

  • 26399.jpg
    26399.jpg
    139.4 KB · Views: 277
  • 26400.jpg
    26400.jpg
    106 KB · Views: 270
you would be correct having the head checked for flatness and skim cut, taking off as minimal material as possible to make sure the head is perfectly flat

and good luck

Hondo
 
Thanks, Hondo!

My biggest worry is remembering how it all goes back. Not so much what goes where (I've take lots of pictures, notes, and labeled things), but what order it all need to go back, as many things are impossible to get to until something else comes off.

I also forgot how much the parts expand once they are off the car, I've got a full table of bits, and more stashed under it. And still need to get the second head off....
 
Darrell_Walker said:
Thanks, Hondo!

My biggest worry is remembering how it all goes back. Not so much what goes where (I've take lots of pictures, notes, and labeled things), but what order it all need to go back, as many things are impossible to get to until something else comes off.

I also forgot how much the parts expand once they are off the car, I've got a full table of bits, and more stashed under it. And still need to get the second head off....

The real trick is to use the order the photos are taken as your reinstallation order. I use my photos when I reassemble. I start with the last photo taken and work backwards.

Jody
 
The other head is now off, too. Looks pretty much like the other side, evidence of some leakage on the top.

There is also some evidence of exhaust leakage into the water jacket. My theory is that the leak was so small that a little exhaust could be forced into the coolant, but not be sucked back into the cylinder.

Still need to get the water pump off, and start cleaning a mountain of parts!
 
tdskip said:
Why did they have to come off?

Coolant kept venting out of the expansion tank. After ensuring it wasn't because of a under-pressure cap or overheating, I ran a test to see if there was combustion gas in the coolant (which there was). That was causing over-pressure in the cooling system.

Luckily it appears that it was a head gasket issue, and not a problem with the cylinder liners (which I gather is more common on the 3.9 and 4.2 liter versions of the engine).
 
The later V8s used a thicker composite gasket instead of the thin steel ones. Common practice has been to skim the heads enough to make up the difference in thickness of the gaskets and use the composites if the heads need a good cut. If they don't, just use the steel ones. Difference is something like 20 thousandths on the 3.5 gaskets but double check. There are also Cometic head gaskets available now. Top of the line stuff, but around $100 a piece. Now is the time to really have a good look at the cam and lifters for wear.
 
Thanks, Todd.

All of my checking and inspections are showing the heads to be in good shape, so I'm planning on using the steel gaskets, and only torquing the four extra bolts to 30 ft-lbs.

Cam, lifters and pushrods are all looking good. Haven't really looked at the rockers or rocker shaft yet. Valves also look good.

It looks like I might also have been sucking a bit of oil into the intake, but that could have run there after taking things apart.

The amazing thing was that I thought the engine was running really well before, so I'm looking forward to seeing how it will run with everything actually sealed up properly!
 
BTW, I probably would just go ahead and replace the cam/lifters, even though they look fine, except for the A/C. It is working well, and I really would rather not disturb it!
 
I had a few spare minutes and decide to start tackling the water pump. What a job this is going to be! I think there are 12 or 13 bolts, all are almost impossible to get to, or get more than a quarter turn on. And this is with half of the engine out of the way, not sure how you would ever be able to do this with more stuff in the way.

I sure hope the noise I was starting to hear was the water pump, after what this is going to take. I've got 3 bolts loosened (of course the 3 more accessible), just 10 more to go!

I also took a look at the rockers and shaft, all looks to be in good shape. Injectors are going to out be tested/cleaned tomorrow. There wasn't any problems with them that I was aware of, but seemed prudent since they are out anyway.
 
Darrel, actually only a couple hold the pump on. Those are mostly long.

Unless,...your pulling the front cover too

FrontCoverThreadSealant-1.jpg


When I pulled the cover off mine last winter I measured all the bolts and put them in the location on this pic.
Still under the car
 
Hi Don,

I'm just pulling the pump.

So only 4, 5, 6 & 7 in your picture need to come off?

-Darrell
 
Don,

I think I need to remove all of them, the longer ones go into the block, but even the shorter ones connect to the front cover, which I'm not taking off.

Anyway, I have all of them loose, and I can move the pump away from the cover. But in your first picture, #6 and #7 also support a bracket that somehow supports the idler pulley and maybe the power steering pump. I need to find out how to relieve the pressure that is putting on those bolts before I can take them all the way out.

-Darrell
 
Sorry, you need others for that.Took those off when I bought it 4 years ago.
One thing, someone post on the list, I think Odd, about installing a stud on that lower PS bracket. Easier to get a nut on it then a bolt
 
Hi Don,

No worries, the pictures did help me find a couple of the bolts that I couldn't see.

I think if I take the tension off of the A/C belt and the idler (jockey) pulley belt, that should relieve the side load on the bracket that is held by those two bolts.

Lots of fun, with everything seemingly bolted to everything else!

-Darrell
 
Water pump is now liberated!

There are a total of 10 bolts that hold this thing on. Two of the holes I was counting from a picture of the gasket are locating dowels. There are 4 long 5/16" bolts that go through the front cover and into the block, one short 5/16" bolt that attached the pump to the front cover, and 5 more 1/4" bolts that also attach the pump to the cover.

I measured all of the bolt lengths, and will post a nice diagram when I get a chance, in case anyone else is interested.

I don't see anything obviously wrong with the pump, but hopefully the noise I was hearing was just the start of it failing. When my new one arrives I can compare the way it sounds. Perhaps because I was flushing the system with water, it aggravated a bearing that was starting to go? Anyway, I hopefully it was the water pump and nothing else, though with the recent talk about the idler bearing, I'll try to take a look at that, too.
 
Darrell, don't forget to put some sealant on those ones that are wet
 
Back
Top