
-
 Hey Guest!
British Car Forum has been supporting enthusiasts for over 25 years by providing a great place to share our love for British cars. You can support our efforts by upgrading your membership for less than the dues of most car clubs. There are some perks with a member upgrade!**Upgrade Now**
(PS: Upgraded members don't see this banner, nor will you see the Google ads that appear on the site.)

Tips
- We have a special forum called "Member Articles" where you can submit actual articles for consideration for publication. Learn More
- Don't have an Avatar? If not, your avatar will default to the 1st character in your username. Go into "Account Details" to change your Avatar.
- Some basic forum navigation info: click
 Hey - did you know if you click on the title of a thread it will take you to the first unread post since you last visited that thread?
- Hey Guest - Is your British Car Club in our Clubs database? If not, send me a PM - Basil

- Looking for a local club? Click the "Clubs" tab above and browse hundreds of clubs world-wide.
- Add Android or iPhone APP: click
- Did you know - any picture or video you add in your posts in any marque-specific forum will also get added to the Media Gallery automatically.
- A few more tips about posting and replying: click
- Hey there Guest - be sure to keep your profile page up to date with interesting info about yourself: learn more
- More tips and tricks on Posting and Replying: click
 but were afraid to ask:
  STOP!! Never post your email address in open forums. Bots can "harvest" your email! If you must share your email use a Private Message or use the
  smilie in place of the real @
- Want to mention another member in a post & get their attention? WATCH THIS

- So, you created a "Group" here at BCF and would like to invite other members to join? Watch this!
- Hey Guest - A post a day keeps Basil from visiting you in the small hours and putting a bat up your nightdress!
- Hey Guest - do you know of an upcoming British car event?
 Pretty Please - add it to our Events forum(s) and add to the calendar! >> Here's How <<
- Hey Guest - you be stylin' Change the look and feel of the forum to fit your taste. Check it out
- If you run across an inappropriate post, for example a post that breaks our rules or looks like it might be spam, you can report the post to the moderators: Learn More
- If you would like to try some different "looks" or styles for the site, scroll to the very bottom, on the left and click the Style Selector.
You are using an out of date browser. It may not display this or other websites correctly.
You should upgrade or use an alternative browser.
You should upgrade or use an alternative browser.
TR4/4A Once more - with feeling - Tr4a front suspension
- Thread starter tdskip
- Start date
Minesweeper
Senior Member
Offline
That's the way I do it (on a TR6), tdskip. I like being able to assemble all of the lower suspension on the bench, especially all the cups, seals, washers, and sleeves that are involved in mounting the trunnion to the lower a-arms, and then offer up the whole tamale to the frame mounts. Next comes screwing the vertical link (with ball joint and steering arm already mounted) to the trunnion. I use a large-ish pair of vice grips to compress the spring enough to get it in place, then a bottle jack to raise the assembly so that the ball joint can be bolted to the upper a-arms.
Scott
Scott
CinneaghTR
Jedi Warrior
Offline
I plan on doing the exact reverse of the disassembly, which is compress the pan and spring together and when everything is lined up, bolt the pan to the lower a-arm. Once that is done, I will decompress the spring. That is what my mechanic-friend-wizard suggested.
At the tech session a few weeks ago that completed the left side, the group vote was to bolt the pan to the arm and then compress and prise the spring into place. Maybe there was a step left out or a better angle to start from, but I was taking a look at that side this morning and noticed the bottom spring buffer is kinked so I get to do that side again.
Good luck!
CinneaghTR said:I was taking a look at that side this morning and noticed the bottom spring buffer is kinked so I get to do that side again.
Bummer.
HerronScott
Darth Vader
Offline
Although it's been a long time since I did mine, I recall following the steps in the Bentley/factory manual which is to install the spring with the lower pan as Jeremy is planning on doing.
Scott
Scott

Offline
Yep, This was approach I followed.HerronScott said:.... I recall following the steps in the Bentley/factory manual which is to install the spring with the lower pan as Jeremy is planning on doing.
Scott
We always fit the spring up then fasten the pan,but I have a home made compresser that may be unlike what is sold....It is a piece of all thread,some washers and a plate that fits into the spring,notched to hold the spring squarely.With the body off and an impact gun I can compress a spring in 30 seconds,install the plate and release the spring in less time than I can hunt and peck this message!
MD(mad dog)
MD(mad dog)
CinneaghTR
Jedi Warrior
Offline
tdskip said:CinneaghTR said:I was taking a look at that side this morning and noticed the bottom spring buffer is kinked so I get to do that side again.
Bummer.
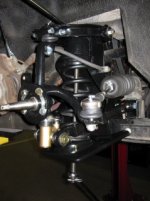
Done. That was a lot easier, especially on the powder coating!!

Attachments
HerronScott
Darth Vader
Offline
Nice and shiny Jeremy!
Scott
Scott
CinneaghTR
Jedi Warrior
Offline
Thanks, guys. I can't wait to get it dirty. Today, it is new bearings.