Hi Mark,
Tim's unhappy experience makes some very good points and you can do a few things to avoid those sorts of problems.
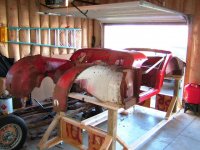
Looking at your pics, the braces in the door openings look good. You might also want to add a cross brace from side to side, and possibly a strap down from the center of that to the driveshaft tunnel to support the center of the tub. Also optional, diagonal straps in the door openings can help keep things square.
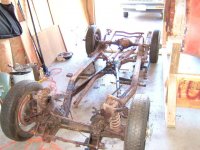
First thing I'd do is clean up and repair the frame, checking that it's solid and good and square, against the dimensions given in the service manuals. You might have the frame media blasted now and temporarily painted with weld-through primer, then go over it carefully to check the integrety of all the original welds, do any reinforcement or repairs that are needed. Don't put a final paint job or powdercoating on the frame yet. Before that, there's more to consider.
1. TR bodies were undoubtedly built on jigs, then eventually married up to the frame, suspension and drivetrain that were pre-assembled elsewhere. Since none of us have jigs to work with, the frame has to serve as one. So, temporarily reinstall the body on the frame before cutting and removing any old panels, especially those you that you need to replace. Leave the body on the frame while fitting, installing and through most (if not all) of the welding of new panels. Frequently check the fit of the new panels by reinstalling various adjacent bolt-on panels.
2. Work on one side at a time. The other side can serve as a guide.
3. "Build around the doors". Directly or indirectly, they are the guide-point for all other panel fitting on TRs. Temporarily re-fit the doors and whatever else you need to, as a guide when installing those parts.
4. Tack weld, check the fit on everything, then later come back and do finish welding a little at a time while being careful not to overheat and warp any particular area.
5. TR2 and 3, in particular, have a hand made quality about them. That means some variation in assembly, nowhere nearly as rigidly controlled as modern cars rolling off a robotic assembly line. You will find new replacement panels need a good deal of fitting.
Once the body is restored, then it's time to separate it from the frame again and strip them both for a trip to the media blaster. Just before it's trip to the blaster is when the body and frame look their ugliest and most derelict, even though you know everything is perfectly aligned and ready for the next step!
Back on the body, use soda or plastic media blasting on all the flat panels to avoid any warpage.
If media blasting shows up any smaller rusted areas in the body, those might be repaired by welding in a smaller patch panels, without necessarily needing to reinstall the body on the frame and go through the trial fitting again. However before final painting, I'd be very tempted to do another trial fit of the body onto the frame and bolt-on key pieces onto the body as well, in case anything needs some a little work before the final finish goes on. Like Tim said, there's nothing worse than having to destroy part of a brand new paint job during reassembly!
It can be a very fun job! But doing things in the wrong order and not doing *a lot* of trial fitting along the way nearly always leads to very frustrating problems later!

 Hey Guest!

 Hey - did you know if you click on the title of a thread it will take you to the first unread post since you last visited that thread?
 but were afraid to ask:
  STOP!! Never post your email address in open forums. Bots can "harvest" your email! If you must share your email use a Private Message or use the
  smilie in place of the real @
 Pretty Please - add it to our Events forum(s) and add to the calendar! >>