• Hi Guest!
    You can help ensure that British Car Forum (BCF) continues to provide a great place to engage in the British car hobby! If you find BCF a beneficial community, please consider supporting our efforts with a subscription.

    There are some perks with a member upgrade!
    **Upgrade Now**
    (PS: Subscribers don't see this gawd-aweful banner
Tips
Tips

Newbie questions on pulling an engine

steveg

Yoda
Gold
Country flag
Offline
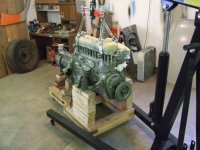
I'm looking at these two items for pulling my engine:

screenshot.581.jpg
screenshot.580.jpg

I have a Toyota trans - Is it best to pull engine & trans together?
Or can I first remove the trans, then pull the engine?
Will the HF crane with this load leveller be able to lift the engine enough to clear the shroud?
Does one pull the engine then push the car out from under it?
Should I pull the head separately, then the engine?

Thanks for any pointers.
 
You should be able to pull the engine and transmission together using these two tools. I would remove the carbs and gear shift lever as a minimum, and a better approach would be to remove the intake and exhaust manifolds. If you want to be real careful about the process, lift the engine slightly and then remove one or both of the motor mounts. You don't need to remove the head. And make sure you have a least one or two helpers.
Moving the car away from the engine lift is the correct method.
No matter what precautions you take, it's still a scary procedure and once the engine and Trans are clear of the car you will feel elated. Of course you will get the experience the thrill again when you reinstall it.
 
Steve,

I pulled mine with the Toyota 5 spd attached. I just used a chain without a leveller. I think if you use the leveller, you're not going to get enough height on the crane for the tranny to clear the shroud. I used a floor jack under the front crossmember as the wheels need to come off the ground a bit to clear the legs of the crane. IIRC, you have to pull the crane back and once you clear the crane legs, lower the floor jack and push the car back. You've got to go slowly and do some juggling back and forth while your heart's in your mouth waiting tor the whole thing to collapse and crush your shroud. Put some padding over the shroud and have a helper guide the tailshaft over the shroud so it doesn't scrape your paint when it finally clears:

 
Another trick You can do too help clear everything at the front of the car is jack up the rear of the car a bit to get a head start on angling the engine/tranny unit up and away from the body. Put the front wheels on flat 2x4's to give You clearance under the crossmember, chock the wheels and start jockeying.
 
Given how easy it was to remove and replace the W58 transmission from my BN7, without even having to go under the car, I don't see the point of fighting with all that bulk at one time. I would think you could pull straight up if you're just dealing with the engine, without any need for a leveler.
 
I have one of those one ton cranes, fully extended it will only lift 1/4 ton, which means it's overloaded with the engine only. Seems to work,but I haven't risked the gearbox as well because of this. I didn't use my leveller because I don't have the height and the crane arm isn't quite long enough. I had to remove the front bumper and put cardboard against the apron to protect it. We were just able to push the engine onto the box and lower it past the crossmember.

If if you have the space, get a bigger crane with a longer arm, it'll make the job easier.
 
Use a better engine hoist - rent or borrow a good one. Less stress if gearbox is out first, especially with front shroud on.
I have an Oberg tilt mechanism that gets the right angle, and easily adjusts as you work, moving the car away from the engine as you lift. Safety, and helpers!
 
Steve, I used a lift and leveling devise very similar to what you are showing. The Healey engine and trans weighs about 720 lbs together so with the boom all the way out it is within the capacity of the lift. Although you will get nervous when that hunk is hanging over your aluminum bodywork. I pulled and install both engine & trans bolted together. It is a little tight getting the trans back far enough so that the front dampener will clear the crossmember, but it is doable especially with the leveler. I also jacked up the back of the car so as it provided a more level entry for the engine.
Here's a side note. The Healey Factory manual will show that the lift gets attached to the rocker shaft mounts. And I think that most experience Healey Engine Pullers will say that's the only way to do it. But sometimes I can get really anal about some stuff and when I looked at hanging 720 lbs off of just those two studs, man I said I can't believe it. So I decided to attach the chains to the front and rear engine plates on one side and to head bolts on the other side. I have been told by a reliable Healey man that he feared that I would snap the "ears" on the engine plates. I seriously considered his counsel and then decided to do it my way. Hanging 720 lbs from 4 points just made more sense to me. Also note that on the passengers side where I had the longer chains, I put bolts between links that would allow me to level the engine from side to side as well. This did become an advantage. Here's a pic:
 

Attachments

  • Copy (2) of DSCF1995.JPG
    Copy (2) of DSCF1995.JPG
    49.5 KB · Views: 162
Drain the trans oil and plug the end with a good clean rag. People do forget that the Toyota trans oil runs out the tail shaft with the driveshaft removed.
 
Well Steve, all I can add here is be sure and remove the Hood as a first timer pulling the engine.
 
Well Steve, all I can add here is be sure and remove the Hood as a first timer pulling the engine.

Thanks, Keoke, for the insight. :wink-new: Should have mentioned I'd pulled Alfa engines before so have some experience. Just haven't done the Healey. My Alfa 1600 GTV engine and trans weighed around 330 lbs as I recall. Did it with a comealong hung from the rafters. It too required removing the hood.
 
To replace the hood in the same location, you can drill a very small hole or two through each bracket before you disassemble them. Use them to key the brackets when reassembling.
 
I didn't have enough room to move the crane so I took the front casters off the cherry picker and relied on rolling the car. It was an afternoon to remember because I had no help and the crane was almost at maximum extension so I had to tip the tranny and roll the car at the same time to clear the shroud. Way scary. Never again without some help. "Do it all yourself, you'll be glad you did".... well, not so much that time.
 
Lots of good advice already given. Take your time and exercise caution whenever possible. If the front shroud is on the car, I likely would separate the transmission from the engine before lifting the engine out - especially if one is not confident with the process and does not have high end equipment. Why add risk to damaging the bodywork?

Hanging the weight of both the engine and transmission from the two studs that project through the valve cover also scares me, although I have not had an issue when using that method. I wonder if anyone has had one of those studs snap when lifting? One stud takes a lot more weight than the other when angling the engine out with the transmission attached.
 
Well Patrick:
Just be sure he removes the Motor Helmet.--:highly_amused:
 
Last edited:
Steve, just more info here for what it's worth. The ceiling in my assembly room is 8 feet, 4 inches high. With my lift set up the way you see it in the previous picture I had no problem with crane height or in manuverability of the crane to pull the crane away from the car. Especially with the car front on it's wheels and the back of the car jacked up and on small jack stands.
 
To replace the hood in the same location, you can drill a very small hole or two through each bracket before you disassemble them. Use them to key the brackets when reassembling.

This is a really good tip. Drill two small holes in each bracket before bonnet removal and insert the same size drill bit in the holes to align them when reinstalling. Saves a lot of time and scratched paint when refitting the bonnet.
 
Back
Top