• Hi Guest!
    You can help ensure that British Car Forum (BCF) continues to provide a great place to engage in the British car hobby! If you find BCF a beneficial community, please consider supporting our efforts with a subscription.

    There are some perks with a member upgrade!
    **Upgrade Now**
    (PS: Subscribers don't see this gawd-aweful banner
Tips
Tips

TR2/3/3A New Wiring Loom, No Clue Where to Begin.

doc50

Jedi Trainee
Offline
I'm standing here with my new loom in hand and I feel like a monkey with a typewriter... where do I start?
I've heard the horror stories about running the wire, then having to start over from the other end!
Under dash pix would help.
Any advice? Thanx!
Thom
59 TR3
TS34909L
 
Horror stories?? Piece of cake. Below is a pic that should help to get you started. :excitement:

23624.jpg


That's an Advance Auto Wire wiring harness I put in my TR3...I guess it's not for the faint of heart.

I'm just kidding with you as i don't have any pics or suggestions for you. There will be others that have experience with original harnesses that will help you out.


Edit: BTW, here's a copy of the wiring diagrams for TR2 thru TR3B that should be of some help.

https://www.advanceautowire.com/tr24a.pdf
 
Start pax side under the dash and work outward from there. All splits in the loom originate behind the glove box.
 
First thing to do is to lay the whole thing out on the garage floor so that you can make some sense of it and see where all the sub-harnesses branch out. The sub-harnesses can be identified by the location of the large bulkhead grommets. Start by running the wire harness from under the dashboard out through the hole on the passenger side of the firewall. This will contain the wires for the voltage regulator, starter solenoid, fuse box, generator, right lights, right horn and brake switch. Put the small rear light harness aside. Then route the rest of the harness across the underside of the dashboard and pull the instrument cluster bundle out of the center hole. Let that lay out above the transmission tunnel and route the remainder to the drivers side. Pull aside the small bundle for the high beam switch and send the sub-harness out through the bulkhead and down along the left fender. This bundle contains the wiper motor, coil wire, left lights, left horn, and the wires that connect to the steering wheel controls. The rear harness runs under the door, over the rear axle and into the trunk.

Use the body straps to secure the harness as you work. I first straightened them all out and covered them with pieces of shrink wrap tubing to keep them from cutting into the wire bundles. Use tubing slightly larger and shrink them down for a nice tight fit. I don't know where you stand with installations so you may need to use a different sequence that I did. I make all the connections on the passenger side of the engine box, then the drivers side, them the rear lights and saved the pleasure of doing the dashboard for last.

Good luck

Joe
 
Here are some pix. Be aware that I make some upgrades to the electricals, so there are wires in the pictures that you wont have.S5001368m.jpgS5001367m.jpgS5001370m.jpgS5001362m.jpgS5001361m.jpgS5001363m.jpgS5001365m.jpgS5001372m.jpg
 
What Joe said...

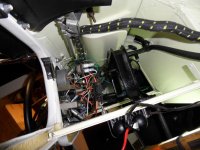
I started with the fuse box and regulator. Also, I wired everything I could, of the instrument panel, before 'offering it up' to the dash. Eventually, I had to remove some of the harness under the dash because the heater would not fit until it was routed properly (or at least differently). Take your time and understand the difference between "Green with a Black tracer", and "Black with a Green tracer". They are very different, and seeing where they start/end will help you understand why they are different. If you have a small 12v power supply, you can test things like lights and switches as you go (the horns take a lot of power, so unless you have a serious supply, don't expect them to function).

I soldered everything I could, but I'm sort of fanatical. I also used some electrical 'grease' on every crimp/terminal/bullet that I put together. Also, I added individual ground lugs on each light fixture. At first it seems daunting, but make one connection at a time, and before you know it, you will be done and everything will work flawlessly forever. I hope.

Jer
 

Attachments

  • wires_down.jpg
    wires_down.jpg
    188.3 KB · Views: 144
I'll add --

Your car should have the bare wire connections that get clamped in place by screws (rather than Lucar [spade] connectors. I soldered the tip of the bare wires to keep them neat and easy to slip into the hole in the connector (gauges, control box, brake switch, etc).

Getting the loom through the hole in the firewall was a tight fit -- I made a sort of funnel out of a piece of plastic from a gallon milk bottle to force the harness into a tight bundle as slip through the hole w/o snagging the cloth cover.

Before I did anything I laid the whole harness out on the floor in the shape of the car and made my own (very literal) wiring diagram to confirm I had IDed every connection and knew what it was for.

Cut no wires. Some are longer that you need (like at the control box) but leave everything long initially. I think it was at least a year later that I finally trimmed mine down to make the install look neater and more factory.

Check you ancillaries to see if their connectors match your harness. For example, later generators often get substituted for the earlier style. Much easy to change the connectors while the harness is still on the bench (or the living room floor).

Really not a bad job and certainly a pleasure to work on and drive a car with the correct harness... not that rat's nest I put up with for many years:

TR3OldWiring.jpg
 
I just put a harness in today in a 56 TR3. Started by putting the bulkhead rubber on behind the VR wires. Mine has a little more braid showing that what some of the pictures of are showing. Worked everything back from there.

Marv
 
Not much to add to the good suggestions made by others. Layout on floor to get a perspective on how it goes, take your time (it is really pretty straightforward), and follow the wiring diagram one item/section at a time. I soldered my connections too. One thing I did find useful was to make a simple "platform" from some scraps of wood (just 2 legs and bit of plywood that leaned against dash), but it was a big help in holding the cluster of small gauges and switches while I worked on the wiring. Good luck. Cheers, Mike

IMGP8340.jpg
 
YIPES!! I just saw that I had never thanked everyone for the great responses.
Thanks, everyone, for the great responses.

600 miles since finishing, she's never let me down. (Knocking on wood here).

Thom
1959 TR3
34909L(O)
 
Back
Top