• Hey Guest!
    British Car Forum has been supporting enthusiasts for over 25 years by providing a great place to share our love for British cars. You can support our efforts by upgrading your membership for less than the dues of most car clubs. There are some perks with a member upgrade!

    **Upgrade Now**
    (PS: Upgraded members don't see this banner, nor will you see the Google ads that appear on the site.)
Tips
Tips

TR2/3/3A Need advice TR3b inner sill replacement

Bruce100

Jedi Trainee
Country flag
Offline
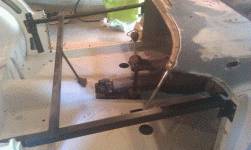
I may be in over my head here. I have braced the doors, and read Roger Williams Restoring How to Restore Triumph... My TR3B needs the inner sills replaced. Williams gives good detail on the order of replacement, stay on chassis, etc. But doesn't specify which body panels have to come off or other details in HOW to replace an inner sill. So I removed the outer sill on the drivers side today, and now am trying to remove the inner sill. What other body panels must be removed first? It seems to me that the outer quarter panel 850043, and part FRF900390 has to come off.

https://www.zeni.net/trf/webcatalog/specials7.13/7.php?s_wt=1024&s_ht=768

Anyone help here? Assume I don't know what I am doing :crazyeyes:
 
Well, as an amateur myself that needs to do this job as well, I don't know if there is "right" way or standard procedure.

It all depends on what panels need replacing and how to access the inner sill weld points.

I will probably cut the lower (6" or so) dogleg 850043 at a place that easiest to weld back. That will allow access to really get the inner sill secured. Get the structural/door gap stuff 100% correct then fiddle with the outer panels that are more easier to tweak and trim.

Are you TIG or MIG welding? I was thinking of investing in one of the tong spot welders.

Sorry no real info, just some thoughts I have had so far...
 
Just a novice comment here, but my opinion, take a look at the inner sill that is in place and see if it is salvageable with patching. I've seen ones that only need small patched in front section for example. It is the major structural backbone for that body so it intimidates me a bit to try to replace it - people have done it though it you absolutely need to.
 
Hi Bruce,

You will need to remove both the front and rear fenders. You will need to make an access panel at the bottom of the B Post dogleg to get to the welds where the bottom of the B post meets the sills. Lots of spot welds to drill out at the front exterior footwell area to release the sill and some grinding/cutting at the bottom of the A posts and along the floor edges from front to back. I found an air chisel to come in handy in certain areas.

Before you start, take some measurements and make some reference marks. They will come in handy.

It is a little tricky getting everything aligned once you get the new sill in. You will need to continously check the door/panel fitment as you move along in the process. Tack weld first before you finish weld to make sure all is well.

Not sure if this helps at all but I have a thread here with some pics of the area.

https://www.britishcarforum.com/bcforum/ubbthreads.php/topics/696460/1

I initially started out by patching but in the end decided to put all new sills in.


Cheers,
M. Pied Lourd
 
Bruce - posting pictures so we can get an idea of what you are doing can be a huge help.

Do you know how to do that?
 
Bruce100 said:
No, don't see an option to browse/upload a picture, just links
If you click on 'Reply' or 'Quote' or 'Switch to Full Reply Screen', there is a link 'File Manager' below the typing window. That leads to a dialog that will let you upload photos directly to BCF. However, unless you are a paid member, it is very limited : only one photo per post and no more than 100kb per photo.

For more and higher resolution photos (plus the convenience of not having to worry about resizing them), it's best to upload them to one of the free photo sharing sites, like Picasa or Flickr. I use PhotoBucket as it seems easiest to me.

With Photobucket, you just let your mouse cursor hover over the photo you want, then click in the "IMG" line of the popup menu. Then navigate over to your BCF post, click where you want the photo to appear, and press Ctrl-V. That will paste a line that looks something like :
<div class="ubbcode-block"><div class="ubbcode-header">Code:</div><div class="ubbcode-body ubbcode-pre" ><pre>
DSCF0195.jpg
</pre>[/QUOTE].
However, after you click 'Submit', it will turn into the photo. Eg,
DSCF0195.jpg


You can also click on 'Preview Post' to see what your photo layout will look like.

Unfortunately BCF still limits the displayed resolution of the photo. I don't know any way around that, except to provide a link directly to the album on PhotoBucket (or your favorite photo site).
 
I'm going to use my Skydrive. Open the "innersill" folder at https://skydrive.live.com/redir.aspx?cid=1cbf9cdaf086f3ab&resid=1CBF9CDAF086F3AB!330
 
No expert here, but look at that I'd be thinking patch if you need too, otherwise just stabilize what is there and move on. Seems pretty competent yet to me.
 
Hey Bruce,

Looks like you've got a pretty good handle on it so far. The only thing I might suggest is to take measurements in every angle you can think of before you finally break out those sills. The wood braces you are using are plenty sturdy, but rmember they will also change shape with humidity. The measurements will save a lot of grief later on.

Like the pics...keep them coming!

John
 
the wood is just a rack that the tub is sitting on temporarily. I have metal cross braces installed (see picture. I would put the tub back on the chassis when attempting to actually remove/replace the sill.

What you don't see in the pictures are the back (inner) side of the sill, which is a mess - rusted through. You can crush it with your fingers wrapped around the back. I have partnered with a quality body shop that specializes in British cars here in Charlotte, and am leaning towards going to see what they would charge to replace them for me. The thought is, since these are the "foundation" of the rest of the car, that I'd get them to do it right, then proceed with the rest myself.
 

Attachments

  • 26748.gif
    26748.gif
    79.6 KB · Views: 250
I like your bracing! Have you already replaced the floors, or were they in that good condition? I would think that as long as you build it back on the frame you will be golden.

John
 
I bought it mid restoration. The floors were already replaced. I did the cross bracing using an old bed frame. One of my concerns is that one of the bolt holes in the floor is out of line with the chassis mount hole by about 3/4 inch. I had a TR restoration specialist look at it before I bought it, he said nothing to worry about. But I do worry still a bit. Having the specialist do the foundational work, perhaps tweaking if needed, will be worth it in the long run I think.
 
Hi Bruce and welcome to our group! I found out about BCF AFTER I completed the refresh on my TR3 and was amazed at how much time I could have saved as there is a wealth of info available here. If you have not already, get connected with the Triumph Club of the Carolinas. We have a lot of members in the Charlotte area as well as a lot of TR parts available collectively. Look us up on the web or send me a PM as I for one would love to see your car.
Gordon
 
If a single hole 3/4" off is the biggest mis-alignment, then you are fortunate. Some of the floor panels I had to return were off by 3-4". When I did the final mounting, I had an air powered die grinder handy to open most of the floor holes a fraction here and there. Fortunately, the bolts use large washers that cover most of the mis-alignment in the holes.

If the bad hole shows, it can be re-drilled and then the bad hole welded closed and ground smooth. But again, for just a 3/4" offset, I think the body washers will cover it.

You floors look good! I know what you're saying about the worry. This is the first hand-built car I have ever worked on. The best description of my emotion every time I held up a replacement panel is shear terror! Nothing fits at first, and a lot of times you have to think for quite a while about how to even start making it fit.

We'll look forward to your progress!

John
 
Back
Top