
 Hey Guest!

 Hey - did you know if you click on the title of a thread it will take you to the first unread post since you last visited that thread?
 but were afraid to ask:
  STOP!! Never post your email address in open forums. Bots can "harvest" your email! If you must share your email use a Private Message or use the
  smilie in place of the real @
 Pretty Please - add it to our Events forum(s) and add to the calendar! >>
bthompson
Jedi Warrior
Offline
Hello, gentlemen! I've been reading the goings-on with rapt attention for the past month or so, and have greatly enjoyed seeing all the fun you had at LotO. Much to my dismay, I found that my Pocket PC gets confused by the forum's "submit" button, leaving me able to read, but not respond.
I just couldn't resist finding a more cooperative computer, though, to show a little of my progress so far with Nigel, my '76. Sorry it's so lengthy, but I've been mute for a awhile. :wink:
When I got him, his bumpers were greyed, and the respray red paint was starting to show its age. He'd collected a fair amount of parking dings, had run the facia over a curb, and the driver's door had been hyperextended, but was rust-free overall, except for under the battery tray.
A little exploration revealed one red fender, one metallic blue fender, and originally bright yellow under the cherry red. The 1500 had been desmogged, and painted <span style="font-style: italic">blue</span>, leading me to believe it has been rebuilt at some point. (otherwise why bother pulling and painting it?) Older dizzy with Pertronix, so no problems on that front. The Z-S was badly worn: I got 9 mpg driving it home (200 miles from Georgia!) and no amount of rebuilding or adjusting could lean it out. I was getting 3/4 of an inch of piston lift before the idle dropped!
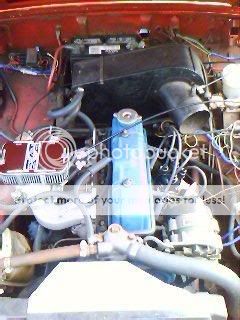
The first order of business was to get the lil'guy drivable, so I ditched the Zenith in favor of (sigh) a DGV. If it was an older model with SU's I never woulda done it, but because Nigel's a '76, I'm keeping a "maximum fun-per-dollar" approach, but trying to keep everything I do reversible, lest one day I be labelled a DPO. :wink: The Weber's giving me about 24 mpg now. Better by worlds, but still jetted a little rich.
When I went through the mechanical bits, everything hydraulic was leaking from somewhere, so new cylinders all 'round, master, slave, and wheel; and a few hoses. Stop, Go, and Shift now results in stopping, going, and shifting, respectively.
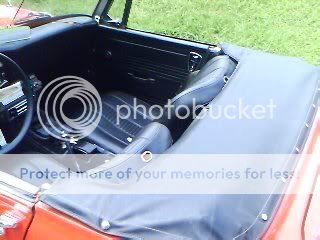
Rebuilt the seats by sewing up the rips, and replacing the rubber slings (long since dryrotted) with rope for more support and less give. Pulled the headrests out for a sleeker look, too.
Replaced the door mirrors (not original anyway) with fender mount Lucas repros, which work great.

Started on the dent-removal-and-painting project by using Duplicolor cans of cherry red spray paint. One panel at a time: hammer, fill, sand, prime, sand, prime, color, sand, color, sand, sand, polish. Heckuva lot cheaper than a pro job, and the results look about the same as Abingdon's.

Pulled the bumpers. The Spridget is such a beautiful and elegant design to begin with, the fedspec rubber is just...<span style="font-style: italic">wrong</span>. How could you hide a face like that? Got a '74 grille to flush-mount to the bumper stubs and painted it silver. The result is a little Sprite, a little Midget...I like it. I thought about recessing it, but that would pretty much eliminate ever putting the bumper back on. Shaved the front side markers while I was at it, to clean the lines even more.

In the back, I made fillers for the fender tips by shaping styrofoam blocks, Bondoing over them, spraying them body color, and attaching them with weatherstrip adhesive. (again, reversible)

Well, that's all the major stuff in Nigel's life so far. Before Fall, I hope to have the rear fenders and boot lid painted, and rear markers shaved. Over the winter, my project will be pulling the dash, cleaning the gauges and switches, replacing the combo gauge (I think it reads overly cool), stripping the cracked puffy foam, and refacing it in wood veneer. Unless, of course, Nigel decides to shift my priorities and throw a rod, spin a bearing, toast some wires, crack a clutch....
I just couldn't resist finding a more cooperative computer, though, to show a little of my progress so far with Nigel, my '76. Sorry it's so lengthy, but I've been mute for a awhile. :wink:
When I got him, his bumpers were greyed, and the respray red paint was starting to show its age. He'd collected a fair amount of parking dings, had run the facia over a curb, and the driver's door had been hyperextended, but was rust-free overall, except for under the battery tray.
A little exploration revealed one red fender, one metallic blue fender, and originally bright yellow under the cherry red. The 1500 had been desmogged, and painted <span style="font-style: italic">blue</span>, leading me to believe it has been rebuilt at some point. (otherwise why bother pulling and painting it?) Older dizzy with Pertronix, so no problems on that front. The Z-S was badly worn: I got 9 mpg driving it home (200 miles from Georgia!) and no amount of rebuilding or adjusting could lean it out. I was getting 3/4 of an inch of piston lift before the idle dropped!
The first order of business was to get the lil'guy drivable, so I ditched the Zenith in favor of (sigh) a DGV. If it was an older model with SU's I never woulda done it, but because Nigel's a '76, I'm keeping a "maximum fun-per-dollar" approach, but trying to keep everything I do reversible, lest one day I be labelled a DPO. :wink: The Weber's giving me about 24 mpg now. Better by worlds, but still jetted a little rich.
When I went through the mechanical bits, everything hydraulic was leaking from somewhere, so new cylinders all 'round, master, slave, and wheel; and a few hoses. Stop, Go, and Shift now results in stopping, going, and shifting, respectively.
Rebuilt the seats by sewing up the rips, and replacing the rubber slings (long since dryrotted) with rope for more support and less give. Pulled the headrests out for a sleeker look, too.
Replaced the door mirrors (not original anyway) with fender mount Lucas repros, which work great.
Started on the dent-removal-and-painting project by using Duplicolor cans of cherry red spray paint. One panel at a time: hammer, fill, sand, prime, sand, prime, color, sand, color, sand, sand, polish. Heckuva lot cheaper than a pro job, and the results look about the same as Abingdon's.
Pulled the bumpers. The Spridget is such a beautiful and elegant design to begin with, the fedspec rubber is just...<span style="font-style: italic">wrong</span>. How could you hide a face like that? Got a '74 grille to flush-mount to the bumper stubs and painted it silver. The result is a little Sprite, a little Midget...I like it. I thought about recessing it, but that would pretty much eliminate ever putting the bumper back on. Shaved the front side markers while I was at it, to clean the lines even more.
In the back, I made fillers for the fender tips by shaping styrofoam blocks, Bondoing over them, spraying them body color, and attaching them with weatherstrip adhesive. (again, reversible)
Well, that's all the major stuff in Nigel's life so far. Before Fall, I hope to have the rear fenders and boot lid painted, and rear markers shaved. Over the winter, my project will be pulling the dash, cleaning the gauges and switches, replacing the combo gauge (I think it reads overly cool), stripping the cracked puffy foam, and refacing it in wood veneer. Unless, of course, Nigel decides to shift my priorities and throw a rod, spin a bearing, toast some wires, crack a clutch....