• Hi Guest!
    You can help ensure that British Car Forum (BCF) continues to provide a great place to engage in the British car hobby! If you find BCF a beneficial community, please consider supporting our efforts with a subscription.

    There are some perks with a member upgrade!
    **Upgrade Now**
    (PS: Subscribers don't see this gawd-aweful banner
Tips
Tips

TR2/3/3A Moving a radius on sheet metal patch

71TR6

Jedi Hopeful
Country flag
Offline
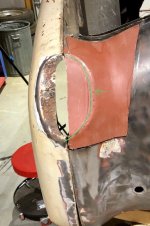
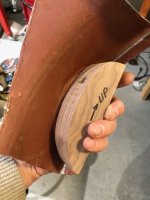
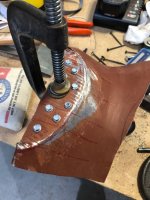
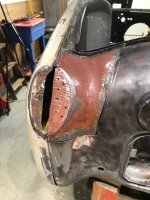
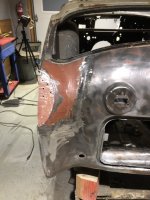
Hello- I’m restoring a 59 TR3A and am doing some major repair of the rear valence. I purchased a “rear valence repair panel” whose quality leaves a little to be desired. One of the major issues is the taillight boss is quite a bit off and I need to move the edge over about a 1/4” to be symmetrical with the boss on the left rear wing. While I have pretty good sheet metal skills, the compound radii are turning this into quite a challenge and I don’t want to bodge this. I thought about making a wood form, clamping the metal to it and working the radius over with a hammer but thought I’d post for other ideas.

Does anyone have any suggestions on how to do this?

Thanks
 
Here is the image of what I'm dealing with...
 

Attachments

  • TR3ARearLampMount.jpg
    TR3ARearLampMount.jpg
    98.5 KB · Views: 159
Heck the rubber pad, bezel, and light do not fit that good; you would not see that unless you knew. I had a lot of difficulty around the other edge where it goes up, out, and around maybe mostly because I was learning body work and mine was pushed is from the bumpers on both sides. But heck hey that is a difficult area.

But I guess if it is that bad why not straighten the folds cut it in and 1/8 to a ¼ and refold it to slid it over some.
 
I'm with Steve. They were about like you have right out of the factory. The rubber gasket hides a lot of that "over-size" you have. You can work hard to make it perfect, but realize that will actually be better than it was when original.

That said, if you want it better, I would simply heat the area and tap to shape with a properly shaped dolly behind to shape the edge. The wood form would also work, but you have to find a way to anchor the form securely as you work around it with the hammer.
 
You'v already heard from some better body and fender guys than I am, but since you are already working with a patch I would look at removing some material from the left side of the patch to move the whole thing to the left. It would be easier to move the straight bends where the patch meets the fenders than to move that rounded contour,
Bob
 
I'm with Bob. I had the wrong light on my 1st suggestion. Looks like you can trim off a little on the left and move it over. You could split the difference but I'd take the rubber pad and the tail light mount them both and trace the outline of the rubber pad then trim to how you want it to look. Considering that you are doing the same thing to the other side. If not then you would want to match it.
 
Another vote for Bob's suggestion. That is a lot of metal to shrink to move the light edge 1/4". I to would cut the left edge move the patch over and work the softer curve of the patch to match the existing rear valance. once you start trying to move the hard edge of the light you will be chasing metal all over the patch. If you don't shrink the metal as you move the edge it will go where it wants to, not where you need it to go. Not impossible but slow and difficult. much easier to move the patch over.
Frank
 
I'm with the "define the new line with hammer and dolly and work the existing line back into the curve" camp. Had to do this with one of the tail lights on my panel. Used a sharp edged round dolly to hammer in the line first. This locks the metal somewhat and then allows you to gently work the old line back into the curve. As John says, if you have an oxy, then heat will allow the metal to move more easily. I did mine cold as I don't have oxy acetylene in the shed.
I think if you try to move the whole thing accross, as you move the middle part out, it will try to move the upper and lower section further up and down respectively.
Always more than one way to skin a cat though!
 
Well, I spent some time today and made a hammer form to move the radius. The profile matched the trunk lid perfectly and if I would have shifted it, the profile would have been off. The hammer form was the way to go. I took a piece of scrap walnut and using the taillight housing, made a line 1/8" out from the housing on the walnut. A bandsaw cut and some light sanding to put a 1/16" radius on the edges and I had a form. I screwed the patch to the form and gradually moved the existing radius over. It really wasn't that bad. I had to do a little shrinking, stretching and hammering to take care of a little warping but that was it. :encouragement:

Thanks to everyone for the suggestions.
 

Attachments

  • IMG_6545.jpg
    IMG_6545.jpg
    139 KB · Views: 120
  • IMG_6547.jpg
    IMG_6547.jpg
    142.8 KB · Views: 122
  • IMG_6548.jpg
    IMG_6548.jpg
    147.1 KB · Views: 113
  • Img6088jpg.jpg
    Img6088jpg.jpg
    143.5 KB · Views: 115
Back
Top