• Hi Guest!
    You can help ensure that British Car Forum (BCF) continues to provide a great place to engage in the British car hobby! If you find BCF a beneficial community, please consider supporting our efforts with a subscription.

    There are some perks with a member upgrade!
    **Upgrade Now**
    (PS: Subscribers don't see this gawd-aweful banner
Tips
Tips

TR2/3/3A Moss Motors Vitesse 5 Speed Conversion Kit Installation Issues

sammy

Member
Country flag
Offline
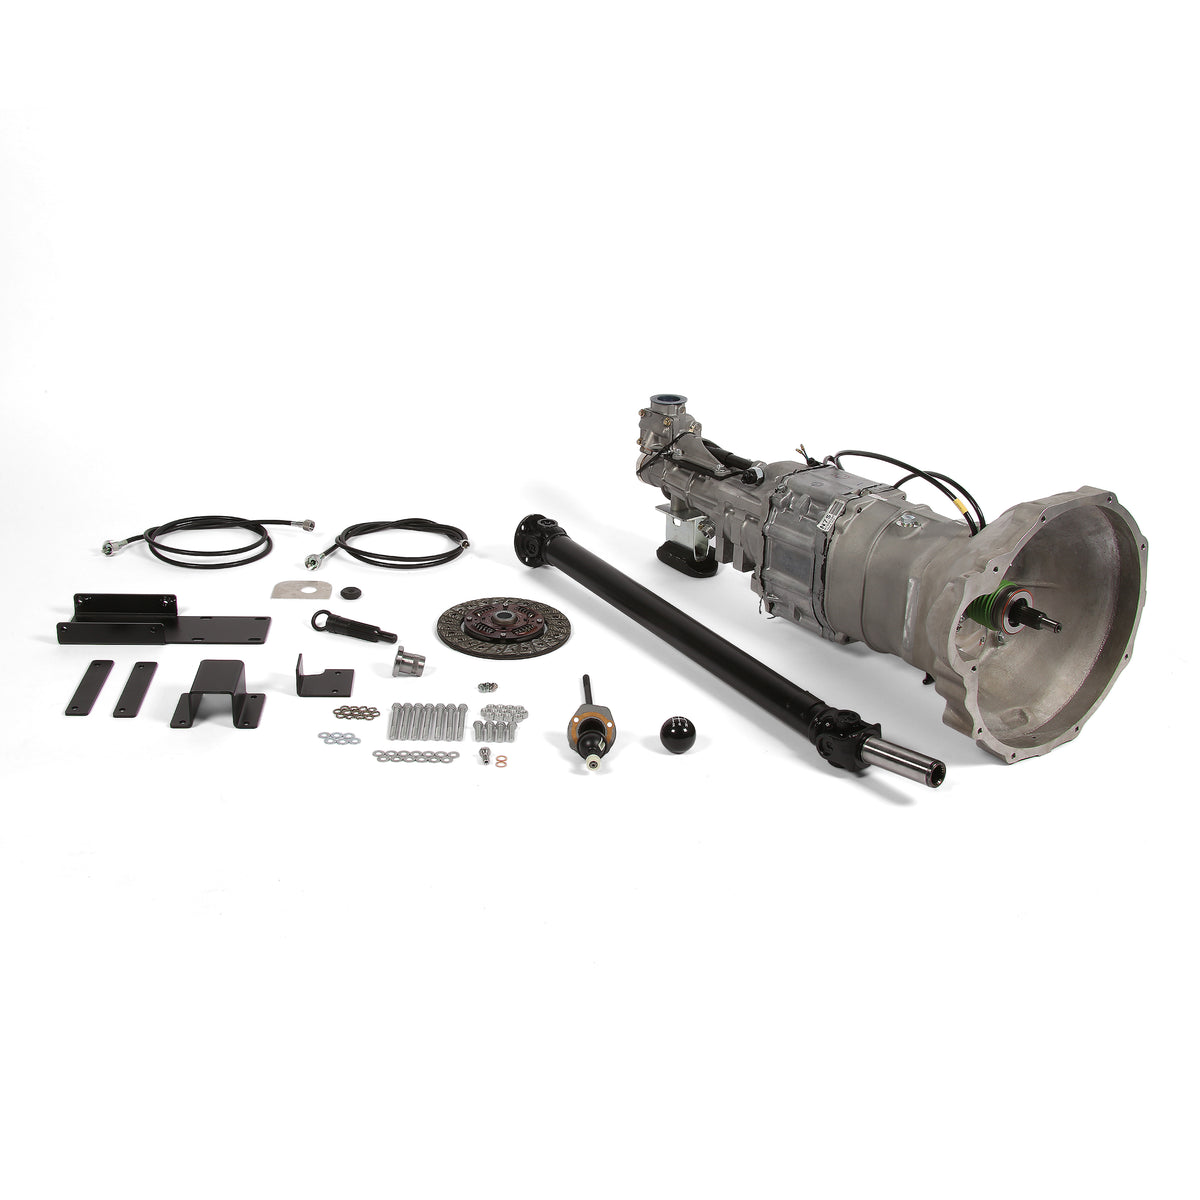
I am in the process of installing the Moss Motors Vitesse 5 speed conversion kit in my TR3A (TS40411L). This is the kit that uses a Miata transmission with appropriate adapters. The new gearbox is several inches longer then the original gearbox. I am installing it with the engine still in the car. Although the instructions could be a bit more detailed, it does seem fairly straight forward.

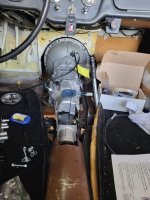
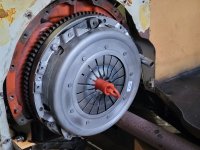
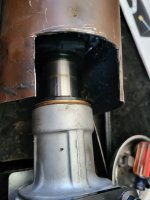
I have installed the clutch disc and housing and am trying the get the actual gearbox into the car. Once installed, there will be approximately 1/2 inch between the rear of the gearbox and the drive shaft tunnel. Because of this tight fit and construction of the gearbox, there is not enough room to push the rear of the gearbox into the rear tunnel and swing the front of the gear box over the clutch housing. There is not enough room to push the bell housing forward and move the rear of the gearbox in line with the rear tunnel. That leaves only one other installation method (that I can think of) while keeping the engine in the car. This would involve going straight in toward the engine with the rear of the gearbox sitting on the rear tunnel until the gearbox is fully seated against the engine. This assumes I can raise the rear of the engine high enough to get it to align with the gearbox without interference from the firewall.

Has anyone else had any experience with this conversion? If so, what method did you use to get it installed? Do you have any other tips or tricks?

Thanks in advance for the help.
 
I was going to recommend option #3. You should be able to tilt the motor enough to just make it work before you hit the top of the tunnel on the firewall...and even if you do, you should still be able to insert the tranny up to the firewall, (just shy of the pilot bearing engaging) and then tilt everything back down to finish up. you will likely need a helper on the jack for all this.
 
have you tried the original convertors of this kit


and the tr2-4 instructions can't be that different


it doesn't hint at rear of box tolerance issues i am afraid

so i would ask them
 
I have been talking to the Moss Motors rep on this issue. The actual installation varies a bit from the instructions. I understand they are gathering information from people who have done the installations on TR3s in order to write better instructions. I wound up cutting a notch out of the top of the drive shaft tunnel. Without it, there was too much of an angle between the gearbox and engine to get the two joined together. I could not get the rear of the engine high enough without the firewall getting in the way. Once I cut the notch, it was a much simpler process. Patching this will be a simple process. I want to express my sincere appreciation to my wife who was willing to help get the gearbox lined up (both before and after the notch was cut) and sit on the bare passenger floor and help me push the gearbox forward with our feet. The Moss rep called me later and said others had found it necessary to cut the notch as well. People doing the installation as part of a restoration or with the engine out of the car will not have the same issue.
I am taking pictures of certain steps of the process as I go along. Like many other projects, I could probably do the next one in half the time or less.

Thank you everyone for your responses.
 
The Moss rep called me later and said others had found it necessary to cut the notch as well. People doing the installation as part of a restoration or with the engine out of the car will not have the same issue.
I suspect they will have that issue "somewhere down the road" when they need to change a clutch or a rear seal or ... ! :unsure:
 
Once you get this tranny installed I'd love to hear how you like it. Someday, when I have the $$ and have a good excuse to replace my transmission I would probably do this upgrade. Good luck with it!

Joel
 
I have been talking to the Moss Motors rep on this issue. The actual installation varies a bit from the instructions. I understand they are gathering information from people who have done the installations on TR3s in order to write better instructions. I wound up cutting a notch out of the top of the drive shaft tunnel. Without it, there was too much of an angle between the gearbox and engine to get the two joined together. I could not get the rear of the engine high enough without the firewall getting in the way. Once I cut the notch, it was a much simpler process. Patching this will be a simple process. I want to express my sincere appreciation to my wife who was willing to help get the gearbox lined up (both before and after the notch was cut) and sit on the bare passenger floor and help me push the gearbox forward with our feet. The Moss rep called me later and said others had found it necessary to cut the notch as well. People doing the installation as part of a restoration or with the engine out of the car will not have the same issue.
I am taking pictures of certain steps of the process as I go along. Like many other projects, I could probably do the next one in half the time or less.

Thank you everyone for your responses.
Sammy - I'm considering the same conversion from TR4 transmission to a new Vitesse 5 speed kit from Moss, and am curious how your experience has been with the new gearbox. Any regrets? Also, any photos you could share would be much appreciated. Thanks!
 
Sammy - I'm considering the same conversion from TR4 transmission to a new Vitesse 5 speed kit from Moss, and am curious how your experience has been with the new gearbox. Any regrets? Also, any photos you could share would be much appreciated. Thanks!
The new gear box is great. I have no regrets on the installation. It drives like a different car. The first time my wife drove it, she said the car was a pleasure to drive. Once I got figured out the installation guide was a basic guidance and some additional steps were needed for the TR3. I do not now how it will compare to installing it in the TR4. I will post some pictures of it in the TR3 for the other interested folks in the forum. For the TR3, I had to cut a notice in the drive shaft tunnel because it was the only was to get it in with the engine in place. The new gearbox is longer than the old by several inches. I had to get it back enough to fit the center shaft into the bearing installed into the rear of the crankshaft. As far as I can tell, the bearing only truly fits one way. I checked on the gearbox center shaft for best fit. Once the bearing is pounded in, it isn't coming out easy. For the TR3, the kit included two rear mounting brackets, one for the pre-60,000 cars, and on for those after. The post 60,000 mount appears to be much easier to install due to the differences in the floors. You re-use the flywheel, but get a new clutch disc and clutch plate, which the instructions say to install with 3 provided bolts. The hose for the hydraulic clutch bearing uses a banjo bolt and attaches to the clutch master cylinder. This confused me at first because there is not an existing banjo bolt there, but it replaces the traditional tubing to the slave cylinder since the slave cylinder is no longer needed. The instructions say to put it all together then test drive it after adjusting the clutch clearance. I did the test drive before putting the gearbox tunnel back on. The speedometer does read 8 mph lower than my actual speed, but I can re-calibrate it. The new gearbox does have wiring for reverse lights. You can also wire your starter solenoid through the neutral safety switch so the starter will only engage when the car is in neutral. Overall, it is mostly a standard gearbox installation once you can get it into the car. I hope this helps.
 

Attachments

  • 5 speed conversion gearbox in car.jpg
    5 speed conversion gearbox in car.jpg
    942.8 KB · Views: 142
  • 5 speed conversion clutch.jpg
    5 speed conversion clutch.jpg
    737.8 KB · Views: 184
  • 5 speed conversion drive shaft tunnel.jpg
    5 speed conversion drive shaft tunnel.jpg
    766.4 KB · Views: 164
The new gear box is great. I have no regrets on the installation. It drives like a different car. The first time my wife drove it, she said the car was a pleasure to drive. Once I got figured out the installation guide was a basic guidance and some additional steps were needed for the TR3. I do not now how it will compare to installing it in the TR4. I will post some pictures of it in the TR3 for the other interested folks in the forum. For the TR3, I had to cut a notice in the drive shaft tunnel because it was the only was to get it in with the engine in place. The new gearbox is longer than the old by several inches. I had to get it back enough to fit the center shaft into the bearing installed into the rear of the crankshaft. As far as I can tell, the bearing only truly fits one way. I checked on the gearbox center shaft for best fit. Once the bearing is pounded in, it isn't coming out easy. For the TR3, the kit included two rear mounting brackets, one for the pre-60,000 cars, and on for those after. The post 60,000 mount appears to be much easier to install due to the differences in the floors. You re-use the flywheel, but get a new clutch disc and clutch plate, which the instructions say to install with 3 provided bolts. The hose for the hydraulic clutch bearing uses a banjo bolt and attaches to the clutch master cylinder. This confused me at first because there is not an existing banjo bolt there, but it replaces the traditional tubing to the slave cylinder since the slave cylinder is no longer needed. The instructions say to put it all together then test drive it after adjusting the clutch clearance. I did the test drive before putting the gearbox tunnel back on. The speedometer does read 8 mph lower than my actual speed, but I can re-calibrate it. The new gearbox does have wiring for reverse lights. You can also wire your starter solenoid through the neutral safety switch so the starter will only engage when the car is in neutral. Overall, it is mostly a standard gearbox installation once you can get it into the car. I hope this helps.
Sammy - Two more questions: with the new shift lever installed, is there a noticeable difference in its position versus the original shifter? And does the Vitesse kit include a new shifter boot (or "gaiter"), or were you able to re-use your original? Here's a pic of what mine looks like... Thanks again. - Doug
 

Attachments

  • IMG_0065.jpeg
    IMG_0065.jpeg
    1.6 MB · Views: 145
Sammy - Two more questions: with the new shift lever installed, is there a noticeable difference in its position versus the original shifter? And does the Vitesse kit include a new shifter boot (or "gaiter"), or were you able to re-use your original? Here's a pic of what mine looks like... Thanks again. - Doug
On the TR3, the new shifter location is located farther back than the original so you need to modify the transmission tunnel. The kit comes with a new shifter that has a horizontal piece that is part of the shifter that "relocates" the shifter to the original position. Imagine the gear shifter lever coming out of the gearbox an inch, then is goes forward 3 inches, then comes up and angles back to the gearshift knob. I was concerned about this, but I am using the original shift boot and new carpet set. Sorry I don't have a picture.
 
Sammy, thanks again. I really appreciate you sharing your experience. This Vitesse conversion is a big investment, so it’s really great to hear from somebody who’s lived with it. I placed my order for one today. Cheers. - Doug
 
If the shifter is further back than the original with the five speed MX5 gearbox, it may well be worth looking into an MX5 6 speed
as these boxes have the selctor rod mounted on top of the tailstock and it can be shortened to where it needs to be.
There is a Blog on the internet where someone has done this conversion in a Midget if my memory serves me correctly.
Its possible the gearbox will be cheaper to buy than the conversion kit.
 
Back
Top