• Hi Guest!
    If you appreciate British Car Forum and our 25 years of supporting British car enthusiasts with technical and anicdotal information, collected from our thousands of great members, please support us with a low-cost subscription. You can become a supporting member for less than the dues of most car clubs.

    There are some perks with a member upgrade!
    **Upgrade Now**
    (PS: Subscribers don't see this gawd-aweful banner
Tips
Tips

Measurement Help Please

Lin

Jedi Knight
Gold
Country flag
Online
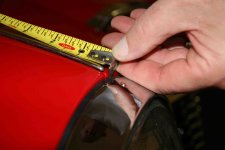
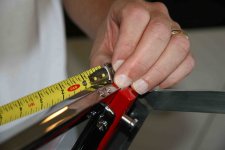
I am thinking that my windshield may be angled back slightly too far. Could someone with a BT7 take the following measurement for me? The images below show the starting and ending points of the desired measurement. I am measuring from the very front tip of the shroud/wing joint to the top corner of the windscreen frame where the top and side chrome frame pieces meet.

Thanks for the help!!!

Lin
1960 BT7 in restoration, thought I was almost done
1959 Bugeye
 

Attachments

  • 9857.jpg
    9857.jpg
    192 KB · Views: 126
  • 9858.jpg
    9858.jpg
    201.1 KB · Views: 122
Hi Lin,
Have you installed the side curtains? I would think that would give you a reference angle to go by. I’m not sure that one measurement would be enough since the base of the windshield may vary slightly from car to car. Maybe add a measurement from the same front point to the base of the windshield also?
 
Hi Greg,
You nailed the problem. I did try the side curtains -new and old - and I am too tight at the top. Seems to be alright at the bottom of the post. I don't recall that much adjustment (front to back) in the post when I secured them. I do remember the top bolt in the stanchion, and the nut that goes on the screw through the front of the post are a pain in the neck to reach on the driver's side.

Lin
 
Hi Lin,
If you are trying to match the windshield to the side curtains there is very limited adjustment available. You can try adjusting, shimming, slotting the holes a bit. see this sketch.

I can verify that no two cars were the same. On my BN2 I ended up reshaping the entire after market side screen frames to match the windshield rake. The front edge weatherstrip helps fill the mismatch.

PS - If you remove the plexi, the bottom of the frame can be clamped in a padded vise & the top part of the frame can be driven forward or backward (big rubber hammer) to match the WS angle. Be VERY careful that you don't crack any welded joints in the frame. I actually had to make new plexi panels to fit the altered frame shape. If you can possibly get an acceptable fit without reshaping it would be better.
D
 

Attachments

  • 9870.jpg
    9870.jpg
    26.1 KB · Views: 136
I was never very thrilled with the way the hardtop on my wife's 3000 fit along the rear squab but put if off to the rubber seals being deformed and hard.

I had the top painted for her as a Xmas gift and in the process put new seals on but found that the fit was no better. By judicious adjustment of the sockets and windshield rake I was able to move the top forward about 3/4" on the driver's side and 1/2" on the passenger side with a much better fit all around.

I'd recommend adjusting the rake to provide a good weather seal along the front bow of your soft top.
 
Well, I must say that I am not looking forward to this, but I will undertake adjusting the rake on the windscreen this week (or weekend). I need to move the top of the windscreen toward the front of the car. Greater rake angle. I am hoping that someone can give me some target measurements so that I will have a sense of how much might be enough.

I had thought about working on the side curtains, but I would really prefer to get the windscreen rake right if I can.

Dave and Mike, Thanks for the tips!

Lin
1960 BT7, thought I was almost done.
1959 Bugeye
 
Lin--

There are three bolts that pass through the stantions horizontally plus the screw that goes through the base vertically.

Loosen everything and station an assistant on the opposite stantion to avoid wracking (and cracking!) the windshield. We each used a straight-bladed screw driver between the forward edge of the stantion and the body work and slowly worked the screwdriver into the joint and drove the stantion bottom back and thus the top forward. Then while "holding" what we had gained with the screw driver in place we each used a ratcheting box wrench to tighten the nut on the bottom-most bolt, etc. etc.

Perhaps I was just lucky but maybe this method will get you what you are looking for.
 
Gilbert and Mike,
Thanks! Yes, Mike I am very familiar with how the stanchion is secured. I just don't recall very much play, but we will see. Perhaps I will be lucky as you were. At the moment, Gilbert, my measurement is 73 7/8" so I need to try to create a greater rake angle.

Lin
1960 BT7 in restoration
1959 Bugeye
 
Back
Top