Re: Alternator conversion
Hi Dale,
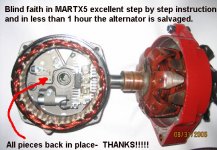
I was surprised to see you took the alternator apart! I can see why you did (to paint it... right?) and am glad you got it back together, though!
Next time, might I suggest to just use masking tape? First use it to close up all the holes during the grinding and cutting on the lower mounting lug of the alternator (best keep the grinding dust and metal debris out of the alternator!). Then use it to mask things off while painting! I think that might be easier, unless you really, really want to see what's inside an alternator... and fiddle with the reassembly! /ubbthreads/images/graemlins/wink.gif
The suggestions you got for reassembly were good. BTW, instead of paper clips or wire to temporarily hold the brushes back during assembly, I've occasionally found plastic zip ties or even a strong piece of thread useful. Once it's assembled, snip the zip tie or thread and just pull it out of the way to let the brushes spring back into place. These are just a couple alternatives that might help in one case or another.
Looks like you worked out the upper mounting bracket/adjuster, too. It's different on TR6, than I had to deal with. On the TR4 it was easy because the original bracket can be re-used with minor modification. The mods were mostly just careful straightening of the bracket /ubbthreads/images/graemlins/hammer.gif to align the alternator, then a little grinding on its underside to get a little more clearance between the bracket and the alternator body. No biggie!
I do plan to eventually replace that upper bracket on my car, with the type that's sort of a reversed turnbuckle with rod ends. That will make adjustment even easier. A local hardware store has the RH and LH threaded rod ends I need. I've just not been able to find the right type of threaded spacer tube as a separate item. These seem to mostly be sold as part of kits for highly popular engines, such as Chevy small block and Ford 302. I'm too Scottish to buy a kit and throw most of it away, to get one part I need! Heck, I'd just make the spacer tube, but don't have some of the tools avaialable right now, that would be needed to do the job right (a drill press and/or a lathe would do nicely!).
I don't think you mentioned it in your slidewhow, but one thing to folks need to watch out for when setting up the converision is that all the engine pulleys are in alignment. This is important so the belt won't put any undue strain on one part or another, which could lead to early bearing failure in either the water pump or the alternator.
It was pretty easy to align the pulleys on my car since the body was completely lifted off at the time I wasa installing the alternator conversion. But even without that luxury and working under the hood and between the fenders, eyeballing it from various angles and perhaps using a straightedge here and there will usually do the trick. One thing that might help visualize and maybe even measure is to loop some white string around all the pulleys, in place of the belt. Or, it might be enough to just temporarily install the belt itself. I finally needed to do a little bit of shimming with washers, to get really accurate alignment.
Now that you have modified the alternator to fit the car, I suggest if it ever needs it that you have it rebuilt, rather than exhanging it for another (which is what most auto parts stores will want to do). Usually one can find a local auto electrical shop that does alternator (and generator, perhaps even starter) rebuilds, particularly on a really common unit like the Delco 7127. By having this particular unit rebuilt, if and when it's ever needed, you can avoid having to "customize" another one before it can be fitted. Generally the cost of a rebuild is about the same as an exchange.
Looks like you are having fun with your TR6 and might have it up and running soon! That will be great! But, IMHO, it's also a lot of fun working on these cars and solving problems.
/ubbthreads/images/graemlins/cheers.gif

 Hey Guest!

 Hey - did you know if you click on the title of a thread it will take you to the first unread post since you last visited that thread?
 but were afraid to ask:
  STOP!! Never post your email address in open forums. Bots can "harvest" your email! If you must share your email use a Private Message or use the
  smilie in place of the real @
 Pretty Please - add it to our Events forum(s) and add to the calendar! >>