 but were afraid to ask:
 I am trying to remove the lower wishbone or fulcrum bolts. I took out the cotter pins and got the nuts as well as the slotted washers on the nut side. The bolts wont budge at all. I tried getting a prybar in there and a pickle fork with no luck. I now have sprayed them with some pb blaster. Is there something Im missing or a special tool needed? Some guys on this forum are recommending cutting them with a sawzall but it looks like there wouldnt be enough room for the back and forth motion of the blade. They are the originals and way overdue for replacement. This job started because there is play in the king pins so any advice on the rest of the job would be appreciated as well. The whole front suspension appears to be original also so I am planning on replacing everything as long as I can get the stuff off. Anyway I am getting off track but just trying to think ahead so once again any advice for the project is greatly appreciated.
-
 Hi Guest!
If you appreciate British Car Forum and our 25 years of supporting British car enthusiasts with technical and anicdotal information, collected from our thousands of great members, please support us with a low-cost subscription. You can become a supporting member for less than the dues of most car clubs.
There are some perks with a member upgrade!**Upgrade Now**
(PS: Subscribers don't see this gawd-aweful banner

Tips
- We have a special forum called "Member Articles" where you can submit actual articles for consideration for publication. Learn More
- Don't have an Avatar? If not, your avatar will default to the 1st character in your username. Go into "Account Details" to change your Avatar.
- Some basic forum navigation info: click
 Hey - did you know if you click on the title of a thread it will take you to the first unread post since you last visited that thread?
- Hey Guest - Is your British Car Club in our Clubs database? If not, send me a PM - Basil

- Looking for a local club? Click the "Clubs" tab above and browse hundreds of clubs world-wide.
- Add Android or iPhone APP: click
- Did you know - any picture or video you add in your posts in any marque-specific forum will also get added to the Media Gallery automatically.
- A few more tips about posting and replying: click
- Hey there Guest - be sure to keep your profile page up to date with interesting info about yourself: learn more
- More tips and tricks on Posting and Replying: click
 STOP!! Never post your email address in open forums. Bots can "harvest" your email! If you must share your email use a Private Message or use the
  smilie in place of the real @
- Want to mention another member in a post & get their attention? WATCH THIS

- So, you created a "Group" here at BCF and would like to invite other members to join? Watch this!
- Hey Guest - A post a day keeps Basil from visiting you in the small hours and putting a bat up your nightdress!
- Hey Guest - do you know of an upcoming British car event?
 Pretty Please - add it to our Events forum(s) and add to the calendar! >> Here's How <<
- Hey Guest - you be stylin' Change the look and feel of the forum to fit your taste. Check it out
- If you run across an inappropriate post, for example a post that breaks our rules or looks like it might be spam, you can report the post to the moderators: Learn More
- If you would like to try some different "looks" or styles for the site, scroll to the very bottom, on the left and click the Style Selector.
You are using an out of date browser. It may not display this or other websites correctly.
You should upgrade or use an alternative browser.
You should upgrade or use an alternative browser.
Lower Wishbone Fulcrum Help Needed!!
- Thread starter srickss
- Start date
Rob Glasgow
Jedi Knight
Offline
The Sawsall is the best way to go in my opinion. There is enough room to cut them out. I tried all the things you mentioned before using the electric saw and wish I had just started with the saw.

Offline
If I sawzall them, are the bolts going to come out, or are they still going to be frozen. Also which side did you cut or did you have to cut both sides. Sorry for the questions but I dont feel like making this any harder than it already is.
You can remove the castellated nuts before sawzalling the bolts. Then the pieces will pretty much fall out. You have to cut both sides because the rubber bushings have a metal liner that's rusted to the bolt.
Be sure to remove the springs first.
I've heard it's the king pin bushings that usually wear, not the pins themselves. You should be able to tell by inspection whether they're worn. Probably a good idea to send both the king pins and swivel axles along to British Car Specialists or Healey Surgeons or whoever has the $900.00 reamer.
Rob Glasgow
Jedi Knight
Offline
Steve is correct. It's the rubber bushings that are the problem. You need to cut both sides to remove the arms. Don't worry, once you cut them both, everything will fall apart and you will kiss the sawzall. When you install the new parts, consider using an anti-seeze so maybe the next time someone needs to take your car about, it will come apart.
Thanks for all the good advice. Im going to resort to the sawzall method. What about the rest of the job? Anything I need to look out for? I plan on replacing the kingpins and related parts as well as rebuild/service the shocks. Is Moss/Victoria British a good source for parts or do you guys like other vendors? Thanks.
Bob_Spidell
Yoda
Offline
I heard there were some low-quality, no-name kingpin sets around a few years ago. Don't know if that problem has been remedied--try to get a name brand like QH. I'd talk to David at BCS or a Moss tech before buying.

Offline
It's been awhile since I've done this job (thank gawd!) and am not sure this will work, but I recall setting the rubber bushings alight with a propane torch and burning them out. Of course this was on a car that was going to be rebuilt so I didn't care about paintwork.
Rob Glasgow
Jedi Knight
Offline
Moss had an issue with some faulty king pins 10 years ago but they handled the issue very well and corrected the problem. When reassembling the upper A arms, make sure you follow the manual and use a block to set the arms at the correct position. As far a rebuilding your shocks, I used World Wide Auto Parts in Madison WI. and have been very satisfied with the results.
I saw in the manual about the 2inch wood block to get the correct height. I was a little confused though as to where exactly the block goes? Also what do you guys think about urethane sway bar bushings? I put the regular rubber ones on years ago and they dont seem to be worth a ****. I want to keep the car stock looking but I was thinking that they would be a better alternative. (As long as they are made in black).
Rob Glasgow
Jedi Knight
Offline
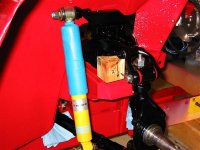
After looking at Lin's photo I realized I mis-spoke when I referred to the "upper" A arms when in fact, they are really the "lower" arms.
After looking in the Moss catalog for coil springs it has an asterict next to them stating that the springs are the closest available replacement and must be done in pairs. I plan on replacing both anyway but the "closest available" part sounds wierd. Does anyone have any experience with these? Are they decent? Thanks.
Bob_Spidell
Yoda
Offline
... Also what do you guys think about urethane sway bar bushings? I put the regular rubber ones on years ago and they dont seem to be worth a ****. I want to keep the car stock looking but I was thinking that they would be a better alternative. (As long as they are made in black).
https://tomsimport.com/new/parts/parts.asp?sect=2&new=1
The only downside is if you stiffen up all the bushings--including the ones on the links--the links may break, probably at the end of the threads.
Offline
I saw that $900 reamer in the moss catalog. Whats that all about? Wouldnt it be easier/cheaper just to buy the whole kingpin kit by the time you send mine out? Or are the originals that much better?
You may not need the kingpins - mine are fine after 53 years. The bushings are bronze and will likely do the wearing. If you buy new kingpins they might not fit as the bushings will still be worn.
I have mine apart right now for my Toyota 4-piston caliper upgrade and am installing BJ8 swivel axles which happen to fit perfectly on my old kingpins. When you take your swivel axle off the kingpin you'll be able to feel with your finger if the kingpin is worn.
Offline
I saw that $900 reamer in the moss catalog. Whats that all about? Wouldnt it be easier/cheaper just to buy the whole kingpin kit by the time you send mine out? Or are the originals that much better?
Forgot to mention earlier - if you buy the kingpin kit you'll still have to have to have the bushings installed & reamed. Use of the step-reamer guarantees alignment of the reams. Russ Thompson, famed Healey mechanic of LA, told me some folks have had connecting-rod shops ream them but due to the irregular shape of the swivel axle, it's difficult to get the two reams in alignment.
I started calling around to British car specialists and Healey Surgeons for the labor on the bushings for the kingpins. All I can say is im in for some serious $$$$. I cant say Im surprised its just been awhile since I have worked on the car and priced this stuff. Other than the spindle bushings is the rest pretty straightforward? It sounds like they need to be reemed correctly.
Offline
I started calling around to British car specialists and Healey Surgeons for the labor on the bushings for the kingpins. All I can say is im in for some serious $$$$. I cant say Im surprised its just been awhile since I have worked on the car and priced this stuff. Other than the spindle bushings is the rest pretty straightforward? It sounds like they need to be reemed correctly.
The rest is straightforward if you're familiar with it. Replacing bearings/seats & Seals. Be sure to get a shim kit so you can add new shims. Check your hubs inside your wheels to see if they're worn. Tom's Imports (linked above) has good prices on these parts. Norm Nock's book suggests lightly oiling the bearings and figuring out the shims required -- only then packing the bearings. I found I had to add another .003" shim when I greased the bearings in order to free up the wheel.