-
 Hey Guest!
British Car Forum has been supporting enthusiasts for over 25 years by providing a great place to share our love for British cars. You can support our efforts by upgrading your membership for less than the dues of most car clubs. There are some perks with a member upgrade!**Upgrade Now**
(PS: Upgraded members don't see this banner, nor will you see the Google ads that appear on the site.)

Tips
- We have a special forum called "Member Articles" where you can submit actual articles for consideration for publication. Learn More
- Don't have an Avatar? If not, your avatar will default to the 1st character in your username. Go into "Account Details" to change your Avatar.
- Some basic forum navigation info: click
 Hey - did you know if you click on the title of a thread it will take you to the first unread post since you last visited that thread?
- Hey Guest - Is your British Car Club in our Clubs database? If not, send me a PM - Basil

- Looking for a local club? Click the "Clubs" tab above and browse hundreds of clubs world-wide.
- Add Android or iPhone APP: click
- Did you know - any picture or video you add in your posts in any marque-specific forum will also get added to the Media Gallery automatically.
- A few more tips about posting and replying: click
- Hey there Guest - be sure to keep your profile page up to date with interesting info about yourself: learn more
- More tips and tricks on Posting and Replying: click
 but were afraid to ask:
  STOP!! Never post your email address in open forums. Bots can "harvest" your email! If you must share your email use a Private Message or use the
  smilie in place of the real @
- Want to mention another member in a post & get their attention? WATCH THIS

- So, you created a "Group" here at BCF and would like to invite other members to join? Watch this!
- Hey Guest - A post a day keeps Basil from visiting you in the small hours and putting a bat up your nightdress!
- Hey Guest - do you know of an upcoming British car event?
 Pretty Please - add it to our Events forum(s) and add to the calendar! >> Here's How <<
- Hey Guest - you be stylin' Change the look and feel of the forum to fit your taste. Check it out
- If you run across an inappropriate post, for example a post that breaks our rules or looks like it might be spam, you can report the post to the moderators: Learn More
- If you would like to try some different "looks" or styles for the site, scroll to the very bottom, on the left and click the Style Selector.
You are using an out of date browser. It may not display this or other websites correctly.
You should upgrade or use an alternative browser.
You should upgrade or use an alternative browser.
TR6 Is there any such thing for a TR6 ?
- Thread starter Lou6t4gto
- Start date
martx-5
Yoda
Offline
Ratco also has front bar upgrades and rear bars...
https://www.sites.google.com/site/tonyratco/sway-bars
https://www.sites.google.com/site/tonyratco/sway-bars
Tybalt
Jedi Warrior
Offline
Regarding the options presented so far, the ADDCO bars are OK. They provide a very noticeable improvement in body roll reduction at a reasonable price. The rear bar is essentially the bar that Kastner describes in the old Triumph Competition Preparation book. If you go with the ADDCO, don't bother going with their "adjustable" end links, it's a rather hokey set up.
Richard Good's bars are nicely done and offer adjustable link set ups that actually work although they do require disconnecting one link should you want to adjust the link. In addition the rear bar is set up so that you can also adjust the bar stiffness by the selection of different holes at the end of each arm, altering the effective arm length. Cost is higher than for the ADDCO stuff, but it's also a nicer set up. Both the ADDCO and the Good Parts rear bar will cost you a bit of ground clearance at the rear.
The Ratco rear bar requires either one of the Ratco frames or modification to the stock frame (get out your welder) and trailing to use a tube damper that will run through the middle of the spring. The anti-roll bar is mounted high along the structure that has the upper spring perches and the end links run down to the holes in the trailing arm where the original lever damper links would have mounted. The Ratco front bars (7/8" and 1" dia available) mount in the same manner as the stock TR6 front bar. Neither the rear or front Ratco bar are adjustable.
There is a fourth option from Revington TR that predates and is similar to the Ratco rear bar except that it is adjustable by means of a sliding block that can be positioned and then locked into place altering the effective arm length. It's another one of those "get out your welder" and prepare to modify the trailing arms propositions. Their 7/8" front bar is not adjustable IIRC and their other front bar is "a bit much" to use with their high mount rear bar in the calculations that I ran.
I have the Revington set up on the rear of my TR6 and the ADDCO set up on the front with a modified end link set up compared to what ADDCO supplies. I calculated out that the difference in stiffness between the ADDCO bar and the Revington 7/8" front bar were noise level deltas and that since I already had an ADDCO bar, there was nothing that justified buying the Revington front bar.
TR3driver
Great Pumpkin - R.I.P
Offline
I'm just curious, can you expand on that a bit? Yes, it's very simple and a bit hokey; but I don't see any reason it shouldn't work provided the end links are long enough. It only lets you cut the rate; but from what I saw on my TR3A with ADDCO bars front & rear, that's probably the right direction in the rear.If you go with the ADDCO, don't bother going with their "adjustable" end links, it's a rather hokey set up.
Tybalt
Jedi Warrior
Offline
I'm just curious, can you expand on that a bit? Yes, it's very simple and a bit hokey; but I don't see any reason it shouldn't work provided the end links are long enough. It only lets you cut the rate; but from what I saw on my TR3A with ADDCO bars front & rear, that's probably the right direction in the rear.
Unless ADDCO has changed it, the adjustable end link kit for the front consists of a pair of bushings for each adaptor plate, a pair for each side of the anti-roll bar, some spacers/distance pieces, cup washers for the bushings, a couple of longish bolts, nuts for the bolts and some little coil springs. I first saw the adjustable link kit when friend got one of those kits to go with his ADDCO bars for his TR250. Essentially, while the set up does allow the bar to be "zero-preloaded," it left a gap that has to close up to before bringing the bar into play. We installed it anyway, but removed it later to go to a more robust set up. As far as cutting the rate of the bar, once the bar is brought into play I don't really see that since the rate for the bar is defined by the length of the bar between the arms, the effective length of the arms, the diameter of the bar and the modulus of elasticity for the bar material.
For the rear of the IRS TR series cars there was no adjustable end link kit offered, just two washers per side, one rather large (2 1/4" OD, 3/8" ID, 1/8" thick per Kastner callout and that sounds about right for what ADDCO supplies), the other not as large (1 3/4" OD, balance same as other washer) that together make the reaction plate for the bar/end links with both fitted into the spring pan of the trailing arm, four cup washers for the upper most and lower most bushings, four link bushings per side plus the hardware for attaching the bar to the frame. The washers as supplied by ADDCO are loose and really should be welded together to provide a more stable reaction plate for the anti-roll bar. Note that other than the washers for the reaction plate, the balance of the Kastner end link set up for the rear is very different from the ADDCO set up but probably not as street friendly since it would cost more ground clearance than the ADDCO set up.
Tybalt
Jedi Warrior
Offline
I have the Ratco front and rear bars. You do not need to weld anything to install the ratco rear bar (perhaps older versions did) but you do need to have the ratco shock-in-coil conversion to fit it. It is not adjustable.
Bearing in mind that I have no first hand experience with the Ratco shock-in-coil conversion, I have a couple of questions. First, do you have one of the Ratco frames with their shock-in-coil conversion? If not, then how is the upper mount for the tube damper handled if you elect to install their shock-in-coil conversion to a TR4A IRS/TR250/TR6 stock frame? The opening in the stock frame upper spring pan is relatively large and something would need to be added so that the damper has something to mount to up top. On the Revington conversion using the stock frame, there are two gussets added to the frame by welding them in along with a plate that is welded in to the upper spring pan opening to act as the damper top mounting plate. I would think that the Ratco conversion has to have something installed as far as a damper upper mount plate goes if you were installing their rear bar to a stock Triumph TR series IRS frame and am curious as to how it is handled.
poolboy
Yoda
Offline
The basics are here:
https://www.sites.google.com/site/tonyratco/shock-in-coil
More here:
https://www.sites.google.com/site/tonyratco/manuals
https://www.sites.google.com/site/tonyratco/shock-in-coil
More here:
https://www.sites.google.com/site/tonyratco/manuals
Tybalt
Jedi Warrior
Offline
The basics are here:
https://www.sites.google.com/site/tonyratco/shock-in-coil
More here:
https://www.sites.google.com/site/tonyratco/manuals
Thanks for the links to the instructions. When Eddie mentioned no welding required, it seemed that some sort of either large cup washer set up or a flat for the bottom of the upper spring pan and a radiused washer for the top side would likely be employed to make up the upper mount.
I did see in the introduction where mention of additional loads in to the upper spring pan are made. These additional loads were why the Revington kit adds the two gussets from the uprights/vertical towers extending outward toward the upper spring pan for each side. I was somewhat surprised to see carriage bolts swaged into place on the control arm for the lower mount. I do like the bar mounts of the Ratco kit better than the mounts that came with the Revington kit. I wound up scrapping the Revington kit ones and made up some solid mounts with a heat cured molybdenum disulfide solid film lubricant finish applied to the bearing surface.
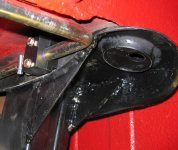
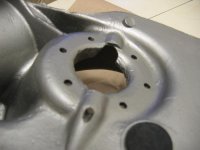
The Revington kit uses a sandwich plate arrangement for the lower mount with that end of the damper in a double bolt shear configuration as opposed to a pin mount. Upper mount is a pin mount set up similar to the Ratco kit. Attached are a couple of shots, one showing the welded in gussets and upper mount plate, the other shows the modified trailing arm with six satellite holes for the sandwich plate set up and what turned out to be perhaps the most difficult aspect of the project to get right, the damper adjustment access hole. It is that hole along that raised and tapered rib. Lots of time expended figuring out how to approach the task without making a mess of things, but it lines up perfectly with the damper adjustment screw, just had to then make sure and orient the spring in a manner that a coil did not block the adjuster on assembly.