• Hey Guest!
    British Car Forum has been supporting enthusiasts for over 25 years by providing a great place to share our love for British cars. You can support our efforts by upgrading your membership for less than the dues of most car clubs. There are some perks with a member upgrade!

    **Upgrade Now**
    (PS: Upgraded members don't see this banner, nor will you see the Google ads that appear on the site.)
Tips
Tips

TR2/3/3A Interior Panel Fitting Question

M_Pied_Lourd

Darth Vader
Country flag
Offline
Hi guys,

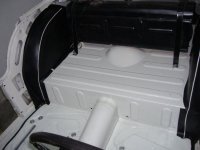
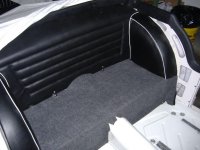
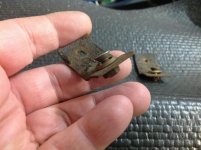
Just putting the interior back in the TR3A. Can someone tell me how the bottom of the rear panel is fixed(this is the panel in front of the gas tank). There are two pins on the bottom of the panel but I can't figure out how these attach to anything...

Pictures would be great if anyone has some.

Cheers
Tush
 
Sorry for the poor resolution. In this pic you can see the fuel tank strap bolt, and just inboard from that is a tab that extends down from the backboard and is held with a small sheet metal screw. I believe the tab is riveted to the backboard, so it sounds like you are looking at the rivet on yours, and the tab is missing. The tab is just a thin piece of metal that is bent about 30 degrees to match the floorboard. There are two tabs.


Found a better view:

 
Thanks John, looks like I am missing the tabs...will see if I can fabricate something...

Cheers
Tush
 
My back board has no tabs, no screws and nothing holding it in place aside from gravity and the slight bend it must make to fit between the wheel wells. It's tight and has not come loose by accident, but I've only got 12K miles on the car so far.
 
Hi Tush. Struggled with sorting this out too. I have the occasional seat and different floor, but with that I used the extension of the seat brackets for bottom support and added two tabs that I fabricated at top to hold that panel in place (roughly were arrows are in pic). Nice to see you are now working on the interior! Cheers, Mike

Interior_1.jpg

Interior_attachment (Medium).jpg
 
Putting in the interior means you are really close Tush. Good on you. The advice about the tabs matches my installation as well. What I did however, was tuck that first bit of carpet that rests on the slope first and put the back panel on top and the pan head self tappers through the carpet. That holds the carpet in place very nicely.
Doing a road test today with new points, Voltage Regulator and generator. There is nothing left to replace!
 
In my 59 TR3A I did not find any tabs welded on the body. The rear panel was fixed with two L-brackets and the corresponding screws, as shown in the photos.
JesĂşs
 

Attachments

  • DSCF0766.jpg
    DSCF0766.jpg
    39 KB · Views: 126
  • DSCF0771.jpg
    DSCF0771.jpg
    54 KB · Views: 120
Thanks everyone for the replies. It is appreciated.

Yes, getting closer but still a month and a half away I think...in have some vacation planned in October so I should be able to get quite a bit done then.

Cheers
Tush
 
Going through my parts bins again today I found the two fasteners that look like Johns. I will take some photos tomorrow when I reinstall the panel. Might help the next guy as well.

Cheers
Tush
 
Personally, I'm excited for you Tush...after such a long trip you are nearing the end of your project! I was googling something Triumph related last week and came across your U-tube series on the rebuild. I sat and watched several of them. It's hard to remember how far you have come till you look back at those. It's great that you took the time to record the progress...I feel like I was there. Thanks for taking the time to do that!
 
Thanks John, getting closer each day.

Here is a pic of the brackets at the bottom of the rear panel

Cheers
Tush
 

Attachments

  • image.jpg
    image.jpg
    61.5 KB · Views: 115
Back
Top