Down here in Johannesburg
I posted this not so long ago
What follows is a list of what to do, what not to do and a sort of order to do it.
1. The first thing to do was to reverse the car up on to ramps.
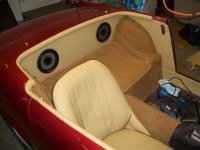
2. Next was to remove the seats. This proved rather tricky as I had no idea where to start. On closer inspection and after trying to removing all 4 bolts per seat from underneath and only succeeding with the front 2 of each seat, I realised that the back 2 bolts had to be removed from inside. This may sound stupid but when I was underneath the car all 4 bolts were covered with rubberising so all looked the same.
3. So lesson number one learnt – first slide the seat forward, move the backrest forward, remove the front 2 bolts from underneath, then remove the back 2 bolts from inside the car.
4. The next step was to remove the carpets and as my garage is rather large I put all the old carpets in the same position they were removed, on the garage floor in front of my car. I then had the pattern of the pieces in front of me.
5. Unpacking the new carpets I was now able to place the carpets in the position they came from by looking at the pattern of the old carpets. This is particularly handy when doing the little carpets behind the seats that go over the wheel arch.
6. Doing the back piece and the wheel arch pieces requires gluing, so a small tin of Gemkem was purchased together with a really cheap paintbrush for application.
7. The rest of the pieces were put in place rather easily.
8. Just a note of caution – The carpets I purchased did not have the press studs on as per the original and the carpet that went over the prop-shaft tunnel had a gap cut out for the handbrake on the right instead of the left. Neither of these points is noticeable when the carpeting was completed.
9. Putting the seats back in is a mission of note, what follows will hopefully help someone if they venture to replace carpets.
10. I put the carpet in first then Craig crawled underneath and put nail polish through the bolt holes to mark where the studs should come through.
11. With these marks I then punched holes through the carpet. I don’t know what is best – to make the holes really big then place them in the seat well and then put the seats on and hope everything matches or what I did. I made small holes, then put the seat bolts through the holes so that the carpet ‘stuck’ to the seat, then I attempted to place the seat, carpet and bolts into the holes. At this juncture Craig started learning a few new French words. This was the most difficult exercise of all.
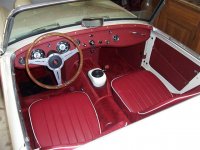
12. All came right eventually and the interior of my Midget looks a million dollars. The final 2 steps to complete the interior – get some crinkly spray paint for the dashboard and put a clip face radio and cigarette lighter (for the iPod) into the centre console accessory.
13. This all took 2 days with plenty of breaks for juice, backache, sandwiches and French lessons for Craig. Only when I had finished did I realize that I have a manual in the book case with instructions on how to do this.
 Hi Guest!

 Hey - did you know if you click on the title of a thread it will take you to the first unread post since you last visited that thread?
 but were afraid to ask:
  STOP!! Never post your email address in open forums. Bots can "harvest" your email! If you must share your email use a Private Message or use the
  smilie in place of the real @
 Pretty Please - add it to our Events forum(s) and add to the calendar! >>