• Hi Guest!
    You can help ensure that British Car Forum (BCF) continues to provide a great place to engage in the British car hobby! If you find BCF a beneficial community, please consider supporting our efforts with a subscription.

    There are some perks with a member upgrade!
    **Upgrade Now**
    (PS: Subscribers don't see this gawd-aweful banner
Tips
Tips

TR2/3/3A Installing Coil springs on a 3a

BillJoBob

Senior Member
Offline
Hello gents,
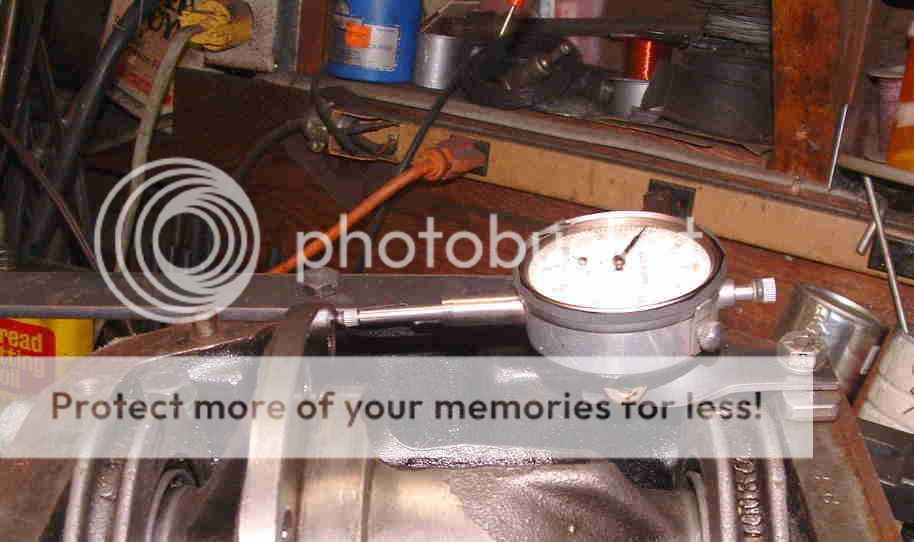
Im new to this site, but have read a lot of posts in search of a method for installing coil springs on a TR3. I rented a coil spring compressor but it was too long to fit in between the shock tower and the spring pan. Is there a trick to this? I thought about removing the pan and then use a floor jack to compress the pan and the spring together, but that looked a bit hairy. Any info or tips would be greatly appreciated. Also, any help in measuring the end play on the rear axle bearing without the use of a dial indicator?
Thanks!
 
There is a spring compressor available through the big three. Look at one of their catalogs to see the design. You can either buy theirs or make your own.
One end of the threaded rod is run through the spring pan, spring and shock absorber mounting hole in the shock tower, with a flatwasher and nut capping it off. The bottom end of the compressor has the metal plates that hold it to the spring pan.
I build one out of threaded rod (B7, which has a 120,000 psi rating), flat washers, nuts and a 10" section of 2x4. It has served well for many years.
 
DO NOT USE A FLOOR JACK ALONE! That is an accident waiting to happen. I did this once when I was young and dumb. I was lucky in that when the spring broke free it only hit me a glancing blow. The best way to remove, or install, the spring is to use a spring compressor that goes down the middle of the spring after the shock has been removed. Moss and TRF both sell spring compressors, or you can make one out of some all-thread and two 1/8" metal plates.
 
Welcome to the Forum!
There is a spring compressor available through the big three. Look at one of their catalogs to see the design. You can either buy theirs or make your own.
One end of the threaded rod is run through the spring pan, spring and shock absorber mounting hole in the shock tower, with a flatwasher and nut capping it off. The bottom end of the compressor has the metal plates that hold it to the spring pan.
I build one out of threaded rod (B7, which has a 120,000 psi rating), flat washers, nuts and a 10" section of 2x4. It has served well for many years.
 
I build one out of threaded rod (B7, which has a 120,000 psi rating), flat washers, nuts and a 10" section of 2x4. It has served well for many years. [/quote]

I like the idea of making a compressor. I have a rod and plenty of hardware. Can I ask what the 2x4 is used for?
Thanks
Bill
 
Welcome!

The one from Moss looks like this;

386-895_1.jpg
 
Here's what my home-made one looks like (although I'm going to shorten it by a couple inches next time I use it)
Springcompressor.jpg


DSCF0031.jpg


I'd guess Doug used the 2x4 for the initial step in installing the compressor, where you have to lift the suspension off of the rebound stop, and remove the stop & shock absorber. A floor jack below the trunnion, with a 2x4 turned sideways so the upper edge presses against the ends of the A-arms (and their grease fittings) works well for me. Just lift a little bit, not enough to pick the car up off the jackstands.

BTW, I just read my latest Enco flyer today, and they have a dial indicator plus magnetic base on sale for $20. Comes with your choice of a point set (tips for the indicator) or a fine adjustment.
https://www.use-enco.com/CGI/INPDFF?PMKANO=241&PMPAGE=46&PARTPG=INLMPA&PMCTLG=01
Although you could probably dummy up a way to do it with feeler gauges; for that price I'd just spring for the dial indicator.

Or more accurately, I did spring for the dial indicator, a long time ago, and I've never regretted it. Here's a shot of it (without the base & stand) checking diff bearing clearance.
DSCF0051_CROP.jpg
 
PS, I used ordinary 3/4" threaded rod from the hardware store. I forget offhand what it's rated load is; but it's many times what is required. And the tool has been through lots of cycles at this point, with no signs of distress (except a little surface rust on the unused threads
grin.gif
)
 
Thanks fellas! Excellent info. I would be lost on this build without the web. I cant imagine how my grandfather restored all of his cars throughout the years without it. one question: should i have the ball joint connected to the lower spindle before installing the spring? That would surely make it easier to handle. Thanks again for all the help, I will keep you guys up to date on my progress.

Bill
 
BillJoBob said:
should i have the ball joint connected to the lower spindle before installing the spring?
You can do it either way; but I prefer to have the A-arms, etc. fully assembled so I can check for binding; before installing the spring. It's not unheard-of for the vertical link to be bent just enough to take up the clearance in the old, worn trunnion; and then bind with a new one.
 
Hey Randall,
Got the spring in without much problem. However, now with the coil spring in, the lower arms with the spring pan is too low to install the shock and bump stop. I cant raise the suspension because theres no weight on the frame to keep it down while I jack up on the assembly. should i just wait till the engine is installed and I am ready for driving it before I put the shocks on?
Thanks,
Bill
 
That would be my approach, Bill, tho undoubtedly others have found an alternate solution. ISTR someone wrote that they were able to jam a length of 4x4 lumber between the frame & an overhead rafter!
 
Interesting...
I was looking at the rafter in the basement last night and thinking the same thing...lol.
 
I had my wife stand on the outer front edge of the frame and was able to get things assembled. I had a ladder out there so she could keep her balance. She's not that heavy, so it really doesn't take a lot. I did have to help things along with a pry bar, and of course the jack, but it's doable.
 
I think I tried the "wife trick" when I was reassembling mine -- and it didn't work. Of course, she weighs nothing near the 450#, or whatever it is that the fully assembled TRactor motor weighs. I just ended up waiting until I had more stuff on the frame (like, nearly everything) to install the shocks and lower bump-stops.
 
Low and behold, the rafter trick worked! Next project is to run the brake and fuel lines. any suggestions on what type of lines to use?

Thanks!
 
For brake lines, I would stick with something rated for brake service. Moss carries a nice set made from 'Cunifer' (a copper/nickel alloy specifically developed for brake lines in Europe) which is much easier to bend and install; and possibly even longer lived than the 'proper' steel Bundy tubing (which is plated with solder for corrosion protection). I believe the Moss set comes from Automec in the UK.

Fuel line is less critical, but I'd still stay away from soft copper tubing. Steel brake line will work fine, or most places sell "fuel line" that has thinner walls (and hence is easier to work with).
 
I rebuilt my calipers and learned that they must be torqued and the bigger bolts have a different torque rate than the smaller ones. Anybody have a clue as to what they might be?

Thanks!
 
I have a long-ago note, originally from Cliff Hansen, saying 75 ftlb for the larger, inner bolts (7/16" diameter), and 45 for the outer ones (3/8").

BTW, Girling's official advice was to not split the caliper halves when doing a rebuild. That's apparently why the O-rings aren't included in the seal kit.

Also BTW, it's preferable to start a new topic, rather than tacking a new question onto an old thread. It's both more likely to generate replies, and easier for other folks to find when they have the same question.
 
Thanks and I understand about starting a new thread. I read that girling advice too but unfortunately after the fact. Hard to hone the piston holes without dissasembly though.
Thanks again!
 
Back
Top