-
 Hi Guest!
You can help ensure that British Car Forum (BCF) continues to provide a great place to engage in the British car hobby! If you find BCF a beneficial community, please consider supporting our efforts with a subscription.
There are some perks with a member upgrade!**Upgrade Now**
(PS: Subscribers don't see this gawd-aweful banner

Tips
- We have a special forum called "Member Articles" where you can submit actual articles for consideration for publication. Learn More
- Don't have an Avatar? If not, your avatar will default to the 1st character in your username. Go into "Account Details" to change your Avatar.
- Some basic forum navigation info: click
 Hey - did you know if you click on the title of a thread it will take you to the first unread post since you last visited that thread?
- Hey Guest - Is your British Car Club in our Clubs database? If not, send me a PM - Basil

- Looking for a local club? Click the "Clubs" tab above and browse hundreds of clubs world-wide.
- Add Android or iPhone APP: click
- Did you know - any picture or video you add in your posts in any marque-specific forum will also get added to the Media Gallery automatically.
- A few more tips about posting and replying: click
- Hey there Guest - be sure to keep your profile page up to date with interesting info about yourself: learn more
- More tips and tricks on Posting and Replying: click
 but were afraid to ask:
  STOP!! Never post your email address in open forums. Bots can "harvest" your email! If you must share your email use a Private Message or use the
  smilie in place of the real @
- Want to mention another member in a post & get their attention? WATCH THIS

- So, you created a "Group" here at BCF and would like to invite other members to join? Watch this!
- Hey Guest - A post a day keeps Basil from visiting you in the small hours and putting a bat up your nightdress!
- Hey Guest - do you know of an upcoming British car event?
 Pretty Please - add it to our Events forum(s) and add to the calendar! >> Here's How <<
- Hey Guest - you be stylin' Change the look and feel of the forum to fit your taste. Check it out
- If you run across an inappropriate post, for example a post that breaks our rules or looks like it might be spam, you can report the post to the moderators: Learn More
- If you would like to try some different "looks" or styles for the site, scroll to the very bottom, on the left and click the Style Selector.
You are using an out of date browser. It may not display this or other websites correctly.
You should upgrade or use an alternative browser.
You should upgrade or use an alternative browser.
TR2/3/3A How do I install the headlight rings on a TR3 ???
- Thread starter rusty55
- Start date
It is a very tight press on pop fit. Make sure there is enough room on the headlight bucket frame because if you have adjusted the lights back too far the ring cannot go down and if you have tightened the bucket too tight against the rubber on the bug eye there is not enough room either. you need wiggle room. Moreover, if there is paint buildup on the buck the ring cannot slide down very good. And make sure they are the correct rings?
Steve
Steve
I had the same problem. I bought at least two rings and could not get them to snap in place. Tried to bend the tab to make it fit but no luck. Tab broke off. several guys at car shows tried and all failed. Finally I got the top to fit and drilled a hole at the bottom and inserted a screw very carefully. Strangely the left ring snapped right in place. Now I am scared to take that one off for fear it will not snap back. The idea of using the removal tool to help make it fit did not occur to me. Good luck.
Gary
Gary
TR3driver
Great Pumpkin - R.I.P
Offline
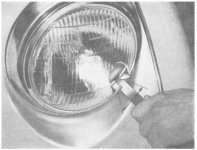
It's just a strip of flat metal, with one end turned up in a lip. Roughly the same size & shape as an old PC slot cover (but the lip is not as tall). Item GT6 here https://trf.zeni.net/TR6greenbook/96.phprusty55 said:what is this removal tool?
I use one I made from an old hacksaw blade, by grinding off the teeth and heating with a torch to turn up the lip.
Normally the lip is used for levering the trim rings off, by sliding it between the ring & the rubber gasket at the bottom, and then levering sideways to pop it apart. But you can also turn it around the other way and slide it in between the trim ring and the lamp retaining ring, to push on the tab and help snap it into place.
Attachments
To install my rings I pressed down quite hard with the palm of my hand on the top of the ring, thus pushing the bottom down enough to snap on.
I made a removal tool by flattening out the end of a short piece of welding rod and bending the proper hook on it, then making a loop on the other end for pulling, works great. just cold working, no heat.
Doug, ME
64 TR3-B
60 Land Rover IIA
I made a removal tool by flattening out the end of a short piece of welding rod and bending the proper hook on it, then making a loop on the other end for pulling, works great. just cold working, no heat.
Doug, ME
64 TR3-B
60 Land Rover IIA