
-
 Hey Guest!
British Car Forum has been supporting enthusiasts for over 25 years by providing a great place to share our love for British cars. You can support our efforts by upgrading your membership for less than the dues of most car clubs. There are some perks with a member upgrade!**Upgrade Now**
(PS: Upgraded members don't see this banner, nor will you see the Google ads that appear on the site.)

Tips
- We have a special forum called "Member Articles" where you can submit actual articles for consideration for publication. Learn More
- Don't have an Avatar? If not, your avatar will default to the 1st character in your username. Go into "Account Details" to change your Avatar.
- Some basic forum navigation info: click
 Hey - did you know if you click on the title of a thread it will take you to the first unread post since you last visited that thread?
- Hey Guest - Is your British Car Club in our Clubs database? If not, send me a PM - Basil

- Looking for a local club? Click the "Clubs" tab above and browse hundreds of clubs world-wide.
- Add Android or iPhone APP: click
- Did you know - any picture or video you add in your posts in any marque-specific forum will also get added to the Media Gallery automatically.
- A few more tips about posting and replying: click
- Hey there Guest - be sure to keep your profile page up to date with interesting info about yourself: learn more
- More tips and tricks on Posting and Replying: click
 but were afraid to ask:
  STOP!! Never post your email address in open forums. Bots can "harvest" your email! If you must share your email use a Private Message or use the
  smilie in place of the real @
- Want to mention another member in a post & get their attention? WATCH THIS

- So, you created a "Group" here at BCF and would like to invite other members to join? Watch this!
- Hey Guest - A post a day keeps Basil from visiting you in the small hours and putting a bat up your nightdress!
- Hey Guest - do you know of an upcoming British car event?
 Pretty Please - add it to our Events forum(s) and add to the calendar! >> Here's How <<
- Hey Guest - you be stylin' Change the look and feel of the forum to fit your taste. Check it out
- If you run across an inappropriate post, for example a post that breaks our rules or looks like it might be spam, you can report the post to the moderators: Learn More
- If you would like to try some different "looks" or styles for the site, scroll to the very bottom, on the left and click the Style Selector.
You are using an out of date browser. It may not display this or other websites correctly.
You should upgrade or use an alternative browser.
You should upgrade or use an alternative browser.
Horn Assembly...not the steering part
- Thread starter Tr3aguy
- Start date
jessebogan
Jedi Knight
Offline
I presume you mean the big windtone horns them selves?? I have a high note in my hand. The Brown wire is on the "upper" of the two connections, Brown/Green on the other. I doubt it matters as I think the connections are electrically isolated from the horn body.Make sure that the pin that moves the points is free to move. You may need to disassemble to do that, just make sketches of how it comes apart. I usually run a drill bit down the hole by hand just to make sure there is no grit, or solidified grease, and clean the pin really well. Connect up to a battery (Large gauge wire, the horns draw a lot of currect), and adjust the points for maximum sound.
Hope this helps a little
Hope this helps a little
lbcs_r_fun
Jedi Hopeful
Offline
Tr3aguy said:Two things...
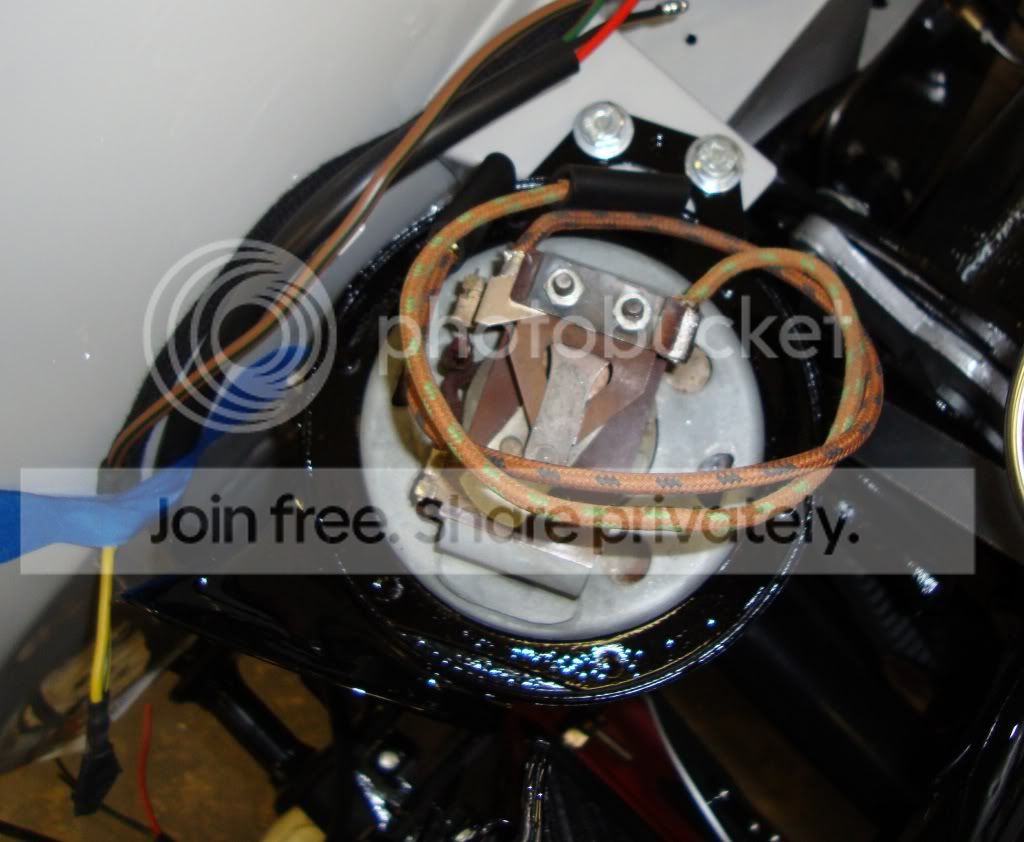
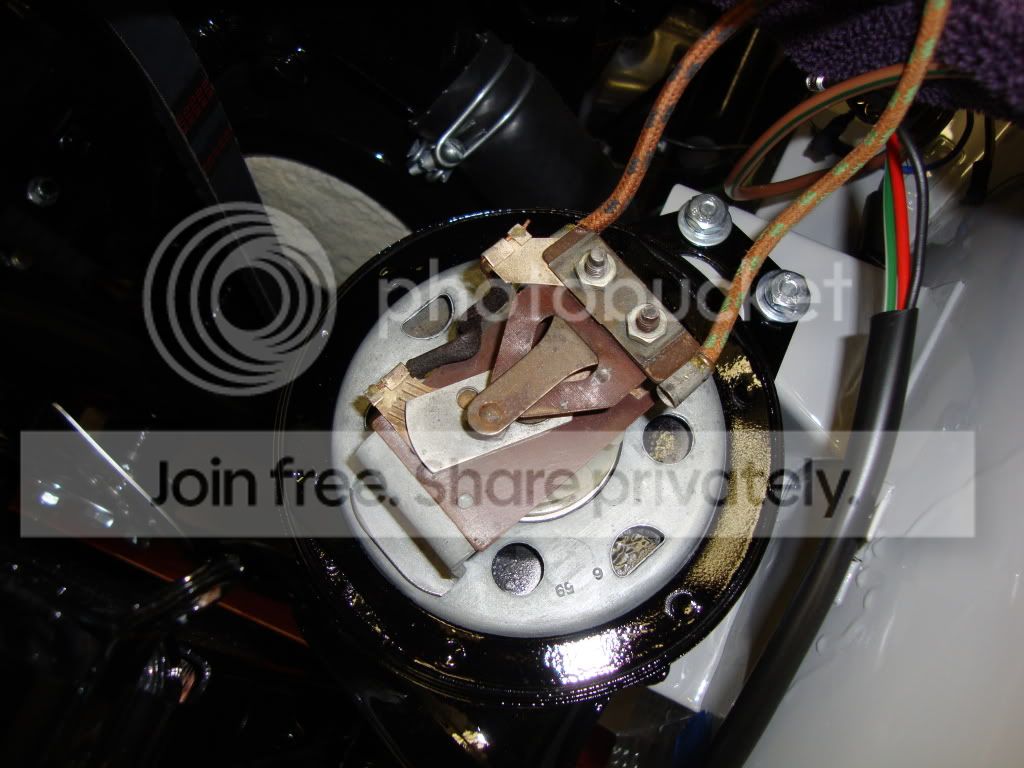
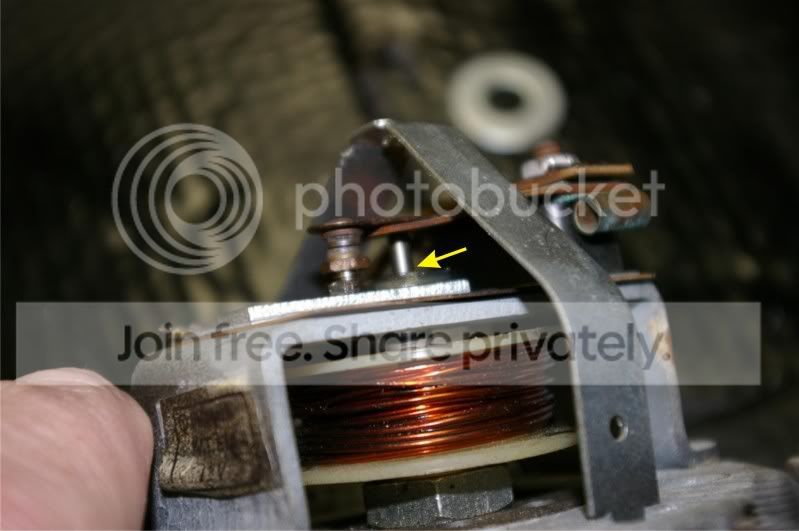
1) Does anybody have a good close up photo of a TR3 horn assembly.
these may help - from a friend's website:
2) Does anyone have a breakdown on dissassembly for the assembly as well. Mine had clipped wires and I am trying to reconstruct/cleanup
here's a write-up from Lucas. it was used to train their mechanics

Thanks
ekamm
Jedi Warrior
Offline
I am also getting ready to work on my horns non operable for a long time. What site did those pics come from? I am going to remove clean and adjust then check out all wiring. I was able to get a faint beep for a very short time yesterday so I am hoping that they will only need to be spruced up. I have a pos grounded car how should I bench test these?
CJD
Yoda
Offline
Hey Eric!
The service manual gives a few paragraphs on how to adjust these horns. I can copy it for you if you haven't got access to the manual. If you are not "beeping" it is most likely the electrical contacts are dirty/burned. Second would be the air gap. Both are relatively easy to fix. The manual even specifies regular maintenance of "oiling" the pushrod regularly...Ah, the good old days, when you had a service interval for your horn!

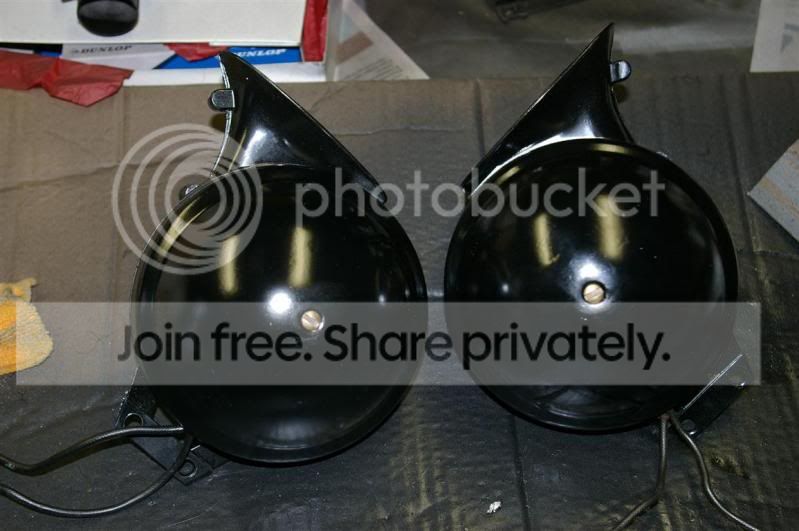
Here's what a little bead blast and fresh paint can do.
I just used a couple jumper wires from the battery (mine is still out of the car) to test the horns. They do use a lot of current, so use a decent gage wire (like 16 or less). There are no semi-conductors involved, so I don't think you can hurt anything if you accidentally reverse the polarity...and it will honk either way.
Good luck,
John
The service manual gives a few paragraphs on how to adjust these horns. I can copy it for you if you haven't got access to the manual. If you are not "beeping" it is most likely the electrical contacts are dirty/burned. Second would be the air gap. Both are relatively easy to fix. The manual even specifies regular maintenance of "oiling" the pushrod regularly...Ah, the good old days, when you had a service interval for your horn!
Here's what a little bead blast and fresh paint can do.
I just used a couple jumper wires from the battery (mine is still out of the car) to test the horns. They do use a lot of current, so use a decent gage wire (like 16 or less). There are no semi-conductors involved, so I don't think you can hurt anything if you accidentally reverse the polarity...and it will honk either way.
Good luck,
John
HerronScott
Darth Vader
Offline
I think you can get a repro of the horn manual from bestbritbooks on eBay for about $10 including shipping.
Scott
Scott
mgedit
Jedi Knight
Offline
I've just rebuilt my horns. I found that one was working well and the other was sucking double (about 16-18 amps) the quoted current. I cleaned the contacts and adjusted as recommended in the manual and it was only marginally better. A list member suggested adding some penetrating-type oil to the "plunger" to ensure it was moving freely. Cured the problem. Oil to both horns, both sound great, and both now draw between 6 and 8 amps for my WT618 horns.
Cheers, Mike
Cheers, Mike


Don Elliott
Obi Wan
Offline
When I dismantled my 1958 TR3A in 1987 for restoration, the horns weren't working. I scraped out a lot of crud from both intakes. The crud was a mixture of sand and gravel from 6 years of rallying on gravel roads plus the dried salt crystals from 8 or 10 years of winter driving in the salty slush, all of which had combined to form a solid crust in both horns. They have been working just fine for the last 21 years of summer driving on paved roads after cleaning it all out.
