• Hi Guest!
    If you appreciate British Car Forum and our 25 years of supporting British car enthusiasts with technical and anicdotal information, collected from our thousands of great members, please support us with a low-cost subscription. You can become a supporting member for less than the dues of most car clubs.

    There are some perks with a member upgrade!
    **Upgrade Now**
    (PS: Subscribers don't see this gawd-aweful banner
Tips
Tips

Help fitting and covering a dash top assembly

chicken

Jedi Trainee
Country flag
Offline
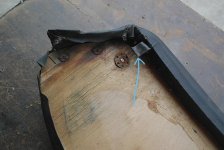
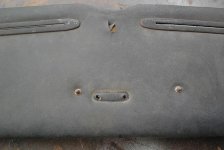
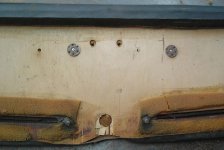
I have a BJ7 and have just purchased a plain (un-trimmed) dash top assembly, can anyone supply any photo's that i can give to my trimmer guy to work to ?
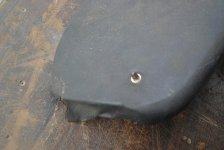
Also as the dash top was never fitted when i first had the car i could do with some guidance on fitting procedure, there are two holes in the center which i guess the rear view mirror scrws through but what about on the ends.

Rob
 
I just finished covering the dash top on my 100-6, and the fit was so tight that the two screws that attach the rear view mirror were sufficient to keep it in place. However I have heard of some sort of clip that goes on either end of the dash top, but I haven't seen one.
 
Hi LB,
Here is a shot of the clip.
 

Attachments

  • 11578.jpg
    11578.jpg
    40.6 KB · Views: 425
Hi Rob,
Here are some photos for my BJ8. Moss list the dashpad as the same part # for the BJ7. The small tear in-between the demisters on the top photo is the hole the windshield bolt goes through. You can see the type of foam used in the second shot. This looks like 1/8" foam, which also covers the top under the vinyl. The edge that faces the driver had a piece of 1/2 round. Not really foam, but not styrofoam either.
 

Attachments

  • 11579.jpg
    11579.jpg
    37.3 KB · Views: 265
  • 11580.jpg
    11580.jpg
    35 KB · Views: 272
  • 11581.jpg
    11581.jpg
    36.9 KB · Views: 276
Hi, GregW - that's about how I figured it would look. When I recovered my dash and top, the top was such a snug fit at either end that I didn't persue finding the clips any further. I guess if it loosens with age I'll have to find them and attach. Thanks for the pic!
 
Greg

I see you have some foam on the back of the panel where the demisters come through, is this to stop it rubbing on the paintwork?
Also on the front edge you mention 1/2 round foam, i assume this covers the small 1" wooden strip which in turn is covered by the vinyl?
On my panel at either end there are two metal shaped pieces, from what i can figure these just fit over the edge of the shroud at both ends, are they riveted/screwed there at all or is it simply the rear view mirrow bolts that hold it in place?

I would post a pic of the new top panel but i havn't a clue where to start.

Rob
 
chicken said:
I see you have some foam on the back of the panel where the demisters come through, is this to stop it rubbing on the paintwork?
I guess, probably also to make a better seal. That way the high powered heater won't blast air up underneath the dash pad.
chicken said:
Also on the front edge you mention 1/2 round foam, i assume this covers the small 1" wooden strip which in turn is covered by the vinyl?
Yes
chicken said:
On my panel at either end there are two metal shaped pieces, from what i can figure these just fit over the edge of the shroud at both ends, are they riveted/screwed there at all or is it simply the rear view mirrow bolts that hold it in place?
If memory serves me, the two clips (in my first photo) and the mirror are what hold the pad in place.

chicken said:
I would post a pic of the new top panel but i havn't a clue where to start.
There is a file size limitation depending on what subscription you have (that would be 100k for you). When you are making or replying to a post, you'll see "File Manager" below the post window. Click that, choose "Browse" and navigate to where the picture is on your computer. Select it, and when you get back to the previous screen click "Add File". After a couple seconds, the file will appear at the top of the file manager window. Click "Done Adding Files" and your done.
 
Back
Top