• Hi Guest!
    You can help ensure that British Car Forum (BCF) continues to provide a great place to engage in the British car hobby! If you find BCF a beneficial community, please consider supporting our efforts with a subscription.

    There are some perks with a member upgrade!
    **Upgrade Now**
    (PS: Subscribers don't see this gawd-aweful banner
Tips
Tips

Group statistics

Members:
18
Threads:
1719
Messages:
4177
Discussions:
3
Photos:
107

Latest posts

Group events

Photography

Getting ready for the milky way next weekend

Basil

Administrator
Boss
Offline
Got the set up put together for the Milky Way pano - making sure everything works. Even made a detailed checklist so that I (hopefully) won't forget anything.

This setup is the Sirui Carbon Fibre tripod, with a leveling base, then the iOptron Star tracker on that, with the new Z bracket attached, then a ball head on that.

I practiced taking time exposures with the lens cap on and the lights out (using a red-light head lamp). Wanted to practice turning the ball head the precise number of degrees after each of the 6 shots needed for the Pano. Took 90 second time exposures with the lens car on, using a remove trigger. Since the Milky way moves about .25 degrees/ minute, the faster I can get through the 6 shots the better chance I'll have of stitching the pano together. I'll take the foreground shots earlier, around blue hour, and blend the two in Photoshop. (The back pack will have dumbbells in it to add weight to help keep the tripod from moving).
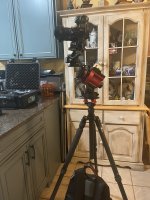
IMG_2415.jpeg
 
Anxious to see the result!

Question: Is the ball-head necessary? I'd think with the Z-bracket, you could position the camera without it and eliminate one possible instability?
 
Anxious to see the result!

Question: Is the ball-head necessary? I'd think with the Z-bracket, you could position the camera without it and eliminate one possible instability?
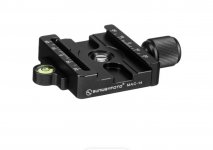
Funny you should ask. I actually bought two Z-brackets so that I would not have to use a ball head. The way the Z-brackets are designed, they can swivel 360Β° and the degrees are marked out on the bracket. However, I forgot that I would also need an area clamp to put on the Z-bracket in order to mount the Camera "L-Bracket". I just ordered a budget arch clamp from B&H and paid extra for faster shipping. Hopefully it will arrive in time for next weekend's trip. If not, then I'll have to use the bal head. The ball head isn't the best option but it will work.

What I just ordered:

Screenshot 2023-04-17 at 7.25.03 AM.jpg

By the way, I'm trying not to forget anything for this outing - there are so many little things that can be "gotchas" when shooting Milky Ways. Here is my check list (So Far):

Milky Way Check List (For the Sky portion of Pano, foreground pano will be shot at Blue hour with different settings)

Pre-Trip:

  1. Check weather for show time and clouds at cleardarksky.com
  2. Check Photocells App for moon - need NO MOON
  3. Use Photocells to determine Milky Way core position to determine time to begin shots
Gear:
  1. R5 Camera
  2. 14mm Rokinon lens
  3. L Bracket
  4. Tripod,
  5. Leveler base
  6. iOptron Tracker,
  7. 2 Z brackets,
  8. Ball Head screw small adapter in from Z bracket)
  9. OR Arca Clamp if using 2 Z brackets in lieu of Ball Head
  10. Laser pointer,
  11. Red light Headlamp
  12. Wireless Shutter release and/or intervalometer (If shooting stacked images instead of using tracker)
    1. Take extra AAA batteries!!
  13. LCD magnifier scope (To get more precise manual focus of stars)
Camera Settings (Do this before leaving home)
  1. Set Mode to Bulb
  2. IMPORTANT: Enable shutter release w/o lens (CF menu, tab #4)*
    1. *Camera will not take pictures with manual focus lens if this isn't enabled.
  3. Set Image Quality to Raw only
  4. Set ISO 800
  5. Set WB to Custom (3900Kelvin)
  6. Set (lower) rear LCD screen brightness to "2" (Wrench menu tab #3)
  7. Turn off Economy mode - (Wrench menu, tab #2)
  8. Set lens aperture wide open at f2.8
  9. Create new folder specific to store images from pano shots.
Preparing for Pano on location (Use red head-band light to see in dark)
  1. Attach L-Bracket to Camera.
  2. Attache Wireless Shutter Trigger to camera shoe and plug into camera.
  3. Set Tripod in desired location (extend Spikes on feet)
  4. Attach weights to hook under tripod for added stability
  5. Attach Leveler Base to Tripod; Adjust leveler to level base (will do this again)
  6. Mount iOptron Star Guider Pro to leveler base
  7. Remove tracker alignment scope eyepiece cap-Attach laser pointer to tracker scope.
  8. Adjust iOptron/ Tripod to point laser at Polaris (this gets us in the ball park of true north)
  9. Re-level Tracker via leveler base (check level indicator on camera LCD to make sure camera itself is level)
  10. Remove laser, look through scope and adjust tracker Az-EL to place Polaris in correct location on reticle (per PS Align Pro iPhone App)
  11. Carefully Attach Z-bkt(s), ball head (if not using two Z-brackets) and Camera. (want to minimize any movement / misalignment of true north. (Once the Z-Brackets are mounted we can't see through the scope to check alignment..with wide angle lens it doesn't have to be perfect, but we want as accurate as possible anyway to get stars as sharp as possible).
  12. Remove Laser pointer and replace rear scope eyepiece cap)
  13. Point camera towards any bright star - Use Rear LCD zoomed in x10. Using LCD magnifier over LCD, adjust manual focus to get stars as sharp as possible.
  14. Point camera in direction for first shot. Try to get azimuth scale on head (if using) or Z-bracket to "0"
  15. Set bulb timer to desired shot time (Start with 90 seconds and take test shot. Adjust if needed).
    1. Bulb timer is Camera Menu, tab #6 (This will need to be done when ready to shoot as Bulb timer shuts off when camera is shut off)
REMEMBER TO TURN ON TRACKER <<<<<<<!!!!!!!
  1. Take first shot. To south (180Β°)
  2. Move 40Β° CCW take second shot
  3. Move 40Β° CCW take third shot
  4. Move 40Β° CCW take fourth shot
  5. Move 40Β° CCW take 5th shote
  6. Move 20Β° CCW take final shot (Due North)
  7. (These positions assume MW rises due South at time of shooting. Adjust as needed)
 
Last edited:
Details, details. And there may be one or two you've left out and won't know 'til they show themselves in the field. But it's likely those would be minor and not have impact on the endeavor.

Good luck with the shoot! πŸ‘
 
Details, details. And there may be one or two you've left out and won't know 'til they show themselves in the field. But it's likely those would be minor and not have impact on the endeavor.

Good luck with the shoot! πŸ‘
That’s more than a little likely. If I do determine I’ve left something out, I’ll be sure to add it to the list for next time.
 
The tip was a bust! First, I mis-set my alarm and didn't get up when I needed to. When I finally did get uo (4AM) there were way too many clouds to shoot stars.
 
Back
Top