• Hi Guest!
    You can help ensure that British Car Forum (BCF) continues to provide a great place to engage in the British car hobby! If you find BCF a beneficial community, please consider supporting our efforts with a subscription.

    There are some perks with a member upgrade!
    **Upgrade Now**
    (PS: Subscribers don't see this gawd-aweful banner
Tips
Tips

Gas Leak in Boot

Burkee

Senior Member
Country flag
Offline
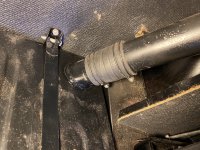
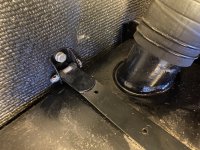
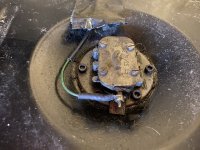
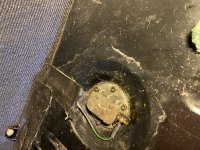
I pulled the carpet out of the boot and noticed an oily area around the base of filler neck and tank. Doesn’t smell like gas and has an oily feel to it. Would gas lose its smell, and gel over time? I wonder if it’s leaking from the rubber coupling? Bottom screw took about 4-5 turns. Planning to replace sending unit. Gauge does not register correctly. Looked like there was seepage in the area around the unit. I filled the tank last week for the first time and have not driven it much since.
 

Attachments

  • IMG_0544.jpeg
    IMG_0544.jpeg
    3.7 MB · Views: 89
  • IMG_0545.jpeg
    IMG_0545.jpeg
    2.5 MB · Views: 76
  • IMG_0546.jpeg
    IMG_0546.jpeg
    2.5 MB · Views: 80
  • IMG_0547.jpeg
    IMG_0547.jpeg
    3.3 MB · Views: 79
Those screws holding the sending unit in place should be Phillips head (10/32??) and have flat copper washers under them to aid in sealing the sending unit . There’s also a cork gasket between the sender and tank . Hard to tell if yours has a gasket due to all that greasy goop .
 

Attachments

  • IMG_6307.png
    IMG_6307.png
    1.2 MB · Views: 81
Thanks! I realized I had put some Lucas fuel treatment in the tank earlier and wonder if that’s what seeped through where the rubber coupling clamp wasn’t tight enough. I’ll look for the correct screws for the sending unit.
 
Some like to use blue thread locker on those screws.
Others prefer Hylomar or Permatex Ultra.
Took me 3 attempts to stop the leak around the sending unit.
I finally placed the Permatex in the screw holes and on both sides of the gasket.
Also, suggest you use a sharp chisel across the top of the screw holes to eliminate raised metal threads that impede complete seating/sealing.
Good luck.

Douglas
 
Before replacing the sending unit, remove it and let the float hang, measure the depth of the tank from mounting ring to bottom,
measure the drop of the float from mounting ring to bottom of float, then you can bend the float wire so as the float is about
a 1/4 of an inch higher than the tank bottom. This will give you a little reserve when the gauge says empty.
 
Thanks appreciate the tip. How do I clean a the area where it mounts without getting pieces of gasket and sealent in the tank which has gas in it? Should I run or drain the gas out of the tank?
 
You could try putting a balloon in the hole and blowing it up, then carefully scrape the old gasket off without popping the ballon.
Or a latex glove would be stronger.
Bear in mind if you pop it while you're scraping the gasket off, it's gonna be a brown trousers moment.
:poop:
 
I had a devil of a time sealing the sender on an aftermarket tank with a poorly-made flange on my BN2. Tried the newish ribbed nitrile gaskets and various sealants with no luck, finally had to stack two cork gaskets--longer screws required--with a film of Permatex fuel-resistant on all surfaces. Thread sealant on the screws is a good idea as well.


We bought a used OEM tank which appeared to be in good shape but had terrible fuel delivery problems (first blamed pump, then carbs ...). It took weeks to diagnose; finally my dad cut the pickup tube out and he found a small hole in the tube which Dad thought might have been caused by the flux used when it was soldered in. Note old tanks like ours will often have pinhole leaks from corrosion that are difficult to track down but can really stink up the boot. FWIW, both my Healeys have new tanks sealed with Bill Hirsch sealant; the BJ8 has probably 20 years or more with no issues, the BN2 is going on 10 years with not many miles.
 
Back
Top