but were afraid to ask:
 SteveHall64Healey
Jedi Trainee
Offline
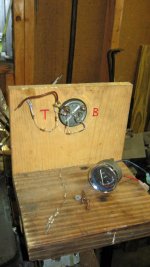
I’d like to calibrate the fuel gauge on my BJ8. A full tank shows over full, and the tank is empty at 1/4 tank. Does anyone have, or know of, a good procedure?
thanks
Steve
thanks
Steve

 Hey Guest!

 Hey - did you know if you click on the title of a thread it will take you to the first unread post since you last visited that thread?
 STOP!! Never post your email address in open forums. Bots can "harvest" your email! If you must share your email use a Private Message or use the
  smilie in place of the real @
 Pretty Please - add it to our Events forum(s) and add to the calendar! >> Here's How <<
  Change the look and feel of the forum to fit your taste. Check it out
 I’d like to calibrate the fuel gauge on my BJ8. A full tank shows over full, and the tank is empty at 1/4 tank. Does anyone have, or know of, a good procedure?
thanks
Steve
If you can shut off the fuel pump with the car idling, do so and let the SUs run dry. Helps prevent varnish in them.....
I’ve generally wintered the car with a full tank of gas with fuel stabilizer. Any recommendations re this?
You cab tell from the outside which way round the sender is. The electrical connection is on the same side as the float you just need to look at the tank.
https://www.ahspares.co.uk/austin-h...o-ful162/sender-unit-new-outright-sale-1.aspx
AJ
I’d like to calibrate the fuel gauge on my BJ8. A full tank shows over full, and the tank is empty at 1/4 tank. Does anyone have, or know of, a good procedure?
thanks
Steve