Hi Guest!

 Hey - did you know if you click on the title of a thread it will take you to the first unread post since you last visited that thread?
 but were afraid to ask:
  STOP!! Never post your email address in open forums. Bots can "harvest" your email! If you must share your email use a Private Message or use the
  smilie in place of the real @
 Pretty Please - add it to our Events forum(s) and add to the calendar! >>
tosoutherncars
Jedi Knight
Offline
Hi all,
Great news! Took Milo to the garage yesterday (Union Auto, just west of Ottawa) to have his safety inspection done. A big thanks to J-P for the front turn signal lights, which worked beautifully.
Only failing points were:
- one backup light bulb,
- play in the p/side front wheel bearing,
- play in the steering knuckles.
I was anticipating a front-end rebuild, so that's no problem... I'm just particularly happy that they didn't find anything else that needs fixing! And, I already have new tie-rod ends, steering rack gaiters, tapered roller bearings, and a full PolyBush kit sitting on the shelf.
I'm using a couple of different webpages, and the workshop manual, as guides. See https://www.teglerizer.com/midgetstuff/suspension.htm for some good pictures.
So, started dissasembly yesterday. Front end jacked way up in the air, all weight off the wheels. Wheels off, steering disconnected, pushed the A-arms down and the spring fell right out. Lovely! Yanked the caliper off and hung it in the wheelwell, to avoid having to bleed all over again. I have new metal braided Goodridge hoses though, so I suppose I should bite the bullet.
With much prying and smacking, I finally got the inner A-arm connections undone - bushings totally shot, collapsed rubber, etc. What a mess this must make of the steering geometry... it's no wonder my tires were wearing heavily on the edges!
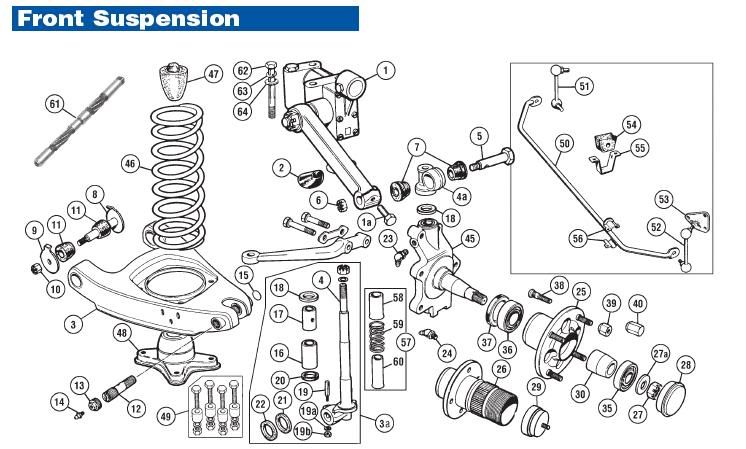
Now, we come to my first QUESTION... I'm having a bit of trouble separating the A-arm from the kingpin / hub assy. There is a very small nut & washer on the bottom of the joint, which I have removed (exposing a small threaded bolt end.) Then there's the large slotted bolt-end, which I haven't tried too hard to remove yet, since I *thought* there was some sort of offset pin that had to pull first. Can anyone shed some light on this?
Pix to follow, as I reassemble. I'm also considering recoating the wheelwell in rubberised 'rocker-guard', since brake fluid has removed the paint in several places. I know this will not be 'stock', since it should be body-coloured, but I'm more interested in durability and rust protection than concours points!
Expect to be finished this weekend, unless the dating life picks up significantly! /bcforum/images/%%GRAEMLIN_URL%%/smile.gif
Great news! Took Milo to the garage yesterday (Union Auto, just west of Ottawa) to have his safety inspection done. A big thanks to J-P for the front turn signal lights, which worked beautifully.
Only failing points were:
- one backup light bulb,
- play in the p/side front wheel bearing,
- play in the steering knuckles.
I was anticipating a front-end rebuild, so that's no problem... I'm just particularly happy that they didn't find anything else that needs fixing! And, I already have new tie-rod ends, steering rack gaiters, tapered roller bearings, and a full PolyBush kit sitting on the shelf.
I'm using a couple of different webpages, and the workshop manual, as guides. See https://www.teglerizer.com/midgetstuff/suspension.htm for some good pictures.
So, started dissasembly yesterday. Front end jacked way up in the air, all weight off the wheels. Wheels off, steering disconnected, pushed the A-arms down and the spring fell right out. Lovely! Yanked the caliper off and hung it in the wheelwell, to avoid having to bleed all over again. I have new metal braided Goodridge hoses though, so I suppose I should bite the bullet.
With much prying and smacking, I finally got the inner A-arm connections undone - bushings totally shot, collapsed rubber, etc. What a mess this must make of the steering geometry... it's no wonder my tires were wearing heavily on the edges!
Now, we come to my first QUESTION... I'm having a bit of trouble separating the A-arm from the kingpin / hub assy. There is a very small nut & washer on the bottom of the joint, which I have removed (exposing a small threaded bolt end.) Then there's the large slotted bolt-end, which I haven't tried too hard to remove yet, since I *thought* there was some sort of offset pin that had to pull first. Can anyone shed some light on this?
Pix to follow, as I reassemble. I'm also considering recoating the wheelwell in rubberised 'rocker-guard', since brake fluid has removed the paint in several places. I know this will not be 'stock', since it should be body-coloured, but I'm more interested in durability and rust protection than concours points!
Expect to be finished this weekend, unless the dating life picks up significantly! /bcforum/images/%%GRAEMLIN_URL%%/smile.gif