but were afraid to ask:
 sjuengst
Senior Member
Offline
 Hi Guest!

 Hey - did you know if you click on the title of a thread it will take you to the first unread post since you last visited that thread?
 STOP!! Never post your email address in open forums. Bots can "harvest" your email! If you must share your email use a Private Message or use the
  smilie in place of the real @
 Pretty Please - add it to our Events forum(s) and add to the calendar! >> Here's How <<
  Change the look and feel of the forum to fit your taste. Check it out
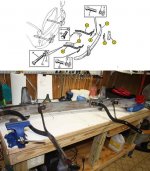
 roscoe said:Beat 'em to fit, paint 'em to match. I had to tweak mine some to make for a good stress free fit. Don't forget to swap pieces around for the best fit.
 It's all part of the fun of owning a Healey or any other vintage E-Ticket ride.