• Hi Guest!
    If you appreciate British Car Forum and our 25 years of supporting British car enthusiasts with technical and anicdotal information, collected from our thousands of great members, please support us with a low-cost subscription. You can become a supporting member for less than the dues of most car clubs.

    There are some perks with a member upgrade!
    **Upgrade Now**
    (PS: Subscribers don't see this gawd-aweful banner
Tips
Tips

Front apron to shroud clearance

Cutlass

Jedi Warrior
Offline
Well, as we say down here, I'm getting to the short rows now on my 66BJ8. Trial fitting the front bumper and apron reveals a gap of a couple of inches. I think the Concours guide calls for around 3/4 inch gap. At the last British car rally I attended, the Healeys I saw varied in this department. It certainly looks better with a small, uniform gap. Anyone deal with this issue? I can move the bumper brackets back a bit by extending the existing slots, but not by much without changing the geometry. The other option I thought of was to take a small section out of the bumper brackets and re-welding them. Re-forming the front shroud is out of the question at this point. Ideas? Thanks. Jim

Should have made it clear: The gap is between the apron and the shroud.
 
I have the small gap and it does look nice but I use a bra on the front that is a very tight squeeze to thread it through. I was thinking of moving it out.
 
Forgetting the apron for a sec, does the bumper look like it itself is too far out? What shape are the bumper brackets in? Were they ever hit, are they original? Is your oil pan leaking?
 
Certainly the car was hit at one time. I took the brackets apart, bead blasted, fitted, repaired, re-welded and painted. Due to the dual nature of the brackets, I don't think that is the issue. Since the apron appears to attach between the brackets and the bumper, thereby fixing the relationship between the bumper and the apron, both must be too far from the shroud. They will have to stay where they are, or move back towards the shroud together.
 
Per the concours registry:

The front apron does not touch the shroud, but should be separated from the shroud by a uniform gap of no more than 3/4" to 1".

I had to make the slots longer on both brackets to obtain a better fit on my car. Looking back, what part did I not tweak to make fit better.....or simply fit.
 
Sorry I was of no help to you Jim. I thought one of your questions was confirmation of distance between the gravel guard and shroud. Best of luck.
 
Hi Jim,
I'll try to pull my old bumper out and have a look at it today. It's buried in a spare garage. :eeek: I'm curious if the apron on my car was bolted behind the bumper bracket or mounted as you said.
From memory, here's a thought. Re-bend the portion of the bumper bracket where it attaches to the bumper. Bend it so the bumper would be about an inch closed to the shroud. Then pinch the two arms of the bracket closer together so the bolt holes will line up again. The pinching will push the bumper away from the car a little again. As Keoke would say FWIW.
 
Thanks, guys. You both are a help. This isn't a big deal, but it really does look better with a smaller gap. Uniformity of the gap is another matter, which won't be solved. That would require re-working the shroud or the apron. On second thought, it sholdn't be too much trouble to re-work that apron to conform to the shroud. I'm certainly not going to touch that shroud, though. If I can get part of the gap closed by elongating the slots on the brackets, and the rest by a careful re-work of the apron, coupled with a bit of Greg's suggested bracket bending, that would probably do it. A nice weekend job.
 
Jim, here's what I did to get the apron to mirror the curve and distance of the shroud.

1. Modify the slots in the two brackets. Make them longer forward or back, which ever is required to get the distance you want for the apron to shroud. Also modifying the angle of the slots will help with making the bumper/apron level.

2. Add large washers or packing plates behind the angle bracket to help it equal out the distance to where it bolts to the bumper. I tried to bend the thick bracket to meet the bumper. Well, that didn't happen.

Here is a photo showing how the apron attaches to the underside of the bumper. That photo also shows the washers I needed to add for spacing.

Other photos show that the center gap will be dependent on how close you get the ends of the apron to the shroud under the turn signals.

Maybe this will help.
Roger
 
AUSMHLY said:
2. Add large washers or packing plates behind the angle bracket to help it equal out the distance to where it bolts to the bumper. I tried to bend the thick bracket to meet the bumper. Well, that didn't happen.
The problem for Jim is the washers make his issue worse by moving the bumper and apron further from the shroud. If only the apron could be mounted inboard of the bracket. I guess it could, but it would need to be notched to clear the top of the bracket itself.
Hi Jim,
Here are a couple photos of my original bumper, it has some damage too, but you might see some differences in the angle of the bracket vs. yours.
 
GregW said:
AUSMHLY said:
2. Add large washers or packing plates behind the angle bracket to help it equal out the distance to where it bolts to the bumper. I tried to bend the thick bracket to meet the bumper. Well, that didn't happen.
The problem for Jim is the washers make his issue worse by moving the bumper and apron further from the shroud. If only the apron could be mounted inboard of the bracket. I guess it could, but it would need to be notched to clear the top of the bracket itself.
Hi Jim,
Here are a couple photos of my original bumper, it has some damage too, but you might see some differences in the angle of the bracket vs. yours.


Sometimes when I say things, it comes out wrong. My point about adding the washers was to help the bracket meet the bumper. The other side of that bracket meets the bumper (no washers, packing plate) it fits flush. So the bumper is as close to the shroud as I can get it.

Jim, are your brackets too long?

I measured from the front bolt on the frame rail bracket to the outside bolt on the bumper (near the parking lens) and the length is 14". To the inside bolt on the bumper is 13". This distance is after I made the slots longer to obtain that distance. Maybe you have enough room in your brackets to make the slots long enough to move the bracket as I did?

You can try and modify the apron as Greg mentioned, but it can only move forward away from the bumper so much, before you see a space between the apron top and the bumper. Visually the apron should be under the lip of the bumper.
 
AUSMHLY said:
Sometimes when I say things, it comes out wrong. My point about adding the washers was to help the bracket meet the bumper.
Ah! I see what you're talkin'bout now. I bolted mine to the frame (without the bumper or apron) and used a pair of big Channellock pliers to bend the tabs in all directions needed.

AUSMHLY said:
You can try and modify the apron as Greg mentioned, but it can only move forward away from the bumper so much, before you see a space between the apron top and the bumper. Visually the apron should be under the lip of the bumper.
:yesnod: I agree.
One answer would be to make a new apron to size.
 
Thanks for the pix and measurements. 13 inches is about right. Mine is 13.5 inches before elongating the slots. I think that first I'll enlarge the existing slots, then see how that works. BTW, couldn't resist going for a quick ride tonight. Temps in the 30's, but just got the interior about finished and couldn't resist. Sweet.
 
Roger -

I hate to tell you this but your top picture illustrates a future problem you WILL have with your splash apron.

The underside of your splash apron needs to rest on the top of the brackets so that the weight of the apron is supported when driving.

If not, you will get vibrational work hardening on the tabs on the front of the apron and the tabs will break off and your apron will come off the bracket. It's a lousy design by the factory.

Loosen your bumper bolt and shove the apron down as far as it will go then tighten it all back up. You will probably need a spare set of hands to do this properly.

:thumbsup:
 
Thank you Healeynut,

It's hard to tell from the photo, but the top part of the curved brace is touching the apron. If you take a closer look, you'll see that the top of the brace is not level. It angles up to the top of the curve. I also have a small piece of rubber between the two to keep it from transmitting the vibration noise I use to get when it sat idling.
A good point to share with others here Healeynut.
 
I'm going to start with extending the slots, if I can convince my buddy to spare some Bridgeport time this weekend. We'll see how it goes from there.

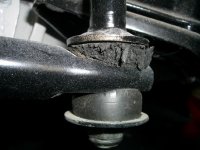
Roger: Is there a wear problem with that tie-rod mounting bushing?
 
Roger's look pretty good. Here is some of Moss' finest. Two years old and 0 miles.
 

Attachments

  • 14181.jpg
    14181.jpg
    46.6 KB · Views: 161
That's why I switched to Cape's rose jointed roll bar. Worth every penny.

The other option is to get them in the soft blue nylatron from Noltec in Australia. Those will never wear out and are soft enough that they won't break the roll bar links.
 
Back
Top