• Hey Guest!
    Yoda says: A FREE resource for the Little British Car community BCF is. Support us with an account upgrade, not many will (less than 1%) "Require" you to pay to play we don't, but if you find BCF helpful, appreciate no pop up ads, and want to ensure we stay online - Supporting us with an "optional" low-cost member upgrade you should. There are some benefits to upgrading!
    **Upgrade Now**
    (PS: Seeing this UGLY banner, you won't)
Tips
Tips

TR2/3/3A Frame repair.

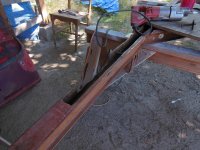
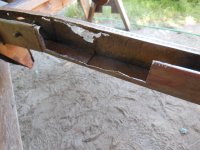
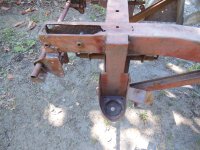
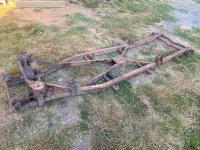
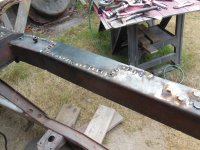
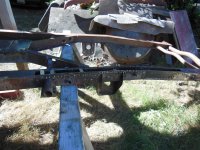
The following is a suggestion as how to do a substantial repair/replacement.
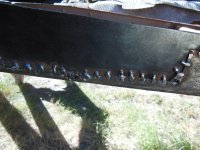
Have you contemplated having new [full length] "C" sections folded up at a steel fab shop. The internal smaller internal "C" for the outer rails can be folded also, then welded in.
For the internal X section, either folded C to suit, or use RHS.
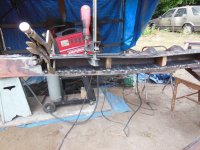
Obviously a lot more work, which you may not want to do, but you would have a new safe chassis. Plus you can make improvements along the way...eg stronger rear spring hangers... new front shock tower supports.
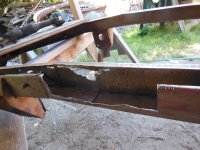
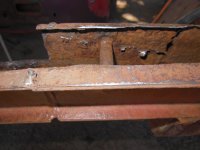
 
In checking around.... Los. Angeles Craigslist auto parts
There is a TR3 frame listed there. Seen it there for some time.
Says very good condition. I know nothing about frame or seller.
He is asking $750.... might take a offer... be worth trying.
Wish you well

Gil. NoCal
 
I always look at a frame and ask "do I want to take my loved ones down the road at 80 mph on that?".
Recently I came across one of the nicest TR3 frame I have seen: the front horns were dented as they often are and someone had cut off the bracket for retaining the split steering column. Had repairs at a fabrication shop. If anyone is interested, I'd sell it for $800. Located in Michigan.
 
Thanks guys, I figure the frame repair is more about me and developing skills I lack. If I fail, no biggie but I need to give the repair a good shot. I used to work with boilermakers who would fix this easy. Anyways I cut a rectangular section out and I am trying to figure out if I should lap joint the metal inside the frame like they did at the factory and then add a piece to level the outside flush for appearances then put a top piece in place. Or cut a piece the exact size of the cut out and weld the sides and then the top in place?

The factory weld on both the inner inside top and bottom is doubled over and welded with some kind of spot welding machine or something and is still very strong. I am thinking I should leave it and weld to the top of it rather than split the two.

In general these frames are heavy duty and with the weight of the car spread out along the frame, I think they could be a lot lighter and still do the job. I mean what about unibody stuff? I know they are usually front wheel drive, but looking at a unibody makes me wonder do they even use frames anymore.

steve
 

Attachments

  • DSCN0235.JPG
    DSCN0235.JPG
    3.3 MB · Views: 86
  • DSCN0239.JPG
    DSCN0239.JPG
    3.4 MB · Views: 91
  • DSCN0233.JPG
    DSCN0233.JPG
    3.3 MB · Views: 76
  • DSCN0230.JPG
    DSCN0230.JPG
    3.3 MB · Views: 74
  • DSCN0244.JPG
    DSCN0244.JPG
    3.3 MB · Views: 78
  • DSCN0234.JPG
    DSCN0234.JPG
    3.3 MB · Views: 73
There is no way I would even consider a frame in that state. You have to assume the parts that don't look so bad are still dangerously thin. I know others disagree, but to me it just isn't worth the risk. Just as an aside, I have sold several cars to Europe where frame repairs are a no-no.
 
I'm impressed, Steve. You're already well into it. I'm with you...I would be more concerned about making sure it is straight than worrying about final strength. A good repair is as strong or stronger than original. After-all, just look a the TR1 frame if you want to see how much extra metal is in the TR3 frame! The problem with the TR1 frame was not strength, but flex. That's when they added the cross braces and gussets. The TR3 frame is a rock compared to the Model T and Model A frames. I grabbed my friend's stock model A frame at the corner and shook it. It flexed at least 3 inches just from that.

Case in point about strength, my Stearman project is a plane that weighs more than the complete TR3. It will easily pull 10+ G's, for an equivalent load of over 30,000lbs...which is supported by 4 - 1" diameter tubes only .035" wall. If one of those tubes failed, you either bring a parachute or you are dead. In a car, worst case you grind to the side of the road...but I guarantee the TR3 frame will never break in normal use. The frame alone weighs 3 times what the Stearman frame weighs!


rjuFM22.jpg
 
You will need to build a jig for precise measurements, find a TR3 schematic with all the measures. Find a level flat space and go from there. Replacement frame will save you a lot of time and welding gas.
 
I'm impressed, Steve. You're already well into it. I'm with you...I would be more concerned about making sure it is straight than worrying about final strength. A good repair is as strong or stronger than original. After-all, just look a the TR1 frame if you want to see how much extra metal is in the TR3 frame! The problem with the TR1 frame was not strength, but flex. That's when they added the cross braces and gussets. The TR3 frame is a rock compared to the Model T and Model A frames. I grabbed my friend's stock model A frame at the corner and shook it. It flexed at least 3 inches just from that.

Case in point about strength, my Stearman project is a plane that weighs more than the complete TR3. It will easily pull 10+ G's, for an equivalent load of over 30,000lbs...which is supported by 4 - 1" diameter tubes only .035" wall. If one of those tubes failed, you either bring a parachute or you are dead. In a car, worst case you grind to the side of the road...but I guarantee the TR3 frame will never break in normal use. The frame alone weighs 3 times what the Stearman frame weighs!


rjuFM22.jpg
Military aircraft frames were made of a little better / a lot better material than those old British car frames. Stearmans were built like a tank, I had one, and loved it! PJ
 
When I did my TR3A chassis, I measured the outer C section of the chassis rails and likewise the dimensions of the C sections making up the crucifix in the middle. Went to a sheet metal shop near where I worked and gave him the dimensions stressing the work needed to be accurate. Picked up the rails in two days time. Stripped off the outer C section and bent up my new rails and welded them back on, checking for square all the time. Always had a reference line strung down the centre line and kept referring to the fabrication blueprints in the manual.
Once done with the outer rails, I cut out the crucifix and completely fabricated a new one which was fitted back in.
Last but not least the right hand tower was removed and rebuilt to rectify an obvious prior collision damage. At the same time, the crossmember between the rails under the towers was refabricated.
Doing the above also gave me opportunity to rebuild and strengthen the chassis outriggers, rear spring mounting points and replace a number of cative nuts that were beyond reuse.
Would not hesitate to do this work again as the experience gained was valuable and I know intimately all the details of the chassis on which I hope to drive safely at 80 mph.
Good to see you are having a go at it.
 
I am continuing to fix my Frame and have a good plan. The frame on craigslist Portland interested me, so copied a picture, so I could magnify the picture. It looks to me like the top front by the driver side shock tower needs some work. My eyes are not the best what do there see?

Thanks Steve
 

Attachments

  • aaaatr3 frame cl.jpg
    aaaatr3 frame cl.jpg
    77.1 KB · Views: 79
That's not a stellar frame! Keep going, Steve!

Paul, 4130 is, indeed, better steel, but higher strength suffers from lower malleability than the frame's low carbon steel. One Stearman longeron is only .11 sqinch of steel able to take 15,000 pounds of load. The top plate of the TR frame is .4 sqinch of steel absorbing a max of 3,000 pounds of load. So...almost 4 times the amount of metal, at 1/5 the strength, taking 1/5 the load. Conclusion, if the Stearman is a tank, then the TR3 frame is built like a battleship. And the malleability of low carbon steel makes cracking much less of an issue. Steve has absolutely nothing to worry about!
 
When I did my TR3A chassis, I measured the outer C section of the chassis rails and likewise the dimensions of the C sections making up the crucifix in the middle. Went to a sheet metal shop near where I worked and gave him the dimensions stressing the work needed to be accurate. Picked up the rails in two days time. Stripped off the outer C section and bent up my new rails and welded them back on, checking for square all the time. Always had a reference line strung down the centre line and kept referring to the fabrication blueprints in the manual.
Once done with the outer rails, I cut out the crucifix and completely fabricated a new one which was fitted back in.
Last but not least the right hand tower was removed and rebuilt to rectify an obvious prior collision damage. At the same time, the crossmember between the rails under the towers was refabricated.
Doing the above also gave me opportunity to rebuild and strengthen the chassis outriggers, rear spring mounting points and replace a number of cative nuts that were beyond reuse.
Would not hesitate to do this work again as the experience gained was valuable and I know intimately all the details of the chassis on which I hope to drive safely at 80 mph.
Good to see you are having a go at it.
Lionel's method is highly recommended.
 
Yes it was nice to hear from Lionel. John I remember you stated it would take working time-- man hours--- and I’m good with that plus my welding is getting better. It was difficult to spend the time working cutting out old rotten metal all the time thinking, well there is supposed to be a pristine Frame about an hour and a half away. My frame is coming along ok plus I am learning.

Thanks steve
 
While you’re in there welding, have a look at RevingtonTR‘s frame strengthening kits. Especially with the Cable being so favorable. Jim
 
Well my welding is getting better, but I still need a lot more experience. My plug welds felt weak, so I went to a method of dragging the hot puddle off the new metal and then onto the old. I usually count to about 5 in my head and then pull out so I do not burn through. The method seems to work well, but when I grind the weld I lose much of the holding power of the weld.

Not a big deal if I do not need to grind, but when I put the top piece on, I need a flatter surface, so I need to improve my plug welding. I am thinking when I put the top on I will plug weld with a ¼ inch hole so I get more penetration and a flatter weld.

If anyone has any suggestions, I am all ears because I am kinda making this up as I go.

Steve
 

Attachments

  • DSCN0282.JPG
    DSCN0282.JPG
    3.4 MB · Views: 57
  • DSCN0287.JPG
    DSCN0287.JPG
    3.4 MB · Views: 57
  • DSCN0290.JPG
    DSCN0290.JPG
    3.3 MB · Views: 54
  • DSCN0275.JPG
    DSCN0275.JPG
    3.4 MB · Views: 52
  • DSCN0259.JPG
    DSCN0259.JPG
    3.5 MB · Views: 55
Hi Steve, what size wire are you welding with? I would use some scrap to set up and test different settings till you like it. I would not go with 1/4” holes as this will require more weld time to fill the hole so more heat and bigger chance to burn thru. Try 3/16 hole a little hotter and 2 to 3 short tacks right at the edge of the hole so you have new metal to help from burning thru. The tacks should blend together and be close to flush. You want the tack to be hot enough that it melts the new and old together without the weld building up on top. Practice, practice, practice, you will get the feel for good welds.
 
Your tacks are MUCH larger than needed. There is nothing wrong with large tacks, except it will be more work when you go to smooth them. My tacks were somewhere between 1 and 2 seconds each...just enough to hold the metal aligned when you come back with the long welds. The key is to practice aiming the wire right at the joint of the 2 metals, so they both melt about the same time.

The hard part about plug welding is to get the arc/wire to start in the very center of the lower level of metal, through the hole. Then just hold it until the puddle grows enough to automatically bring in the upper metal. A larger hole does make it easier to start on the lower metal.

Looking good!
 
Similar threads
Thread starter Title Forum Replies Date
C TR2/3/3A Frame repair and value Triumph 2
D General TR Frame repair - recommendations for NJ area Triumph 3
Popeye TR4/4A Seat frame - rust "repair"? Triumph 1
M TR4/4A Frame Support for Body Repair Triumph 5
RJS Top Frame Repair - ideas needed Triumph 8
K Is this a tough frame repair Triumph 5
O TR2/3/3A TR3 Frame Repair Triumph 1
Scot1966 TR6 Tr6 Frame repair Triumph 0
N Need body/frame repair in the Pacific Northwest Austin Healey 4
B TR6 DIY TR-6 frame repair feasibility- Triumph 15
Rick_Neves Big Healey Frame Repair - I need some suggestions Austin Healey 3
wkilleffer Top frame removal and repair MG 6
bill_young Folding top frame repair. Spridgets 2
tr6web TR6 TR6 Frame repair progress - it's done! Triumph 10
T TR6 TR6 rear frame repair Triumph 2
C Soliciting opinions, advice for frame repair Triumph 9
C Frame Repair Progress Triumph 2
tr6web TR6 TR6 Convertible frame repair Triumph 2
C TR6 TR6 Frame and Body repair Triumph 2
B For Sale Lifting & Bracing Frame Kit TR4-TR6 Triumph Classifieds 0
Editor_Reid Healey 100 Frame Diagram Austin Healey 1
J TR6 Repadding TR6 frame Triumph 0
B TR6 TR6 convertible top frame Triumph 0
zoohow BN4 Top Frame Installation Austin Healey 1
K TR6 Goodparts Trail arm kits mounting just to the frame( no body) and shims? Triumph 9
S TR2/3/3A Placing the differential on the frame Triumph 4
Racer-X- Frame mounted power brake pedal/booster/master cylinder kits for RHD cars? Restoration & Tools 1
G For Sale NEW PHOTOS: Triumph TR3 Chassis Frame + Front Suspension, Fits TR2,TR3,TR3A,TR3B Triumph Classifieds 1
BJ8Healeys Location of VIN tag, 1964 Sprite HAN8L43421 (I know it's stamped on the frame. Looking for the tag.) Spridgets 8
P Wanted Wanted: Healey 100-4 frame Austin Healey Classifieds 4
H TR4/4A Advise asked on TR 4 a frame collision/issue Triumph 20
T For Sale Excellent Original 1968 TR250 Frame with Engine & Transmission Triumph Classifieds 6
Ericstammer TR4/4A TR4A body on TR4 frame Triumph 0
BobHaskell Mini Cooper rear subframe replacement British Motor Corp 3
ActionJackson Spitfire Frame Triumph 0
AngliaGT For Sale Two Piece Top Frame - MGB '62 - '70 MG Classifieds 0
57 Healey For Sale Original top (hood) frame for BT7 Austin Healey Classifieds 8
R TR6 Frame repaired? Triumph 6
71TR6 TR2/3/3A TR3 windscreen frame corner bracket screw thread Triumph 9
7 Wedge Removing sunroof frame Triumph 5
Rut TR4/4A 4a frame modification Triumph 6
D Wanted WTB: Late Triumph Spitfire Top Frame Triumph Classifieds 8
D TR2/3/3A Windshield frame fitting. Triumph 2
algot1901 Rear Seat Bottom/Frame for 1950 Ford Prefect Other British Cars 12
JamesD BJ8 Top Frame Bumpers Austin Healey 12
TomMull Wanted Herald Hood Frame Triumph Classifieds 9
TomMull Convertible hood frame Other British Cars 3
Healey Nut Seat Base Frame Position Austin Healey 4
P TR6 TR6 Frame Stiffener Triumph 4
C TR4/4A Advice for grafting TR6 frame front to TR4A frame rear Triumph 15

Similar threads

Back
Top