• Hi Guest!
    You can help ensure that British Car Forum (BCF) continues to provide a great place to engage in the British car hobby! If you find BCF a beneficial community, please consider supporting our efforts with a subscription.

    There are some perks with a member upgrade!
    **Upgrade Now**
    (PS: Subscribers don't see this gawd-aweful banner
Tips
Tips

TR2/3/3A foot well driver side carpet

sp53

Yoda
Country flag
Offline
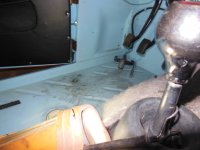
Would anyone care to share their technique on how to do the foot well driver side carpet? The indent has me. Last time I used spray clue and cut the carpet to size almost. I had the arc part on the door correct, but wheel well looked wrong. This time I am thinking contact cement the indent and then the come out from that with maybe 2 move brushed on contact cement forming and work out from the center. Let the carpet run large all the way around then trim to fit the door arch after the glue has set and any other areas.

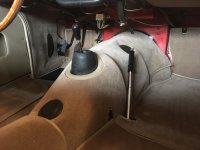
This is my second attempt. I just ripped out the first attempt

thanks Steve
 

Attachments

  • DSCN3579.JPG
    DSCN3579.JPG
    3.4 MB · Views: 155
I never used glue for that panel. The screws for the door arch hold the front up. Then, the frame for the dimmer switch holds most of the rest up and into the detent. I don't think my carpet contours fully with the detent area, though. It just follows enough to cover without getting bad wrinkles or creases. The very front is wedged under the front carpet...which is in turn held by 2 clips in each wheel well.
 
Attached is an excerpt of Edwin Tiben's TR2 rebuild, where he fixes the driver's side footwell carpet:
 

Attachments

  • Screen Shot 2021-03-29 at 9.57.22 PM.png
    Screen Shot 2021-03-29 at 9.57.22 PM.png
    3.7 MB · Views: 149
I forgot to add, when I did my interior, I followed what Edwin did and it fit nicely. (Not the best photo)
 

Attachments

  • IMG_5392.jpeg
    IMG_5392.jpeg
    300.7 KB · Views: 152
Back
Top