• Hi Guest!
    You can help ensure that British Car Forum (BCF) continues to provide a great place to engage in the British car hobby! If you find BCF a beneficial community, please consider supporting our efforts with a subscription.

    There are some perks with a member upgrade!
    **Upgrade Now**
    (PS: Subscribers don't see this gawd-aweful banner
Tips
Tips

Floor pan replacement

bugedd

Jedi Knight
Country flag
Offline
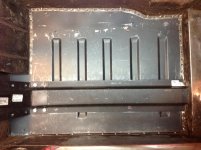
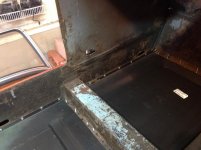
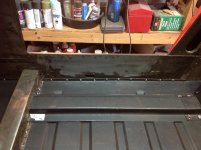
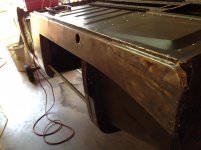
I had an expert on the restoration of British cars look at my shell and tell me a bit about floor pan replacement, as mine should be done. Is there a tutorial, video, or something out there to help walk a rookie thru this processs? I assume the pans from Moss are a good replacement part.
 
I used Moss floor pans and they fit ok, but the pre punched holes don't line up. That said, if both pans need to be replaced like mine I would go with the one piece floor. There will be some fitting required, but it saves you a lot of welding!
Rut
 
Both pans should be replaced to do things right. Looks like a ton of work
 
It's time consuming, but not difficult work...the biggest pita is drilling out the spot welds. I used the Peter Plouf method of self tapping screws to put everything together and I'm very pleased. Invest in a really good spot weld drill, cutting fluid, slow speed drill, and plenty of beer! An angle grinder is a must have as well.
Rut
 

Attachments

  • image.jpg
    image.jpg
    194.2 KB · Views: 127
  • image.jpg
    image.jpg
    193.3 KB · Views: 115
  • image.jpg
    image.jpg
    192.1 KB · Views: 119
I bought one of those and it left a cut out that had to be ground off...too much trouble. I picked up 4 5/16" Ti tipped drill bits at Atlas welding today for about $2.25 ea and they really do a good job, much better and cheaper than the ones I get at Lowes or HD. Don't know about local welding shops in your area, but they know their stuff.
Rut
 
cutting the pans out without some sort of support on the rest of the car would be a bad idea, I'd imagine, as the car could twist?? Maybe do one side at a time?
 
I used a piece of 1" emt conduit flattened on each end, bent and screwed to the upper door hinge and door lock plate for a brace. The car has been on a rotisserie for a couple of years and NONE of the measurements have changed at all. These are **** sturdy cars and as long as the sills are good you shouldn't have a problem.
Rut
 

Attachments

  • image.jpg
    image.jpg
    176.4 KB · Views: 96
I bought one of those and it left a cut out that had to be ground off...too much trouble.

If you are planing on resistance spot welding the new panels in place these cutters are about the only option. A good center punch helps to keep them from wandering.

When thru-hole welding is the only practical option I like to use smaller holes than needed to remove the original spot weld with a conventional drill. This lets me match the original spot weld diameter with the MIG. Having a panel without holes also lets me punch/drill the holes in a nice straight line rather than having to follow the original.

No, I'm not OCD. I'm CDO - got to keep the letters alphabetical. :friendly_wink:
 
I'm trying to justify it for future projects! I've been pleased with the drill bits I've used, but it just takes so long to do all of them. I'm seriously considering a Harbor Freight 110 volt spot welder for those places it can fit.
Rut
 
I'm seriously considering a Harbor Freight 110 volt spot welder for those places it can fit.
Rut

I've not used the HF welder but it looks identical to the one I bought many years ago. There is a small learning curve and the metal needs to be clean on all the surfaces being welded and well clamped, but the result is fast and neat. With a bit of imagination and some heavy welding cable you can use the power head and make some custom jaws to reach odd spots.
 
Back
Top