
-
 Hey Guest!
British Car Forum has been supporting enthusiasts for over 25 years by providing a great place to share our love for British cars. You can support our efforts by upgrading your membership for less than the dues of most car clubs. There are some perks with a member upgrade!**Upgrade Now**
(PS: Upgraded members don't see this banner, nor will you see the Google ads that appear on the site.)
-
 When posting a classified ad, you MUST select a prefix from the drop-down next to the subject line. If you don't you will get an error and your ad will not be posted!

Tips
- We have a special forum called "Member Articles" where you can submit actual articles for consideration for publication. Learn More
- Don't have an Avatar? If not, your avatar will default to the 1st character in your username. Go into "Account Details" to change your Avatar.
- Some basic forum navigation info: click
 Hey - did you know if you click on the title of a thread it will take you to the first unread post since you last visited that thread?
- Hey Guest - Is your British Car Club in our Clubs database? If not, send me a PM - Basil

- Looking for a local club? Click the "Clubs" tab above and browse hundreds of clubs world-wide.
- Add Android or iPhone APP: click
- Did you know - any picture or video you add in your posts in any marque-specific forum will also get added to the Media Gallery automatically.
- A few more tips about posting and replying: click
- Hey there Guest - be sure to keep your profile page up to date with interesting info about yourself: learn more
- More tips and tricks on Posting and Replying: click
 but were afraid to ask:
  STOP!! Never post your email address in open forums. Bots can "harvest" your email! If you must share your email use a Private Message or use the
  smilie in place of the real @
- Want to mention another member in a post & get their attention? WATCH THIS

- So, you created a "Group" here at BCF and would like to invite other members to join? Watch this!
- Hey Guest - A post a day keeps Basil from visiting you in the small hours and putting a bat up your nightdress!
- Hey Guest - do you know of an upcoming British car event?
 Pretty Please - add it to our Events forum(s) and add to the calendar! >> Here's How <<
- Hey Guest - you be stylin' Change the look and feel of the forum to fit your taste. Check it out
- If you run across an inappropriate post, for example a post that breaks our rules or looks like it might be spam, you can report the post to the moderators: Learn More
- If you would like to try some different "looks" or styles for the site, scroll to the very bottom, on the left and click the Style Selector.
You are using an out of date browser. It may not display this or other websites correctly.
You should upgrade or use an alternative browser.
You should upgrade or use an alternative browser.
engine removal- where to connect hoist?
- Thread starter Roberte
- Start date
BJ8Healeys
Jedi Warrior
Offline
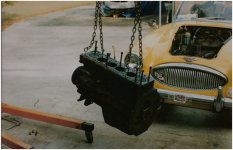
Remove the head, which makes the load about 70 - 80 pounds lighter and gives access to the head studs. You can attach the lifting chains to the studs. The photo is a bit small for good detail and was more than 20 years ago so my memory is a bit fuzzy; but you can see the rods with circular hooks on the end that threaded into some of the holes in the head.
Attachments
Bob_Spidell
Yoda
Offline
We used the head studs too. We put short lengths of pipe on 2 studs so we could loop the chains at the base of the stud, then put a nut and washer on the top of the studs to hold the pipes down. This way, you're not putting side loads on the studs; they're pretty strong but I think you could still bend them if you lift from the top.
Keith_M
Jedi Knight
Offline
I've done this two ways: using the head studs and attaching chains to various bolt holes near the front and back. I think the latter was a better solution because it allowed me to tilt the engine. When using the head studs, the transmission was out of the car already, so I could lift straight up. Pictures below.


Offline
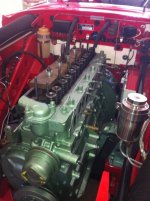
I've used some BMC engine lift brackets attached to the long cylinder head studs that fasten the valve cover:

Depending on the width of the legs of your cherry picker, you may need to jack up the front wheels to be able to slide the picker back sufficiently. If you leave the trolley jack under the front crossmember you can then lower it when the engine clears and roll the car out from under. Be very careful, I had a friend drop his engine on the front of the shroud during removal. Not pretty.

Replacement is reverse of removal .... mostly.

Depending on the width of the legs of your cherry picker, you may need to jack up the front wheels to be able to slide the picker back sufficiently. If you leave the trolley jack under the front crossmember you can then lower it when the engine clears and roll the car out from under. Be very careful, I had a friend drop his engine on the front of the shroud during removal. Not pretty.
Replacement is reverse of removal .... mostly.
Offline
The last one I did, I used the long studs as described by Rick, and used the tilting tool from Moss as shown by Keith. Worked fine.
Healey Nut
Luke Skywalker
Offline
Offline
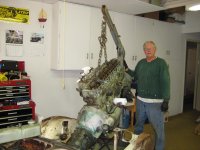
I'm pretty sure that the book discribes lifting the engine with the trans and od attached by attaching chains to just the two bolts protruding thru the valve cover. I was deathly afraid to do that. Just couldn't imagine all that weight hanging on those two bolts. I rigged it up by attaching four chains, 2 from the front, which one was attached to the front engine plate and one to a head bolt. The two rear chains were attached one to a rear head bolt and one to the rear plate at the starter location. I talked to Bruce Phillips at Healey Surgeons about it and he told me my way had the risk of breaking the front and rear engine plates because those pieces were not intended to angular stresses away from veritcal. He might be right but I liked my way better and that's the way I did it. I included a leveling device for front to back angulation and also "L" shaped brackets on the right side so that I also could tilt the assembly left to right if necessary. I requires alot of front to back angle to slide the whole thing in. I also jacked up the back end of the car to try to reduce the angle required with the engine crane. See pick.
Attachments
Offline
Funny how we all (myself included) get nervous about lifting from the two valve cover studs but when you look at the carburetor lift plate on my V8, it's just held on by those four carb mounting studs that go into an aluminum manifold and are a lot smaller than the Healey cylinder head studs. And big V8s have been swapped out with a carb plate for years.
Bob_Spidell
Yoda
Offline
... big V8s have been swapped out with a carb plate for years.
Yep, but I'll bet a lot of the big V8s weigh less than a 3L AH engine with the gearbox and OD attached.
red57
Jedi Knight
Offline
Sorry guys but I think some are over-thinking this - see the Bentley book, page 32, figure A.2. and page 33, figure A.5. clearly shows and describes lifting the complete engine & gearbox by two 'suitable lifting brackets' attached to the two long rocker studs.
It's the only way I have ever done it and I've never had any trouble, nor have I heard of anyone having any trouble with this method.
It's less than 1000# hanging from two 3/8" studs.
I just googled tensile strengths and found that even 'grade 2' 3/8 have a proof load of 4250 for coarse thread and 4800 for fine thread and the tensile strength is 5750 coarse thread and 6500 fine thread. Should be enough.
The factory must have thought about liabilities when they told us how to do something even back then......
Dave
Offline
Good show Red, but I have always had trouble following authority. But I do say you are right. And Bruce Phillips of Healey Surgeons, also a good authority, agrees with you not me. I did like my ability to control the left/right tilt. the assembly went in without a hitch. My research at the time said that the engine, trans, and OD combined weighs about 730 lbs. That alot more than most, if not all American V8s.
Rob Glasgow
Jedi Knight
Offline
I used the two long studs on the head. It did bend them a bit and I was apprehensive during the process but everything held. Both coming out and going in. Of course I had the benifit of having the front shroud removed this time. I did pull the engine using the same technique 45 years ago through the bonnet opening. It certainly is one of those moments that you're glad when it's done.
Attachments
So after you realized you put the wrong engine back in, did you have to do it all over again? :smile-new:I've used some BMC engine lift brackets attached to the long cylinder head studs that fasten the valve cover:
View attachment 50335
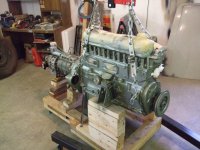
Depending on the width of the legs of your cherry picker, you may need to jack up the front wheels to be able to slide the picker back sufficiently. If you leave the trolley jack under the front crossmember you can then lower it when the engine clears and roll the car out from under. Be very careful, I had a friend drop his engine on the front of the shroud during removal. Not pretty.
View attachment 50336
Replacement is reverse of removal .... mostly.
View attachment 50337
Online
Lolol
Offline
So after you realized you put the wrong engine back in, did you have to do it all over again? :smile-new:
Surprisingly, no.
[video=youtube;oSofUMrwQX0]https://www.youtube.com/watch?time_continue=3&v=oSofUMrwQX0[/video]
bob hughes
Luke Skywalker
Offline
Due to the height of my garage I had to remove the head first.
Then I used a couple of lifting straps, one around the pulley at the front and one around the flywheel at the rear. I biased the system so that the hook would be forward allowing the engine to tilt backwards, and that was it. I raised the engine and then pushed the car back and then mounted the engine onto a home made engine stand that had wheels.

Bob
Then I used a couple of lifting straps, one around the pulley at the front and one around the flywheel at the rear. I biased the system so that the hook would be forward allowing the engine to tilt backwards, and that was it. I raised the engine and then pushed the car back and then mounted the engine onto a home made engine stand that had wheels.
Bob