 but were afraid to ask:
Earlier I solicited advice on removing the filler plug on my BN6's differential filler plug (as they say, always make sure you can remove the filler plug before taking out the drain plug). I know this car's differential was rebuilt during the PO's ownership, so I am assuming the plug was out then--within the past five years. I had determined that neither a 3/8" or 1/2" ratchet would work (the first too small, the second too large) and suggested the plug takes a 7/16" ratchet end. I've never seen one of those, so I took the suggested measure, I purchased a spare 1/2" drive and ground it down to fit the 7/16"hole (imperfectly, I might add). All of my efforts to break the plug loose were unavailing--these two included two (judicious) applications of the propane torch, Kroil, cursing, etc., etc. Finally, I took a 1/4" flat faced round punch and started tapping in an effort to turn the plug. This eventually cracked one segment of the plug, meaning the wrench will no longer work. I now see two options, drilling a hole in the plug (not easy to get an alignment to drill the **** thing), and then using an Easy Out. This, if it worked, would require a super cleaning of the unit's interior. Or maybe better, and this just dawned on me, removing the bolts around the circumference of the cover so that it can be removed to permit a more robust attack in the filler plug. This assumes the cover plate bolts will come free. So, any better suggestions, and does anyone know the capacity of the differential? And yes, does anyone know if the plug is a standard size. I ask this because I just visited the local suppliers looking for a couple of replacement nuts for a rear wire wheel hub (spindle?) and found that though 7/16" by 20 tpi lug nuts are available, they are far larger in outer diameter than the Healey breed.

-
 Hey Guest!
British Car Forum has been supporting enthusiasts for over 25 years by providing a great place to share our love for British cars. You can support our efforts by upgrading your membership for less than the dues of most car clubs. There are some perks with a member upgrade!**Upgrade Now**
(PS: Upgraded members don't see this banner, nor will you see the Google ads that appear on the site.)

Tips
- We have a special forum called "Member Articles" where you can submit actual articles for consideration for publication. Learn More
- Don't have an Avatar? If not, your avatar will default to the 1st character in your username. Go into "Account Details" to change your Avatar.
- Some basic forum navigation info: click
 Hey - did you know if you click on the title of a thread it will take you to the first unread post since you last visited that thread?
- Hey Guest - Is your British Car Club in our Clubs database? If not, send me a PM - Basil

- Looking for a local club? Click the "Clubs" tab above and browse hundreds of clubs world-wide.
- Add Android or iPhone APP: click
- Did you know - any picture or video you add in your posts in any marque-specific forum will also get added to the Media Gallery automatically.
- A few more tips about posting and replying: click
- Hey there Guest - be sure to keep your profile page up to date with interesting info about yourself: learn more
- More tips and tricks on Posting and Replying: click
 STOP!! Never post your email address in open forums. Bots can "harvest" your email! If you must share your email use a Private Message or use the
  smilie in place of the real @
- Want to mention another member in a post & get their attention? WATCH THIS

- So, you created a "Group" here at BCF and would like to invite other members to join? Watch this!
- Hey Guest - A post a day keeps Basil from visiting you in the small hours and putting a bat up your nightdress!
- Hey Guest - do you know of an upcoming British car event?
 Pretty Please - add it to our Events forum(s) and add to the calendar! >> Here's How <<
- Hey Guest - you be stylin' Change the look and feel of the forum to fit your taste. Check it out
- If you run across an inappropriate post, for example a post that breaks our rules or looks like it might be spam, you can report the post to the moderators: Learn More
- If you would like to try some different "looks" or styles for the site, scroll to the very bottom, on the left and click the Style Selector.
You are using an out of date browser. It may not display this or other websites correctly.
You should upgrade or use an alternative browser.
You should upgrade or use an alternative browser.
Differential Plug Fitment
- Thread starter RDKeysor
- Start date

Offline
I had this same problem a few years ago and found I had a Sears cold chisel which is 7/16" square. When I ground the mushrooming off the end it fit perfectly into the square hole in the plugs. Used a crescent wrench on it to remove the plugs.
Failing that, it would be possible to get a piece of 1/2" square stock and grind the end down to fit the hole.
After that, suggest replacing the plugs with the allen plugs Moss sells.
If they're stuck that much, maybe the PO used red loctite, in which case they'd need to be heated to 400 degrees to release

Offline
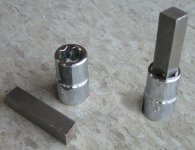
Here's a photo of a simple to make tool for the job. Buy a 8pt socket and a piece of 7/16" stock. My local hardware store carries both but it's not a Hm Depot.I had this same problem a few years ago and found I had a Sears cold chisel which is 7/16" square. When I ground the mushrooming off the end it fit perfectly into the square hole in the plugs. Used a crescent wrench on it to remove the plugs.
Failing that, it would be possible to get a piece of 1/2" square stock and grind the end down to fit the hole.
After that, suggest replacing the plugs with the allen plugs Moss sells.
If they're stuck that much, maybe the PO used red loctite, in which case they'd need to be heated to 400 degrees to release
Attachments
Bob_Spidell
Yoda
Offline
Don't understand why cracking one side of the plug means you can't wrench on it, but I've had success using a 3/8" air impact wrench to remove stubborn screws and bolts.
Steve G is correct in observing that the backside of the differential is not removable. As I mentioned, I purchased a set of ratchet connectors, 1/2" to 3/8", etc., as suggested by a forum member earlier. I reduced the 1/2" piece to 7/16" square by simply grinding it down to size. The immediate problem is that a large diameter steel bar runs across the underside of the car just behind the differential plug. This makes it impractical to use the 3/8" ratchet because of a lack of clearance. Yes, I could have removed the steel bar, and I might eventually do that. Instead, I tried holding the homemade wrench with a small vise grip. Unfortunately, the aperture in the plug is very shallow, and the wrench wants to slip out of it since it is hard to apply force directly because of the mentioned steel bar. Now that I have cracked a segment in the plug wall at two corners by tapping on it with a punch, I think it will be even harder to get my wrench to engaged. The notion of drilling the plug and trying to remove it with an easy out also must contend with the fact that I don't have a right angle drill. I realize that if I drill it, I will also have to test the drain plug to insure that I can get it out. There is a bit of oil emerging from the drain plug, which is one reason I want to check the oil level in the differential. I still may try the suggested 7/16" square piece. I can probably get more force with that while turning it with a large Crescent wrench.
CanberraBJ8
Jedi Trainee
Offline
Perhaps its time to remove the axle from the car so you can work on it more easily. Sometimes the time it takes to set the scene for easy work is less that messing about in discomfort and less damage done...
Offline
...I still may try the suggested 7/16" square piece. I can probably get more force with that while turning it with a large Crescent wrench.
IMHO this is the way to go - since you only have to do this every few decades. Once you get the 7/16" stock per Patrick above the rest is easy. Piece of cake!
If you can't find the 7/16" stock locally, here you can buy a piece of it online for just over $5:
https://www.onlinemetals.com/merchant.cfm?pid=16123&step=4&showunits=inches&id=1&top_cat=0
British_Recovery
Jedi Warrior
Offline
If all else fails to remove the plug, before you remove the whole axle, think about removing the pumpkin from the front. This will show you the inside of the plug. Any drilling and it's mess could be easily cleaned up. Hope it works without having to do that though. Bob
Offline
I agree with Derek. If the plug is buggered you may only get one more shot at removal before you have to resort to extreme measures like axle removal or drilling the plug (which basically means you'll have to disassemble the rear axle to make sure all the swarf has been removed). I'd remove the Panhard bar and fashion the tool made out of bar stock that Patrick has pictured. Heat the area around the plug with a Mapp torch from the outside and using a long breaker bar on the socket tool try to get the bar stock as straight as possible in the plug and hope for the best.
bob hughes
Luke Skywalker
Offline
As a last resort and if all else fails, and before you remove the axle casing from the car, pull back your half shafts, remove the pumpkin catching the oil as you go. stuff a couple of rags into the axle casing - up the half shaft lines and lay in some rags at the bottom of the housing, all this to catch and prevent the spread of swarf. Use a drill with slow revs and drilling grease, that should help with retaining the swarf. Go easy on the drill sizes, stepping up a size each time, then when the plug wall is thin, collapse it in by gently driving a thin spike or old screw driver down the side of the plug. I have an idea that the plugs are marginally tapered as they may well be pipe threads, but can not be 100% sure.
Best of luck

Bob
Best of luck
Bob
Offline
They are tapered. If they are pipe threads, they are probably an odd size..... I have an idea that the plugs are marginally tapered as they may well be pipe threads, but can not be 100% sure.
Best of luck
Bob
I'm happy to report that I have been able to remove my differential plug by the simple expedient of grabbing the threaded portion protruding from the differential with a pair of Vise Grips and working the plug back and forth. It is 14 threads per inch and about .814 in diameter, which approximates 13/16". Yes, having used countless other attempts to remove the plug, I hit on the obvious one I had overlooked Believe it or not, I acquired this pair of Vise Grips in an attempt to extract the trans-axle plug from a Porsche 944 several years ago. Unfortunately, there was very little of the Porsche's threaded plug available to grab with the Vise Grips, and it may still be in there--wherever that car has gone. To recapitulate, I first purchased a set of ratchet converters and ground the 1/2" one down to 7/16", the size of the hole in the plug. The other end accepted a 3/8" socket. I was unable to budge the plug, even with a section of pipe on the wrench handle. I applied Kroil, then a mixture of acetone and ATF, supposedly the best mix for breaking loose seized threads. I also did three applications with a propane torch, though I must admit to having been very cautious. Eventually I removed the Pannard rod that runs from one side of the frame to the other directly behind the differential in an effort to get a better avenue of attack. I don't know if any of this prepped the plug for removal, but I must say it yielded rather easily to the Vise Grip treatment. Once I had the plug out, I found that my 7/16" plug wrench was not getting all of the way to the bottom of the plug's hole, which probably caused the tendency of my tool to spin out of the plug. The drain plug, which had oil around its perimeter, came out rather easily I'll probably put a bit of Teflon tape on it when I reinstall. My thanks to all of the input. Got to say there was no way I was going to try to remove the rear axle to better attack the pllug. Yikes!
Offline
Seems like a lot of grief. Urge you to pop for one or two of the Moss plugs and an allen wrench for same. End of problem. I used the teflon tape too, but was warned by an old timer to be careful of tightening them too tight with teflon tape as you can crack the mounting boss.