• Hi Guest!
    You can help ensure that British Car Forum (BCF) continues to provide a great place to engage in the British car hobby! If you find BCF a beneficial community, please consider supporting our efforts with a subscription.

    There are some perks with a member upgrade!
    **Upgrade Now**
    (PS: Subscribers don't see this gawd-aweful banner
Tips
Tips

De-bondoing rear view mirror holes

drooartz

Moderator
Staff member
Gold
Country flag
Offline
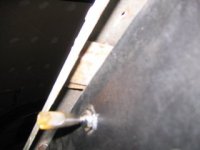
Now that I can get to the Tunebug, it's time to start on some projects. The first one is to uncover the 2 holes in the scuttle for the rear view mirror. At some point when the car was repainted the holes were covered over. Looking up from beneath, I can see that at least one of the 2 captive nuts is still in place (can't really get to where you could see the other with the dash in place).

I can sort of see where the holes are from the top, as there are some dimples in what looks to be the correct place. My assumption is that the best method is to remove the steering wheel and dash, and drill up from underneath, through the centers of the captive nuts. Don't know if I'm brave enough to guess from the top side.

Any better ideas? Also, can someone remind me what size socket I need for the steering wheel nut?
 
Drilling from the bottom up might cause unwanted tearing and flaking.
 
Think it is 1 1/16 but 1 1/8 will work as well.
 
Drill up with a very small drill (1/8" or so) and then drill down from the top with the full size one (VERY carefully so you don't remove the threads in the nut!!)
Bill
PS I would wrap the 1/8" drill in a wrap of electrical tape to both center the drill on the nut and to protect the threads.
 
Once you are through from the bottom with the 1/8" bit, I would very lightly (just cut the paint) come down from the top with the right sized bit and then use a tap for the rest of the way through which should clear bondo from the threads easily enough!
 
Bill -- I like the idea of the small drill bit wrapped in tape, for a from-the-bottom drilling. Guess I'll have to bite the bullet and remove the dash.
 
Dash not too hard Drew, just remove throttle cable, choke cable and oil press line at the engine side.

one nut up in center, one at either end of dash. two small ones kind of mid way for supports on the bottom. Remove wheel and tilt the thing back toward you. Reinstall is the reverse. Always wanted to say that.

I had mine out and back in today.
 
You give me hope, Jack. I need to pick up a socket for the wheel next week, then I'll be ready to give it a go.
 
I would us a dremel and bit to work it from the top down. You can be pretty careful with a finer instrument. Use the side of your hand to rest and guide. Hopefully there will not be a "slip", however, the mirror base should cover a slight imperfection.

If you use a dremel from the top you should be able to stay out of the nuts.
 
Didn't even think of the Dremel, one of the most versatile tools ever invented. Hmmm...
 
"If you use a dremel from the top you should be able to stay out of the nuts."

Drill the small hole up from the bottom first to locate the point of attack.
 
Just took a quick look while I was out there, and I'm definitely going to have to pull the dash either way. Too hard to tell from the top where the original holes were. A project for next week.

The plan is to drill some pilot holes from the bottom, then use either dremel or some small rat tail files to open the holes from the top. The base of the mirror will cover any small oopses (I hope).

It will feel good to be back working on the Tunebug after all this Midget work this winter. /bcforum/images/%%GRAEMLIN_URL%%/grin.gif
 
Too bad you have to pull the dash Drew. Good luck. If you are going to drill from the bottom up, you might put some tape on the top of the dash. I think this would help with unnecessary "flaking."
 
I've got a better idea, how about from the bottom up without removeing the dash?

Bondo is kind of soft to a dril bit. take an eight inch one by your friendly welder had have it made about eight inchs or so long, measure first, then turn the darn thing with a very small pair of vice grips while pushing up on it with your leather gloves.

any way something like that.
 
How about a length of stiff wire like rod ground to a point and flattened on each side. Chuck it in your doall.
 
Use the wire from a choke cable the solid kind leave it in the sleeve cut to length and mess up a cutting end, turn it with a slow elec drill of some sort, ought to be quite accurate with this and not hurt the nuts.

You can reach all the way to those holes up under the dash on either side of the ign switch. Kinda tight but doable.

That's all folks, that's how I would do it. Was kinda thinking out loud, sorry for that.
 
Just went out for a looksie (hey, 15f is warm enough). I took off the front cockpit surround trim piece so I could get a slightly better look. I've identified a small problem with my up-from-the-bottom approach.

There is a welded in brace that runs directly under the 2 captive nuts. I can see both of the nuts clearly from the sides, but the brace is right under them, so no hope of being able to drill up through the nuts.

Anyone able to measure for me where their holes are? I'd need distance to the edge of the cockpit (without the trim), center-to-center distance between the 2 holes, and also distance side to side from that center trim screw hole (that would be my reference point. I'm thinking I'm going to have to measure carefully and take a best-bet stab down from the top now. I can sort of see some indentations in the paint where I think the holes are. That might have to do.

I've got a repro mirror to use, which gives me a template of sorts. Just need to know where to place it, and hope for the best.
 
Here's what it looks like from below. The bracket runs all the way to the firewall, and the 2 nuts are right above it.
 

Attachments

  • 4305-bracket.jpg
    4305-bracket.jpg
    17.2 KB · Views: 84
Will get you the measurements tomorrow Drew, but your eyeball and a strong light just may show you the dimples where the bondo shrank.

That support you spoke of has one bolt in it to the center of the dash at the top.
 
Thanks, Jack.
 
Back
Top