• Hey Guest!
    British Car Forum has been supporting enthusiasts for over 25 years by providing a great place to share our love for British cars. You can support our efforts by upgrading your membership for less than the dues of most car clubs. There are some perks with a member upgrade!

    **Upgrade Now**
    (PS: Upgraded members don't see this banner, nor will you see the Google ads that appear on the site.)
Tips
Tips

TR2/3/3A Cubby hardware question

RC64

Jedi Hopeful
Country flag
Offline
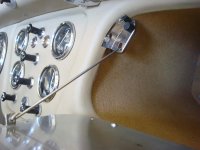
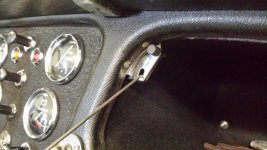
On my TR-3A I've got the dash installed and the cubby lid is attached. I'm in the process of "fitting"
the cubby box itself but I'm not sure how the stayrod bracket and the other buffer bracket on the right side should be mounted. For example, is the entire stayrod bracket mounted on the dash opening so both surfaces are visible? Or is the bracket attached on the inside of the dash so only the surface with the holes is visible? I used some good vinyl that is a bit thicker so the fit of the lid is quite tight. As a result I'm reluctant to try to jam the lid over the bracket. Suggestions?

I'm looking at items 9 and 12 in the photo.

Rick...
cubby brackets.jpg
 
Hope this helps, but it can be a tight fit.
 

Attachments

  • DSC04910.jpg
    DSC04910.jpg
    53.4 KB · Views: 146
Same thing here. I remember it being a bit snug, and I have everything covered in leather.

IMG_1101C.JPG
 
Or maybe like this.

Thanks for all the photos gentlemen. I see that it could work either way. However, I was fiddling with it again today and I'm afraid it will be so tight with it on the outside that it's liable to damage the vinyl. The new box I bought has a recess in that location so a couple of stubby screws and speed nuts should work if I mount it before the box goes in.

Joe, I can also see the screw in the back on the lower left. Does that support the rear of the box enough or did you have to add any other support?

Rick...
 
Art...

I'm intrigued by the Air / Fuel Ratio gauge in your photo. I'm in the process of trying to tune the carbs now and that seems like it might be a great help. Would you have any other information on that unit... how it's connected... source? Or better yet, does it work good?

Rick...
 
Art...

I'm intrigued by the Air / Fuel Ratio gauge in your photo. I'm in the process of trying to tune the carbs now and that seems like it might be a great help. Would you have any other information on that unit... how it's connected... source? Or better yet, does it work good?

Rick...

Actually, it is a help, as I have modified my engine quite a bit. I have 87mm pistons, a 282 deg cam. milled the head about 0.80" and have a header. The A/F ratio gauge that's currently in there is a narrow band Westach with a generic heated O2 sensor. The instructions that came with the Westach shows how to wire it in with the O2 sensor. I have a wide band set-up that will provide better and more accurate readings, but I just haven't gotten around to putting it in yet. The narrow band will at least tell you if your too rich or lean, which is what I was initially interested in. I have grandiose ideas about putting in electronic fuel injection, and the wide band would be a big help there, although not imperative. I drove the car around quite a bit yesterday, and except for running pig rich at idle, the readings looked pretty good since I put in a set of "RH" needles, although I think I might want to try a set of "RAs".

It's a useful tool if you like to play around with this kind of stuff.

BTW, here's a great on-line program for comparing SU needles. you can compare your original size (SM in the TR3) to four others.

https://www.mintylamb.co.uk/suneedle/

I apologize for the thread drift...:smile-new:
 
Art...

Thanks for all the detail. I'm running the original stock engine, carbs and needles but am in learning mode. The local engine gurus (non TR folks, but ones who are very good at this) feel that I'm still running rich so I'll definitely be experimenting and will explore the technology you mentioned. It would be neat to be able to analyze your mixture real time. I tend to be a sucker for techie stuff like this. Promise you won't tell my wife I'm buying MORE parts for the TR. :friendly_wink:

A google search on Westach turned up a bunch links including a thread with posts by you and others on this forum back in 2009. I've got some good reading to do.

Rick...
 
Yes, that is the standard bracket, no other support needed.

I added a narrow aluminum band across the bottom glove box to hold it from drooping from heavy items. It doesn't show unless you look for it and is fastened to the dash brackets.

That rear screw only holds it on the one rear corner and wasn't enough for my use.
 
I ended up installing it on the inside also, as you've shown in the photo. I tried it on the outside first, but it was way too tight. It wouldn't be long before it would damage the vinyl. I also decided that there isn't a need for the bumper on the right side since the lid won't close far enough to even come in contact with it.

Rick...
 
Finally had a chance to make it to where I've got the TR3A stored. This car has never been restored and the dash is the original Silverstone Grey so I'm pretty sure this has probably never been apart. Like Joe and Geo, I would say inside was original.

 
I ended up installing my bracket on the inside as well. The door wouldn't shut with it on the outside. Besides, it looks better like it shows in your photo.

Rick...
 
Back
Top