Hey Guest!

 Hey - did you know if you click on the title of a thread it will take you to the first unread post since you last visited that thread?
 but were afraid to ask:
  STOP!! Never post your email address in open forums. Bots can "harvest" your email! If you must share your email use a Private Message or use the
  smilie in place of the real @
 Pretty Please - add it to our Events forum(s) and add to the calendar! >>
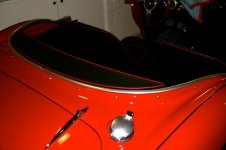
Howdy all: I have a BT-7, hence no roll-up windows, and the rim of the cockpit has the screw-on aluminum trim...rails? Whatever those are called. Two q's:
1) I very vaguely recall reading somewhere that these trim pieces should not be cleaned/polished. Something about the finish. Maybe I'm off base on that but I'm on the verge of doing a slight body restoration project and don't want to botch this. My plan was to use a non-abrasive auto metal cleaner followed by a polish like Happich Simichrome. Good idea or bad?
2) I can brute force the answer (ie test various screw sizes in bins), but does anyone know offhand the size of the chrome sheetmetal screws that hold these trim pieces to the door? I can figure it out by trial and error but if someone knows off the top that'd be great. Worth asking.
Many thanks,
-Tom