• Hi Guest!
    If you appreciate British Car Forum and our 25 years of supporting British car enthusiasts with technical and anicdotal information, collected from our thousands of great members, please support us with a low-cost subscription. You can become a supporting member for less than the dues of most car clubs.

    There are some perks with a member upgrade!
    **Upgrade Now**
    (PS: Subscribers don't see this gawd-aweful banner
Tips
Tips

clutch bleeder extension

  • Thread starter Deleted member 21878
  • Start date
D

Deleted member 21878

Guest
Guest
Offline
i saved an old brake line that i was going to use to make an extension to bleed the clutch. but i can't seem to find a coupling long enough to handle both the valve and the tube. can any suggest where i can find one?

Thanks
 
You'll need to make bubble flares or use adapters. This is the schematic view of the adapter:
Caveat: adapters may not work with Girling tube nuts. SAE style nuts have threads all the way down to the flare.
ClutchBleederExploded.JPG


This looks like the fitting the late Doug Reid used. The bubble flare inside works as a seat for the bleeder screw.
screenshot.1132.jpg


Summit and Speedway have this:
screenshot.1130.jpg
 
steve,
Thanks. i think i will take the easy way out and buy the kit.... getting lazy in my old age.
 
Hate to tell you but I did exactly what you intended a while ago. I needed to go to Home Depot on a different errand and brought the line with fittings with me. I easily found a fitting and did a test fit. The coupling was under $3 (if I remember correctly) and I didn't have to go to the local Auto Parts.

An easy and convenient addition.
Ray(64BJ8P1)
 
I made the equivalent of the Quartermaster bleed kid from a bunch of bits I had sitting around and a purchased Wilwood bleeder kit.
I had no idea you could buy one. However, I made the line about 3 foot so I could get it away from everything and in front of my Bugeye radiator.
 
Hate to tell you but I did exactly what you intended a while ago. I needed to go to Home Depot on a different errand and brought the line with fittings with me. I easily found a fitting and did a test fit. The coupling was under $3 (if I remember correctly) and I didn't have to go to the local Auto Parts.

An easy and convenient addition.
Ray(64BJ8P1)

Ray - the one pictured above from FedHill looks like an ordinary fine-thread coupling, but has two bubble flare seats in it. Did you find one like that or is it a 3/8"-24 coupling - threaded all the way through?

BleederConnector.JPG
 
Last edited:
Bein CHEEP::friendly_wink:

I simply cut the head off the top mtg bolt for the cylinder, use it as a guide pin and remove the bottom bolt, clyn drops down where it is simple to bleed it.

Course now these supply places were not around back in the day.
 
Steve,

I can't be certain without taking the unit apart as it was done a while ago but I think it went completely through and expect the bleed valve would seat in the line flair. Not perfect but it is something I would need to open and close very infrequently and not need to put force in closing down. The unit you picture with the built in valve seat would be a more reliable alternative to a straight through coupling but during the years in place I may have touched the bleeder only once or twice at most.

Ray(64BJ8P1)
 
i ended up ordering a fiting from FedHill. i expect it any day. i was putting in my slave cylinder and was going to use my brake line. well first of all no wonder people make an extension. that has got to be a bear to bleed. anyway when i went to put the brake line in the one end was messed up. i could not get it to thread. i was about to just order the kit tbut then realized i had a flexible brake line for the rear of the car left over from a kit.
it is about 12" long. right now it comes out about as high as the starter solenoid wiring and once i add on the union and bleeder, should be at least even with the top of it. i have it wire tied to the starter wire but once i get the union i may change that. i think the threaded end of the line is long enough i will be able to run a nut under the union. So i can easily make a little bracket and drill a hole to pop this line thru. then i can move it a little and brace it.
My only concern right now is that it may not seal at the slave cylinder end. not sure if the fitting on that end was what i need.
DSCN0407.jpg
 
Looking at the rear axle hose (lowest one in pic): one end is flat and uses an aluminum crush washer - this will go in the top of the slave; the other end, conical, will seat in the FedHill connector.

I believe the Moss Classic Gold slave I bought last year had a machined surface on the top port to accept a crush washer.

You might want to get a 3/8-24 jam nut to tie the conical end to the FedHill connector. The nut could hold the connector end to your mounting bracket.

BrakeHoseSetSS.jpg
 
Last edited:
steve
exactly what i was thinking.
if it works then it seems a lot easier than trying to bend a pipe to make the same end result. at one point i even thought i would just leave it under the tunnel but i could see there may be a time you have to bleed and do not want to pull the tunnel out. So i went in the engine bay.
 
Steve
Thanks for the info on the coupling above. i got mine in and installed it all today. the bracket is pretty basic. i could probably have left it wire tied to the starter cable but this way works fine also. i left it at the angle shown below because it made the bleeder valve easy to get a wrench on to bleed.

i thought later that if i had run the line into the tran tunnel, i could probably bleed it by myself sitting in the car. Something i may change later. that is one nice thing about using the flexible line. you can move it most any direction.

IMG_2189.jpg
 
For those of us in the U.S. who would rather purchase a "kit" of parts with everything needed to get the job done, there is such a kit put together by Steve Christiansen of Old Phartz Partz:

https://www.olphartz.com/


Although the kit is listed for the Sprite, it went in easily for my BJ8 as well.

The SpeedBleeder is a nice touch and the mounting bracket does the job but will need a a small bit of adaptation.

Cheers,

~ Joe
 
Last edited:
Joe,
Thank you for the post. A couple of things you did not mention. The Speed Bleeder makes this kit a ONE man bleed. The line is not just any old piece of AN hose like the others pictured in this thread. The line is of course the standard Teflon hose but it it sheathed in a Kevlar hose then wrapped in Carbon Fiber before the steel braid goes on. The fittings are 1 piece so when they are crimped , they will not break or come loose. After all of this a coating of clear vinyl shrink tubing coats the hose. You could grenade the engine and the hose will survive. You could run the engine bay temperature up to 500 degrees and the line will survive (heat shrink might not). These lines are quiet long and should get you close to the master cylinder for proper bleeding. Cost is a bit more but you get a great deal more for your money.

Sorry for the bit of bragging here but I think we make a superior product. I thank you Joe for purchasing one and letting me know they work in Big Healeys.
 
Steve G.

I have not fabricated the bracket or bracket adapter as yet and I keep the car at my summer place in Southampton, NY about 70 miles from where I live here in Oceanside, NY.

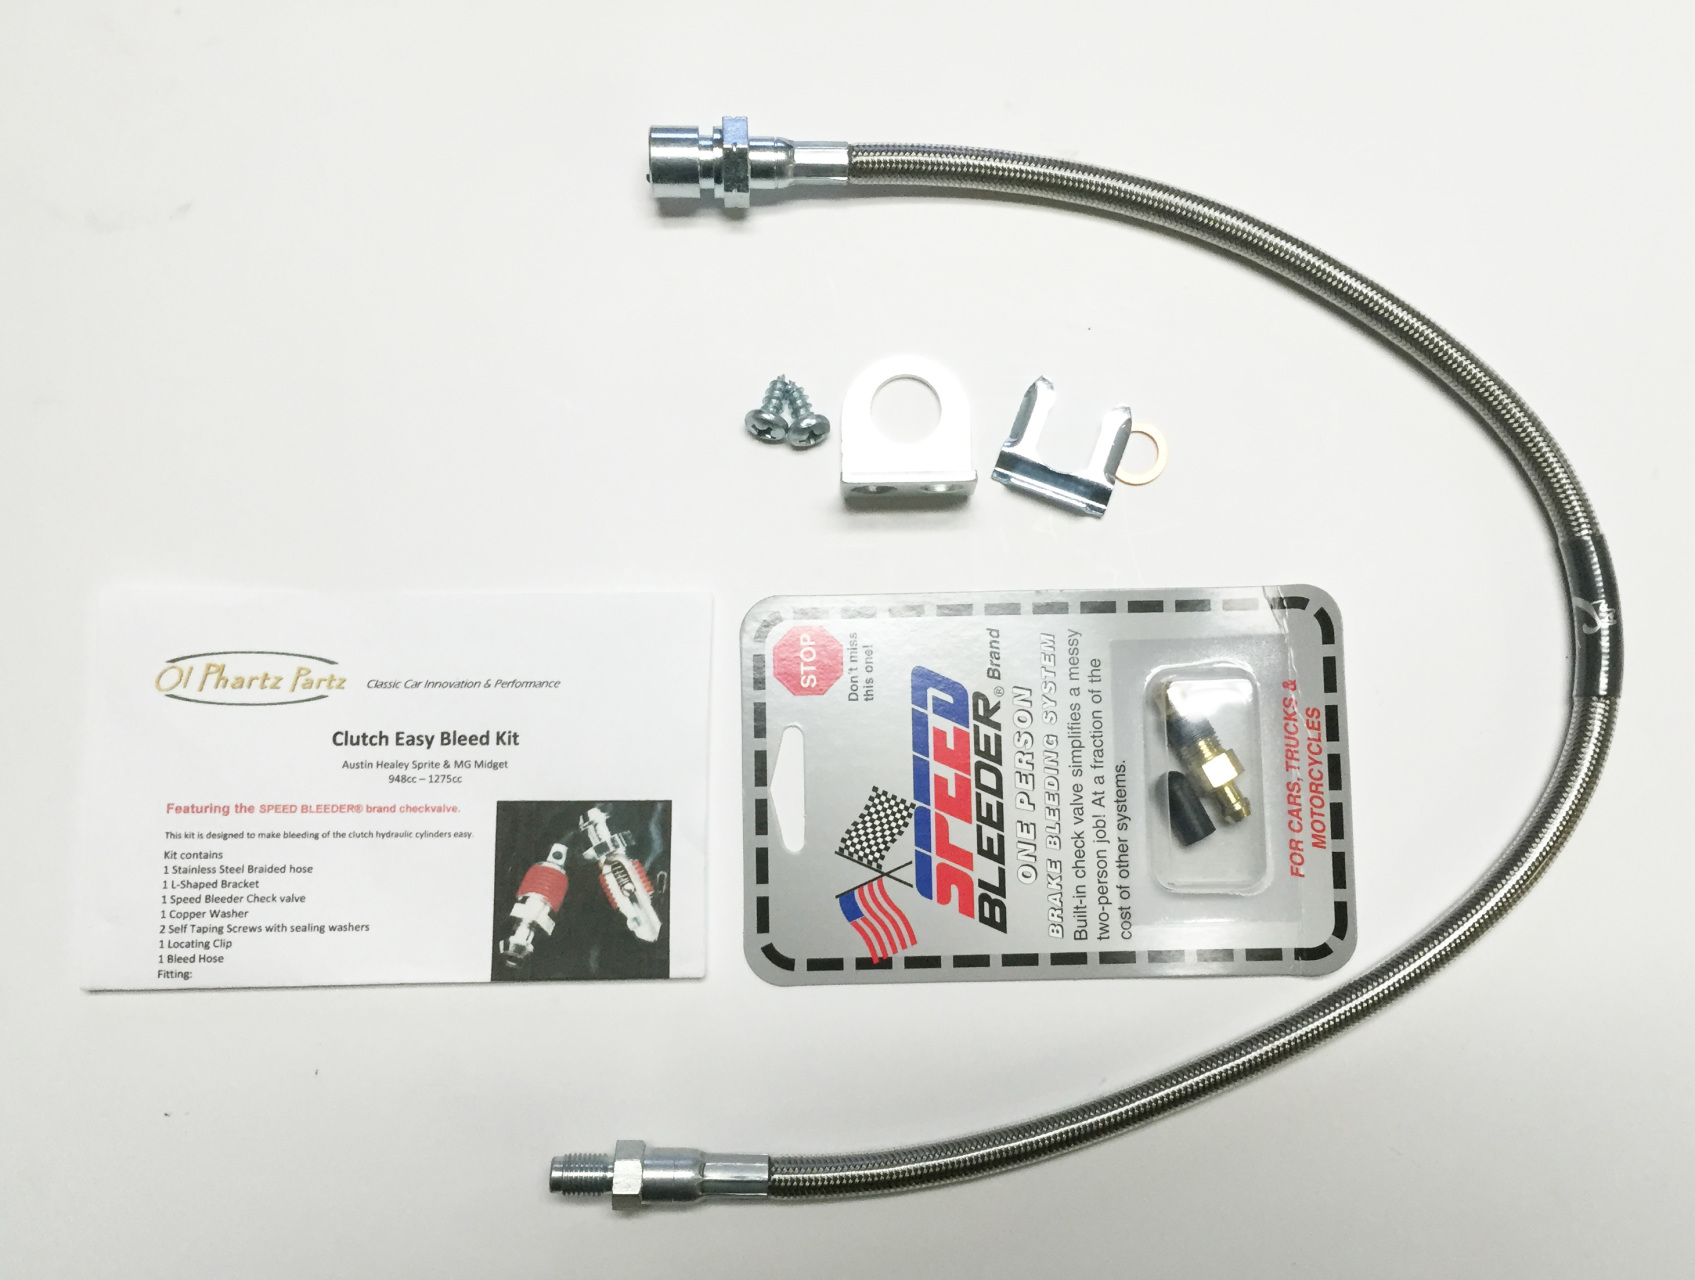
The bracket that comes with the kit can be used "as is" if attached to the inside frame opposite and slightly to the rear of the distributor, forward of the starting solenoid. The bracket is clearly seen in the photo above just above the SpeedBleeder fitting package.

I was thinking of making a simple bracket similar to what Drone Dog did as shown in his photograph - attached to the upper bolt for the starter.

Alternatively, I may drill two small holes to the protruding lip on the fender side of the starter solenoid and attach a fabricated adapter bracket that would accommodate the one supplied by Steve Christiansen.

As a temporary measure I just have the extension brake (clutch) line tie-wrapped in place pending a more elegant mounting solution as described above.

The main reason for the original post was to make folks aware that a reasonably priced kit exists made up of quality parts that can be easily installed, minus the rather small challenge of adapting the mounting plate.

I'll come back to this thread when I have mounted the bleeder and and I have taken photos.

~ Joe
 
I'm Back after having decided how to mount the bleeder end of the assembly inside the engine bay.

The kit from Old Phartz Partz comes with an L-shaped bracket and the bracket supplied is adequate to mount the bleeder end, but I like to avoid drilling holes and using sheet-metal screws unless I have no choice.

Working from the end result back to the mount, kindly see below where I mounted the bracket below the windscreen washer fluid bottle:

Fabricated-Extension-bracket-4.jpg


A closer look:

Fabricated-Extension-bracket-3.jpg


Fabricated-Extension-bracket-3b.jpg


The finished bracket (kit supplied bracket shown on the right):

Fabricated-Extension-bracket-2.jpg


The pieces I fabricated in my hobbyist machine shop using my SX2 mill:

Fabricated-Extension-bracket-1.jpg


It's a simple clamp that can be moved around a bit if deemed necessary and it's out of the way.

As they say, "that's the story," in simple words and photos.

~ Joe
 
Back
Top