 but were afraid to ask:
 Randall he probably does not have the long clevis pins and the linkage choke connector on the outside of the frame. The whole deal looks wrong and counterintuitive. Plus the cable has to be just right at the clamp with about 2 inches of cable sticking out from the sheath and about ¼ inch sticking outside the sheath holder then that 2 inches hooked onto that special pin.
-
 Hey Guest!
British Car Forum has been supporting enthusiasts for over 25 years by providing a great place to share our love for British cars. You can support our efforts by upgrading your membership for less than the dues of most car clubs. There are some perks with a member upgrade!**Upgrade Now**
(PS: Upgraded members don't see this banner, nor will you see the Google ads that appear on the site.)

Tips
- We have a special forum called "Member Articles" where you can submit actual articles for consideration for publication. Learn More
- Don't have an Avatar? If not, your avatar will default to the 1st character in your username. Go into "Account Details" to change your Avatar.
- Some basic forum navigation info: click
 Hey - did you know if you click on the title of a thread it will take you to the first unread post since you last visited that thread?
- Hey Guest - Is your British Car Club in our Clubs database? If not, send me a PM - Basil

- Looking for a local club? Click the "Clubs" tab above and browse hundreds of clubs world-wide.
- Add Android or iPhone APP: click
- Did you know - any picture or video you add in your posts in any marque-specific forum will also get added to the Media Gallery automatically.
- A few more tips about posting and replying: click
- Hey there Guest - be sure to keep your profile page up to date with interesting info about yourself: learn more
- More tips and tricks on Posting and Replying: click
 STOP!! Never post your email address in open forums. Bots can "harvest" your email! If you must share your email use a Private Message or use the
  smilie in place of the real @
- Want to mention another member in a post & get their attention? WATCH THIS

- So, you created a "Group" here at BCF and would like to invite other members to join? Watch this!
- Hey Guest - A post a day keeps Basil from visiting you in the small hours and putting a bat up your nightdress!
- Hey Guest - do you know of an upcoming British car event?
 Pretty Please - add it to our Events forum(s) and add to the calendar! >> Here's How <<
- Hey Guest - you be stylin' Change the look and feel of the forum to fit your taste. Check it out
- If you run across an inappropriate post, for example a post that breaks our rules or looks like it might be spam, you can report the post to the moderators: Learn More
- If you would like to try some different "looks" or styles for the site, scroll to the very bottom, on the left and click the Style Selector.
You are using an out of date browser. It may not display this or other websites correctly.
You should upgrade or use an alternative browser.
You should upgrade or use an alternative browser.
TR2/3/3A choke operation from the factory !!!!
- Thread starter sp53
- Start date
TR3driver
Great Pumpkin - R.I.P
Offline
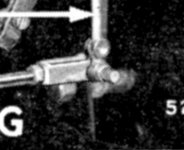
Good point! Here's a photo of the later setup (from Practical Hints 6th ed). Notice too how the link runs entirely behind the levers, instead of straddling them. Believe it or not, it works better this way.Randall he probably does not have the long clevis pins and the linkage choke connector on the outside of the frame. The whole deal looks wrong and counterintuitive. Plus the cable has to be just right at the clamp with about 2 inches of cable sticking out from the sheath and about ¼ inch sticking outside the sheath holder then that 2 inches hooked onto that special pin.

TR3driver
Great Pumpkin - R.I.P
Offline
Not originally, AFAIK. But IMO it is a very worthwhile modification. I also added a separate ground wire for all the rear lamps, to the same ring terminal on a tank strap.John, I thought there was a second ground wire at the tank sender that went down underneath one of the tank strap bolts ?
Geo Hahn
Yoda
Offline
...Notice too how the link runs entirely behind the levers, instead of straddling them...
Hmm. I've studied that photo (it's up there with Nessie swimming and the Zapruder film in my book) and I can see that the rear one is indeed inboard from the arm, not straddling:

But when I look at the front one it appears to me that it straddles:

That bolt & nut have to clamp down on the cable to hold it so it makes sense (again, to me) that the bolt would have to be tight but the arm would need free movement so it goes inside the fork.
In the end - the best set-up is the one with the easiest movement, no binding.
TR3driver
Great Pumpkin - R.I.P
Offline
Yeah, I find that somewhat puzzling too. Best I can make out, the photo has been carelessly retouched and some of the features are simply missing. My guess, they started with a photo that did not include the cable at all, and added (most of) the cable to it.
To add to the confusion, the SPC shows the pin oriented the other way!
But it's not a bolt, the original part has a long smooth pin on one side, which obviously goes through the lever and clevis and is secured there by a cotter pin. The other end is threaded, and there is a hole for the cable to pass through and be clamped by the nut.
Here's a shot from an earlier manual, which more clearly shows the clevis
Attachments
Since I am reconstructing my carbs I looked at this area. Having the forks not straddling the jet lever seems very odd. I looked in Bill Piggots book ( the TR3 one) and the only pic I could find there , at the bottom of Page 65, showed the rear lever being straddled. Not sure how authoritative that is, but it is logical. I have to replace that lever as a PO had used a wood screw as a cotter pin and the hole was way out of round. I guess you put it where it works with least friction.
6TTR3A
Jedi Warrior
Offline
Don't rely too much on the photos in Piggot's books. The one you refer to
on P. 65 has at least two other "in-accuracy s" His written information is
very reliable, so IMO that makes up for the photos.
I set my choke up so the distance from closed to the first notch takes
up the clearance on the fast idle cam so the first notch is still "no choke"
I pull it (straight) out to the 2nd or third notch to start, then twist it back
to the first notch for a fast idle 'till it warms up enough to drive.
All my linkage is set up according to the later "Hints" (6th ed.) but
I still found it difficult to pull to the 3rd notch. So I got lazy & disconnected
the link from front to rear carb. Choking the front carb only works
fine. (A couple more cranks than before but only when the car
hasn't been started in several days)
Frank
Geo Hahn
Yoda
Offline
On mine I could see there was enough slop in the connections that the front carb was getting 'choked' quite a bit before the jet began to pull down on the rear carb. To reduce this I put a bit of pre-load on the linkage by lengthening the rod to the point where is was just about to move the rear jet. That way I get pretty good action on both jets.
I never would have believed those choke forks and rod sit on the outside of the choke arms had I not purchased new and bought an old choke original clevis pin that is so long it would only fit and work that way. All that linkage is so counterintuitive, right down to very large holes that just slop around so the linkage does not bind. My mind likes bearings and things that roll in exact spaces.
I live in a very damp cold wet climate in the winter and I love driving my tr3 more on cold clear days more than summer. If I did not have a choke that worked as good as it could, I would be out there squirting starter fluid in there to get it to fire; the voice of experience.
I live in a very damp cold wet climate in the winter and I love driving my tr3 more on cold clear days more than summer. If I did not have a choke that worked as good as it could, I would be out there squirting starter fluid in there to get it to fire; the voice of experience.