• Hi Guest!
    You can help ensure that British Car Forum (BCF) continues to provide a great place to engage in the British car hobby! If you find BCF a beneficial community, please consider supporting our efforts with a subscription.

    There are some perks with a member upgrade!
    **Upgrade Now**
    (PS: Subscribers don't see this gawd-aweful banner
Tips
Tips

TR2/3/3A Carpet and upholstery installation

Gene Schwarting

Freshman Member
Offline
I am restoring a 59 TR3, which came with NO interior. I have purchased new carpet and interior kits, which came with no instructions and would appreciate directions. I have done other cars, but TR3's are definitely unique. Are there resources or videos available? Suggestions appreciated.

Gene
 
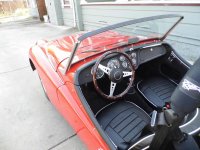
SANY0005.jpgI just did mine. Carpets are easy, just lots of contact cement. I also put "Killmat" under the carpet for sound and heat. Definitely recommend over the hump to keep your right leg cool. Vinyl is another story. Difficult locations are the wheel well covers and the curved piece right behind the door. Put a pad under the wheel well cover so it will stretch flat. The curved piece (name?) required a lot of heat and patience. I never did get mine perfect. You should be able to locate lots of previous posts on this subject.
 
I am super happy with the Dynamat that I installed across the entire floor and firewall of the car. The sound deadening was definitely worth the effort. And reduction of exhaust heat. Thin stuff, lined with a heavy aluminum foil. Easy to install.
 
Gene, I ran across a u tube video last summer that covered the process of installing the upholstery kit. Sorry I cant give you a link but if you go to u tube and do some searching on installing upholstery on a TR3 I’m sure you will find it. I will be doing mine in a couple of months too and I will be looking it up as well. Who’s kit did you get?
 
+1 on John’s excellent tutorial. Like him, I went with John Skinner. Prices were actually cheaper for what you get from the big three over here, at least last year. I also sprung for the thin padding for the wheel well from Macy’s garage.

There’s also a few clips on YouTube . I’d like to show you mine, but I’m still reassembling the mechanicals!
 
another +1 on John's thread. I refereed to it over and over as I went through my interior rebuild. He has step by step photos and directions for almost all the interior.
I also used the kit from John Skinner but could not get along with his seat padding (Foam material) so I got the Roadster factory padding kit which I found much easier to work with. There was some thin fabric backed foam in the Skinner kit that was intended for the seat cushion. I used that to pad the rear wheel wells.

David
 
Oh, yes I forgot that... I also substituted the TRF horsehair for the Skinner foam!
 
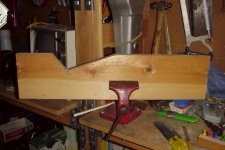
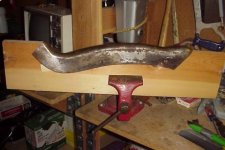
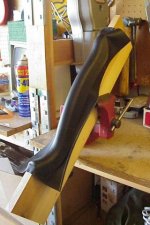
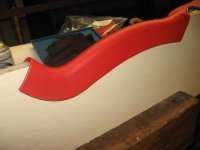
The doglegs behind the doors can be a bear to get looking good. Geo Hahn made a jig to hold the dogleg from a 3/4" board. It works great and makes it much easier to get them wrinkle free. I did mine in leather and and some heat and water got everything to stretch jut fine. The red one is mine.

dogleg1.jpg dogleg2.jpg dogleg3.jpg dogleg5.jpg
 
I went with Roadster Factory for my bright red leather kit. The leather has a pretty heavy print to it compared to the matching vinyl. It is also a brighter red than what I was expecting. More orangey than what was in my car. I’m on the fence as whether I like the color or not. I don’t like the difference in grain between the leather and vinyl. Anyone can tell me if the 60’s cars had a heavy grain to the leather back then?
 
Art,
When covering the dog leg piece did you work the leather until it formed over the metal and only then apply glue? Was the material then cool and dry before the glue went on?
 
Art,
When covering the dog leg piece did you work the leather until it formed over the metal and only then apply glue? Was the material then cool and dry before the glue went on?

I applied the glue first. I'm pretty sure it was 3M Super 77 (although it might have been Super 90). Right after applying the glue on both the metal and some on the leather...not where you grab the excess leather to stretch. I used a heat gun and water (in a spray bottle) to stretch the leather onto the metal. After it dried, I trimmed the excess, folded the leather over the back and glued it down. I used some Welwood contact cement that came in a small jar with an applicator brush inside for that.
 
Back
Top