• Hi Guest!
    You can help ensure that British Car Forum (BCF) continues to provide a great place to engage in the British car hobby! If you find BCF a beneficial community, please consider supporting our efforts with a subscription.

    There are some perks with a member upgrade!
    **Upgrade Now**
    (PS: Subscribers don't see this gawd-aweful banner
Tips
Tips

TR2/3/3A Carburetor Rebuild

ckeithjordan

Jedi Trainee
Silver
Country flag
Online
Hi All,

I’m having Joe Curto rebuild my carbs off my 1957 TR3, while they run OK, they do leak and have been sitting stored for almost 30 years. I’ve attempted to fix the leaks by replacing the jet seals, but figure I might as well get the whole shebang rebuilt and spiffed up while the car is dormant (I also need to replace other rubber parts under the bonnet and check the cooling system).

My question is this: When Joe sends back my carbs, what else do I need to do/repair/replace in order to make sure everything is running correctly? Timing? Condensor, points, plugs? New vacuum tube (mine is a metal/rubber/metal pipe)?

Thanks in advance for the collective advice.
 
Keith,
Many owners subscribe to the adage that "if is isn't broke don't fix it". But after 30 years I would be suspect of the fuel pump. Sometimes those things work okay but they also have a rubber component that gets hard over time and then does not function. Next the fan belt and lots of lube on anything that can be lubed. Then change all of the fluids ( don't forget to clean out the gas tank). Once it is running then you can sort out what electrical parts might need replacing. In some cases the old parts might actually be better built than a new replacement.
 
Charley,

Thanks. I have already plans to replace the rubber parts and check out the cooling system. I was asking more about the tune-up pieces. The suggestion about the fuel pump is a good one.
 
If you know how to do an ignition tune up, I'd say do it....points, plugs, condenser, distributor cap, rotor, and wires
 
I'd suggest getting a copy of Practical Hints (which is effectively the owner's manual) and going through the periodic maintenance items it gives.
After 30 years storage, IMO it would also be a good idea to disassemble, inspect, clean and lube the distributor. However, if you don't want to go that far, at least hook up a timing light and verify that the centrifugal advance is working as it should. It's easy for them to get gummy over the years (or simply worn out).

Here's a later edition of PH; I don't have the earlier ones scanned yet. There are a few minor differences (like your car probably has a dipstick filler for the gearbox, instead of a plug on the side) but the service intervals and such should be good.
https://drive.google.com/open?id=0B2H2NJt34OffNjQ4MTkyNjItZTVmYi00M2U2LWJhYWUtMjEyZDgxMzUyNzUw
 
Randall,

Thanks for the suggestion. I have an early copy of the “instruction manual.” Scanned, too, if you want it for your on-line reference library (which has been helpful).

I have a dizzy replacement parts/upgrade kit from TRF, which I plan to use. I’m not sure about the ease of removing and cleaning of the distributor, though.
 
Sure, I'll take a copy.

There is some skill and effort involved with disassembling the distributor, but not much. Hardest part is driving out the pin that holds the dog to the shaft, preferably after making witness marks so you can reassemble in the same orientation. It should only fit one way, but it's best to mark it anyway, IMO. Also make a note of which way the rotor points before you remove the dizzy, and don't turn the engine while it is out.

Loosen the pinch bolt and pull the distributor housing up (it's OK to wiggle it some). Don't remove the pedestal unless you absolutely have to (so you won't lose the position of the drive gear against the cam).

The original Mills pin has a slight taper to it, it will be easier to remove if you drive on the small end. But it's possible it's been replaced with an ordinary split or roll pin, so if you can't see which end is smaller, just pick one.

I suggest buying a cheap pin punch in the right size, and then cutting it off just below the taper to make a "stubborn pin" punch. You can use that to get the pin started moving, the shorter length will make it much less likely to bend or break.
 
Randall,

PM sent.
 
Does the engine have proper oil circulation? Have you spun the engine over after it has set for 30 years?
steve
 
Sure, I'll take a copy.

There is some skill and effort involved with disassembling the distributor, but not much. Hardest part is driving out the pin that holds the dog to the shaft, preferably after making witness marks so you can reassemble in the same orientation. It should only fit one way, but it's best to mark it anyway, IMO. Also make a note of which way the rotor points before you remove the dizzy, and don't turn the engine while it is out.

Loosen the pinch bolt and pull the distributor housing up (it's OK to wiggle it some). Don't remove the pedestal unless you absolutely have to (so you won't lose the position of the drive gear against the cam).

The original Mills pin has a slight taper to it, it will be easier to remove if you drive on the small end. But it's possible it's been replaced with an ordinary split or roll pin, so if you can't see which end is smaller, just pick one.

I suggest buying a cheap pin punch in the right size, and then cutting it off just below the taper to make a "stubborn pin" punch. You can use that to get the pin started moving, the shorter length will make it much less likely to bend or break.

I like to do as much myself as I can but when it came to the distriburor it made more sense to me to send it out to Jeff at Advance distributors.
He is cheapest for the rebuilt vacuum advance,and when you put that savings toward the rebuild its not much more than doing yourself.
He also curves the advance to your motor specs.
I got the whole deal,rebuild with points(electronic also avail.),cap and wires and coil and it was very reasonable with about 2 week turnaround .Just a thought.
Tom
 
The engine is fine, except for minor oil and coolant leaks, due to sitting for so long. I’ve driven it several times.

I plan to go through everything and replace all of the “soft” parts this winter. The carbs were leaking around the jets, which I’ve fixed by replacing seals, but felt like I wanted to have them rebuilt not knowing what the PO actually did (he did do a F/O restoration). I also plan to have the engine rebuilt by Macy’s next winter 2018-2019.
 
Tom,

Thanks for your distributor suggestion. I’ll check out Advance Distributors.
 
Tom,

If I may ask, what was the cost of your distributor rebuild?
 
Does Jeff still change the initial advance setting to 12 BTDC? Might be an issue if you ever try to hand-crank the motor.
 
Tom,

If I may ask, what was the cost of your distributor rebuild?

It was five years ago so don't remember exactly but I think the dist.rebuild was 125 and the vacuum diaphragm was less than half a new one.At the time the cap and wires and Bosch blue coil were also competitively priced.
My old unit was beat up and it was nice to drop in a fully rebuilt unit.
Check out his website andI think you can get a quote.
Tom
 
Jeff at Advanced Distributor rebuilt my 24D this past summer. Total cost including return shipping was $163. He recommended an initial 16 degree BTDC setting with the vacuum disconnected.

The distributor looks new and I am very happy with the results.
 
Just be warned, 16 before is plenty to cause a kickback when you're trying to crank by hand. IMO that's the reason the original curve calls for only 4 BTDC.
 
I have to ask, aside from the hand crank kick-back, what other differences would one notice 16 vs 4 degrees BDTC? Why the "great" discrepancy (difference)?
 
The 4* ATDC is the effect of having the vacuum retard active and working at idle.
 
Vacuum retard was only on later cars, not a 57 TR3.

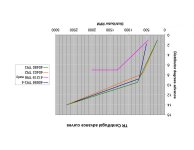
TR2-4 used 4 BTDC (not ATDC) as the factory (static) ignition timing, and then had a very aggressive centrifugal advance so the timing was advanced much more than usual as the engine came off idle. The purpose, I believe, was to make sure the timing was late enough to avoid kickback when hand cranking. With the spark occurring significantly before TDC, all it takes is for the cylinder to be full of combustible mixture and the crankshaft to be moving very slowly, to cause the cylinder to fire and force the crankshaft to turn backwards.

You'd have to check with Jeff for details, but I believe he installs a slower advance curve, such that the total advance is about the same at normal operating rpm, even starting with 16 BTDC static. (Or maybe just a pinch more, the factory total advance is fairly conservative.)

Just for grins, here is a comparison of the centrifugal curves for a couple of TR2-4 distributors, and a TR6 for comparison.
advance.jpg
 
Back
Top