• Hi Guest!
    You can help ensure that British Car Forum (BCF) continues to provide a great place to engage in the British car hobby! If you find BCF a beneficial community, please consider supporting our efforts with a subscription.

    There are some perks with a member upgrade!
    **Upgrade Now**
    (PS: Subscribers don't see this gawd-aweful banner
Tips
Tips

Carb removal

trotti

Senior Member
Offline
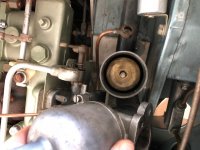
I'm having a problem removing the rear carb in my 100-6. Manual, at D.12 step 9, says "Remove the four nuts from each carburetter flange and pull the units off the studs together . . ." If only life were that simple.

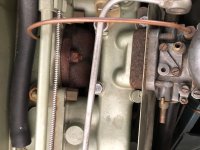
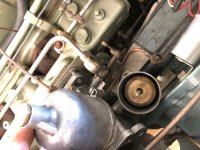
I've disconnected the carbs and everything is out of the way, but the rear carb's float chamber is catching on the bulkhead--it's as if the carb is too close to the bulkhead for it to come off the studs.

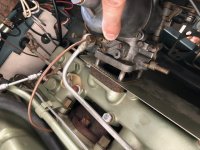
I've disconnected the two carbs and removed the front carb easily enough, but I can't see a way to get the rear carb off. I'm thinking the only option is to somehow get to the four screws that hold the float chamber to the carb body. I've attached some pictures. Sanity check, please? Ideas?

FYI - I have a 1959 BN-6 with a BJ7 engine and the original carbs, the HD6s. Could that pairing be the cause of the problem?
 

Attachments

  • IMG_5387-1.jpg
    IMG_5387-1.jpg
    90.4 KB · Views: 165
  • IMG_5388-1.jpg
    IMG_5388-1.jpg
    94.4 KB · Views: 165
  • IMG_5389-1.jpg
    IMG_5389-1.jpg
    102.1 KB · Views: 161
  • IMG_5390-1.jpg
    IMG_5390-1.jpg
    128.2 KB · Views: 170
Looks to me like you have studs that are too long - they should only reach thru the carb flange enough to have a nut & washers and no extra sticking out. In your second picture it is clear that the studs reach thru the carb flange with enough length to put two nuts on, suggesting you could use at least 1/4" shorter studs and that might be enough to get the carbs on & off.

For now, I would suggest raising the motor to get the rear carb off. If you can't get enough stretch out of the motor mounts, you may need to loosen the drivers side one to get enough lift to get the carb off (leave the passenger side tight so the engine will rotate a bit to the passenger side when you jack it up).

Then experiment with shorter studs - they are common 5/16x24 and can be had in various lengths from any auto parts store.
Dave
 
Thanks for the reply @red57! Not sure why I didn't think of removing the studs in the first place! I was able to back out three of the four studs and then it was able to spin off the fourth stud and it's out. Now for the rebuilding! I have an ultrasonic cleaner and a lot of time on my hands - this should be fun!
 
Don't forget to loosen the throttle rod if there's any interference on raising the engine. Might be helpful to substitute longer 3/8" motor mount bolts so you don't get out of alignment.

Also, sometimes it's useful to substitute extra-long socket-head set screws in place of studs to make future removal easier.
BoltDepot has them in black oxide up to 2" length; SS up to 1":
https://tinyurl.com/yddz7f89
 
Double nut the studs and remove them??
 
Although double nutting sounds like it might be related to straining really hard to get tg studs out, it just means if you have enough thread showing to put two nuts on and tighten the bottom one hard against the top one , you may then use the lower nut to unthread the stud while keeping the upper nut from moving. I've even gone as far as spot welding a nut on the stud instead of using 2 nuts, when I didn't have enough thread. It wasn't on or near fuel or oil, or an engine for that matter but it worked like a champ. Of course you have to do this before you completely goober up the stud with your vice grips trying to get it out. The latter sometimes works but if you are unlucky you end up with a stuck stud, no good threads and a raging headache.
 
Is it possible that one (1) of the spacers is missing? I haven't had SUs on my own BN6 for about 32 yrs, but I'm thinking there was a spacer on each side of the heatshield. Should be easy enough to measure the studs and get somebody to compare them for you.

As for the clearance issue, sunken motor mounts__rubber isolators and pedestals__were the first thing that came to mind...
 
Is it possible that one (1) of the spacers is missing? I haven't had SUs on my own BN6 for about 32 yrs, but I'm thinking there was a spacer on each side of the heatshield.

I wondered about that too but pictures in the Clausager book show only the Mk 2 w/HS6 have one on each side of the heat shield. Pictures of 100-6 6 port, Mk 1, and Mk 3 all show just one on the manifold side. Not sure if that is definitive but suggests the spacers are correct.
Dave
 
The carbs on a BJ7 (and BJ8) have the float chambers between the carbs instead of on the outside. Maybe that this is why the change.
 
Interesting. If the float was on the other side it would probably work. Can the carbs be switched?

On HD series, the angled float bowls can be swapped between carbs - either both inside (per BJ7/8) or both outside (BN6/7, BN4/BT7).

PS - we're getting pretty far afield here. There's nothing wrong with Trotti's original setup except the studs are too long.
 
Last edited:
Back
Top