 but were afraid to ask:
 Nearing the end of my first season with my BJ8, I was under the hood today doing some work, and without me realizing it, the back end of my wrench hooked the choke cable of the front carb right by the jet adjustment screw. When I pulled on the wrench, the choke cable was pulled way out and I heard a bunch of nasty sounds immediately followed by gas running out the bottom of the carbs. I waited until it stopped dripping, reset the choke cable and energized the fuel pump- it still dripped, but only once every 5 seconds or so. So what did I do- did I crack the diaphragm? Is this novice reparable, or should I pull the carbs and send them off? All help appreciated- thanks.

-
 Hey Guest!
British Car Forum has been supporting enthusiasts for over 25 years by providing a great place to share our love for British cars. You can support our efforts by upgrading your membership for less than the dues of most car clubs. There are some perks with a member upgrade!**Upgrade Now**
(PS: Upgraded members don't see this banner, nor will you see the Google ads that appear on the site.)

Tips
- We have a special forum called "Member Articles" where you can submit actual articles for consideration for publication. Learn More
- Don't have an Avatar? If not, your avatar will default to the 1st character in your username. Go into "Account Details" to change your Avatar.
- Some basic forum navigation info: click
 Hey - did you know if you click on the title of a thread it will take you to the first unread post since you last visited that thread?
- Hey Guest - Is your British Car Club in our Clubs database? If not, send me a PM - Basil

- Looking for a local club? Click the "Clubs" tab above and browse hundreds of clubs world-wide.
- Add Android or iPhone APP: click
- Did you know - any picture or video you add in your posts in any marque-specific forum will also get added to the Media Gallery automatically.
- A few more tips about posting and replying: click
- Hey there Guest - be sure to keep your profile page up to date with interesting info about yourself: learn more
- More tips and tricks on Posting and Replying: click
 STOP!! Never post your email address in open forums. Bots can "harvest" your email! If you must share your email use a Private Message or use the
  smilie in place of the real @
- Want to mention another member in a post & get their attention? WATCH THIS

- So, you created a "Group" here at BCF and would like to invite other members to join? Watch this!
- Hey Guest - A post a day keeps Basil from visiting you in the small hours and putting a bat up your nightdress!
- Hey Guest - do you know of an upcoming British car event?
 Pretty Please - add it to our Events forum(s) and add to the calendar! >> Here's How <<
- Hey Guest - you be stylin' Change the look and feel of the forum to fit your taste. Check it out
- If you run across an inappropriate post, for example a post that breaks our rules or looks like it might be spam, you can report the post to the moderators: Learn More
- If you would like to try some different "looks" or styles for the site, scroll to the very bottom, on the left and click the Style Selector.
You are using an out of date browser. It may not display this or other websites correctly.
You should upgrade or use an alternative browser.
You should upgrade or use an alternative browser.
Carb Leaking Gas
- Thread starter SpacerM
- Start date
Thanks, Keoke- looks like another "learning project" for me. I will pick up the SU rebuild manual/booklet locally tomorrow to see what I am getting myself into. I'm looking at the Moss catalog now, but don't clearly see the part # I am likely to need- hoping it is not an entire rebuild kit- any suggestions?

Offline
You can buy just the jet/diaphrams separately from the usual sources. You will need to have a jet centering tool set.SpacerM said:Thanks, Keoke- looks like another "learning project" for me. I will pick up the SU rebuild manual/booklet locally tomorrow to see what I am getting myself into. I'm looking at the Moss catalog now, but don't clearly see the part # I am likely to need- hoping it is not an entire rebuild kit- any suggestions?
Thanks, Patrick. Just spent the better part of the evening going through Randy Forbe's pictures, and I now understand what is likely broken and how it seems quite easy to fix- it appears on the HD8's that the jet and the diaphragm are one piece, and that's why I couldn't find the diaphragm listed I the Moss catalog. I'll start the disassembly process tomorrow with an eye to picking up a new jet/diaphragm and the centering tool. Thanks for the insights.
Offline
Take your time doing the carbs the first time around and do not mix parts between the the carbs and use a digital camera to help and you should get through this job with no problems.SpacerM said:Thanks, Patrick. Just spent the better part of the evening going through Randy Forbe's pictures, and I now understand what is likely broken and how it seems quite easy to fix- it appears on the HD8's that the jet and the diaphragm are one piece, and that's why I couldn't find the diaphragm listed I the Moss catalog. I'll start the disassembly process tomorrow with an eye to picking up a new jet/diaphragm and the centering tool. Thanks for the insights.
AUSMHLY
Yoda
Offline
Offline
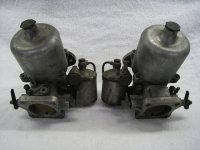
How about showing us the details...what you used and the process, etc.AUSMHLY said:Once you have them on your bench, you can clean all the dirt, oil and junk out of the areas you can't normally get to.
Then theirs guys like me who seem to have too much time on my hands.
There, they're clean now...lol
AUSMHLY
Yoda
Offline
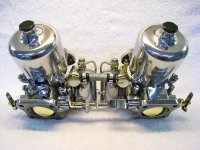
Sitting at my bench for a couple weeks doing some wet sanding, and using my dremel and hand drill to polish. Used different grades of polishing rouge. Replaced all the small pieces that I could with stainless (polished them) and chromed some of the larger pieces that are unique to the carbs. All aluminum parts were polished. Good times!
Attachments
Offline
They look great. Did you polish the butterfly's too?(can't tell from the angle they're sitting at). LOLAUSMHLY said:Once you have them on your bench, you can clean all the dirt, oil and junk out of the areas you can't normally get to.
Then theirs guys like me who seem to have too much time on my hands.
There, they're clean now...lol
AUSMHLY
Yoda
Offline
Patrick67BJ8 said:They look great. Did you polish the butterfly's too?(can't tell from the angle they're sitting at). LOLAUSMHLY said:Once you have them on your bench, you can clean all the dirt, oil and junk out of the areas you can't normally get to.
Then theirs guys like me who seem to have too much time on my hands.
There, they're clean now...lol
Of course. When you have too much time on your hands, you polish things that will not be seen too...lol. Actually, I just cleaned them then wiped them down with Mothers billet polish for the photo.
Offline
AUSMHLY said:Of course. When you have too much time on your hands, you polish things that will not be seen too...lol. Actually, I just cleaned them then wiped them down with Mothers billet polish for the photo.

Offline
"too much time on your hands" must mean "retired"?AUSMHLY said:Patrick67BJ8 said:They look great. Did you polish the butterfly's too?(can't tell from the angle they're sitting at). LOLAUSMHLY said:Once you have them on your bench, you can clean all the dirt, oil and junk out of the areas you can't normally get to.
Then theirs guys like me who seem to have too much time on my hands.
There, they're clean now...lol
Of course. When you have too much time on your hands, you polish things that will not be seen too...lol. Actually, I just cleaned them then wiped them down with Mothers billet polish for the photo.