• Hi Guest!
    You can help ensure that British Car Forum (BCF) continues to provide a great place to engage in the British car hobby! If you find BCF a beneficial community, please consider supporting our efforts with a subscription.

    There are some perks with a member upgrade!
    **Upgrade Now**
    (PS: Subscribers don't see this gawd-aweful banner
Tips
Tips

Camshaft installation/end float problem

Sarastro

Yoda
Silver
Country flag
Online
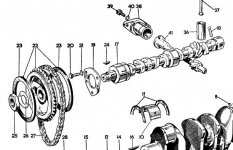
Back to working on my 1275 rebuild. Put in the camshaft (stock), but it seems to slide about 50 mils too far toward the rear of the engine, giving me ~50 mils of end float instead of the requisite 3-7 mils. Problem is, I can't see what locates the camshaft at the rear of the engine. It just seems to slide into the oil pump a bit too far.

I suspect I'm missing a washer or something similar, which I could have lost in cleaning or perhaps it just wasn't there in the first place--I wouldn't have noticed on tear down.

Attached is a picture of the oil pump--anyone see anything missing? Or, is there something else that locates the camshaft?
 
There's a locating plate and shims that go on the gear end of the cam not aware of anything on the oil pump end.
 
The camshaft is located by the triangular plate with three bolts that is behind the timing gear. Do you have this plate installed and the timing gear torqued down?

Item # 19

Complete view
 

Attachments

  • 14769.jpg
    14769.jpg
    51 KB · Views: 403
As above, there is nothing at the back, only the plate and pulley at the front that control the position and the end float.
 
OK, this is one of thosse "duh!" moments.

I didn't realize that the timing gear limits the crank motion in the rearward direction because I didn't have it all the way on when I trial-fitted it. The li'l sucker is a bit tight.

Interesting how just a few suggestions can get one's thinking going in a different direction, then suddenly things make sense....

Thanks for the suggestions.
 
...you're SCARIN' me, Steve...

:jester:
 
Scaring myself, more, I think.

But, anyway, thanks for the compliment. Never thought I'd reach the level of being scary, but, hey, keep tryin' and who knows what's possible?
 
Sarastro said:
OK, this is one of thosse "duh!" moments.

I trial-fitted it. The li'l sucker is a bit tight.

If the front retaining plate, the cam, or the pulley is new, things may indeed be tight. The plate is supposed to have "white metal" on the forward side towards the pulley. If you can't get the specified axial play, lap the BACK surface of the plate a little bit using wet/dry paper on top of a piece of plate glass. Sometimes it's just a bit of a burr on the plate or a slight amount of bow from when the plate was formed.

I think we've all had our "duh" moments.
 
Steve said:
But, anyway, thanks for the compliment. Never thought I'd reach the level of being scary, but, hey, keep tryin' and who knows what's possible?

That was TOTALLY a tongue-in-cheek jest, Steve. As Doug said, we've all been there.

Likely me more'n others: I've had more opportunities. :jester:
 
It's back together now, and the end float is 4 mils, just right.

By "tight" I meant that the fit was close when the timing gear slid onto the camshaft. It's OK, just a very close fit, as it should be. A little oil and it goes on OK.

Now, on to the head...
 
Looks nice. I'm just about at that point in my engine rebuild. I have to bump my cam up about 4 degrees and I'll be ready to start buttoning things up.
 
may I suggest just a bit more paint on the block before you finish up.
 
Now would be a good time to put a top timing mark on the engine as well, maybe that is what you are doing, sure make timing the engine alot eaiser than having two folks and one uderneath the car. Jeff Schelmmer at Advanced Distributor makes a bolt on timing pointer and timing tape for the balancer, this is nice for engine already together. I make my own top timing pointers when building a engine.
 

Attachments

  • 14807.jpg
    14807.jpg
    24.6 KB · Views: 207
Hap's right. I do this to all my personal BMC engines. I use a piece of steel and drill/bend/form it into a pointer to bolt up with timing cover bolts. Usually scribe the damper and stamp it TDC so's not to confuse it with the original. A real convenience and easy to do on the bench.
 
Yes, good idea. I don't have the means to weld a pointer to the timing cover, but I hadn't thought of using one of the timing-cover bolts.

As for paint, I chose to do it all before assembly even though it's a bit harder to mask everything and not the traditional way it's done. I don't want to paint over the fasteners or the oil tube, that kind of thing. The only parts beyond those left unpainted are gasket surfaces, which are better off unpainted.
 
Jeff @ Advanced Distributors timing pointer kit use a timing cover bolt to bolt his pointer down, and he supplies you a very degreed timing tape, helpful if you use a static timing gun vs a dial timing gun.

If you don't want to make it yourself, this is a nice kit, you can reach Jeff here, www.advanceddistributors.com
 
Back
Top