• Hi Guest!
    You can help ensure that British Car Forum (BCF) continues to provide a great place to engage in the British car hobby! If you find BCF a beneficial community, please consider supporting our efforts with a subscription.

    There are some perks with a member upgrade!
    **Upgrade Now**
    (PS: Subscribers don't see this gawd-aweful banner
Tips
Tips

Cam gear position BJ8

woodshopdoc

Freshman Member
Country flag
Offline
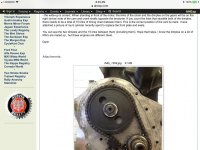
My harmonic balancer delaminated so am replacing. Decided to open Pandora's box and replace the timing chain, gears, and tensioner along with the water pump. Car always ran rough and was hard to time. Dots on old gears did not line up per book. Crank is now TDC #1 with slot at 12 o'clock. When I set cam shaft slot to 12 o'clock, valves #6 are closed and #1 open. I must be 180 out but thought I was following the manual. Engine is in the car. Thoughts?
 

Attachments

  • 609927FA-22C3-486D-BDE9-0EED15055695.jpg
    609927FA-22C3-486D-BDE9-0EED15055695.jpg
    73.1 KB · Views: 161
Thank you Jedi. I understand the link count but it is the timing of the gear position to what the valves are doing is my problem. With the gear in the position shown in your photo, the #6 valves are closed. I assumed this would be the firing position for #1 but both those valves are open.
 
Follow the link to the old thread and all will be revealed . Gear position relative to valve position relative to firing order piston position etc . Its all in there .
 
You can not quite see the indent for the top (camshaft) sprocket in Randy's picture but it is there under the top red mark.
One you have lined up everything as shown, your relative timing - pistons to camshaft can not be wrong.

Unless you have a cam in there from some other vehicle - highly unlikely to impossible :angel2: or you have one of DW's special cam sprockets that will allow variations for square cams, comes in two pieces for adjustments to occur !!!

:cheers:

Bob
 
Bob, Thanks for the additional information - it was very helpful. I successfully installed the crank and camshaft gears along with the timing chain. All looks good. Only problem I have now is that the new harmonic damper does not appear to be all the way on the crankshaft. Heated it in the oven per instructions but it seems to be about 1/4" short of the shaft shoulder (start of the threaded area). So far tapping is not helping.
Thanks,
Scott
I answered your PM, but it's not showing up in my "sent" folder; let me know if you didn't get it...
 
I can't comment upon your immediate issue but from my recent (if ultimately successful) experience of replacing the timing chain and tensioner belt on my 100 with the engine in situ, the next time I consider an operation that the manual describes as done with the engine out of the car I'll take that as a strong imperative rather than a mere suggestion.

Even with four hands getting the pulleys started on their shafts was extremely difficult and at one point I had resigned myself to having to pull the engine. On the sixth or seventh try it happened and I drew a deep breath.

I hope the presence of the cam tensioner on the six-cylinder engine makes the job easier for you. Persevere.....
 
I doubt that you will be able to work it home by using the nut, you could try it, otherwise, I am afraid that you are going to have to get a puller on that and start again, it will help if you can get a hot air gun to warm it up a tad, your local hire shop may help there. I am not sure if the wife's hair dry will cut it but you could give it a try.

When I installed mine I boiled it for 15 minutes until it was tender and then with the oven gloves, whipped it into the garage and shoved it on, if I remember correctly I had a hammer and a suitable drift ready and with one or two belts, deftly placed of course, the damper was driven home. The nut was torqued up beyond the manufacturers recommended value as I am told that there has been a tendency for that nut to work loose. If you can not get the answer to that one I will consult my Guru.

The engine was out at the time.

Best of luck with that one.

:cheers:

Bob
 
That's great, but for the benefit of future enthusiasts faced with the same dilemma, HOW did you get the damper off/fully seated?
 
Back
Top