• Hi Guest!
    You can help ensure that British Car Forum (BCF) continues to provide a great place to engage in the British car hobby! If you find BCF a beneficial community, please consider supporting our efforts with a subscription.

    There are some perks with a member upgrade!
    **Upgrade Now**
    (PS: Subscribers don't see this gawd-aweful banner
Tips
Tips

Bumper mounting bolts,

Jim_Gruber

Yoda
Country flag
Offline
So far have used up 2 Cobalt, I Titanium, and 2 other 3/8" bits trying to drill out a bumper iron mounting bolt. Must be a grade 5 or 8 1/4" bolt that I am trying to drill through as prep work for a front tilt bumper mount. Got another mounting bolt hole I need to drill through on the rear. I was able to drill through the back mount with a 1/4' but hole came out crooked and off center. If I PB Blast for several days and then try a screw extractor after heating with a torch any thoughts on chances of success? I've have the unfortunate experience of snapping off a screw extractor once and there is no way to drill one of those out.

Thoughts gentlemen?
 
SOB. There is a solid Tube welded in place from one end of the bumper iron to another. I know my '68 Sprite was not like that. No way am I going to be able to drill through 4 of those to enlarge the existing 1/4" mounting holes to 3/8" for a front tilt kit. I need more brain trust ideas. Thanks guys.
 
A cobalt bit will readily cut a grade 8 bolt. Are you trying to start on a chrome surface? If so, abrade the chrome down to steel and you should have no problem. Also, never start a drill hole in steel with anything larger than a 3/16 bit. Above that, the ratio of volume to surface area is so high that heat will not dissipate and the bit burns out. Screw extractors are almost always a bad idea. If work room allows, you can make a guide from aluminum stock.A description of the space and position of the fasteners could help generate ideas.
Bob
 
Last edited:
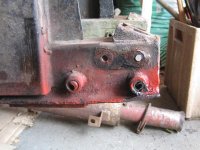
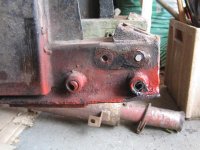
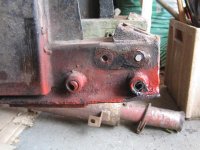
03 11 15 Bumper Bracket Bolts.jpgHere's a picture of what I am trying to drill out. I have an issue coming from between the frame rails as a 3/8" bit + cordless drill is too long to fit in there much less my big Dewalt 1/2" Drill. It's possible to do from the DS but PS is a problem. Pilot hole of rear bolt came out crooked in spite of attempts top keep l;evel and straight. A frame to brace the drill to keep straight and level may be in order. Here's my dilemma.
 
Front one doesn't look too bad. You will have to make several small holes in what remains of the rear one, gradually increasing the diameter, until you can collapse the bolt and wiggle the pieces out. The way to go for the other side is, take a piece of 1/2 inch (or thicker) aluminum stock and thru drill it in your drill press with a 3/16 bit. Then measure the diameter of the threaded boss on the frame. Again on the press, drill the boss' diameter half way thru the aluminum plate concentric with the 3/16 hole. Slip the big diameter hole over the boss and put your 3/16 bit in the 3/16 hole and you will have a centered hole in your bolt. You can probably use the same type of jig to complete the front hole you are showing, using a bit slightly smaller than tap drill spec for the smaller hole in the jig. On the broken bolt upper right, drill a bolt diameter hole in the aluminum all the way thru. Eyeball that hole to the center of the bolt and clamp the jig in place. Use a full size bit to just start a hole. Remove the jig. Use that small starter nick as a locating dimple for the 3/16 bit, drill it, and gradually increase the size
Bob
 
Last edited:
I'd use the flame wrench!
Back one look's like you might be able to get hold of it with a vise grip. Front is drilled a bit to large for a extractor and the extractor might just expand and lock the remaining bolt. Whats the other end look like? If you can get a hole drilled there [not as big] you maybe can get an extractor in there to have something to turn when you get things heated up. Heating will most likely do in the extractor but, hey, whats the option. Might call for a couple of try's with liberal application of penetrating oil while hot also called for.
My .02!

Kurt.

Kurt.
 
Thanks Bob, I way be able to find a socket that might work for the pilot hole as well. I know I needed to walk away and ask for ideas this afternoon. Thanks again.

A 3/8" drill with a reduced chuck size for the end of tge drill bit will likely be shorter and I will be able to drill from inside the frame rails as well. I'll get it eventually. Thanks.
 
Re: Bumper mounting bolts, I won!,

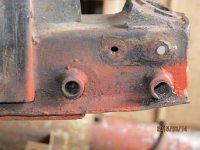
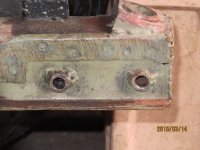
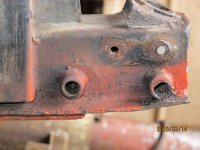
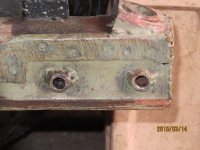
03 11 15 Bumper Bracket Bolts.jpg03 12 15 Bumper Bracket Bolts PS .jpgSuccess, I was able to find a short shanked 3/8" drill bit and with my old trusty corded Black and Decker drill was able to attack from the inside of the frame rails. The drill just fit and I mean just fit. Actually with a sharp drill drilling from the inside I was able to keep things level and straight and enlarge the existing hole from 1/4" to 3/8" without much of an issue. When I came to the broken bolt that was lodged in there at the end on both the front and rear bolts my drill powered through and things worked out fine. DE not an issue, absolutely straight and with my 1/2 Corded DeWalt felt like going through butter. always helps to have a pilot hole I have learned. I may add a few hits with the MIG on the PS Front Bolt to clean up the bottom right side but overall after the start I had on this I am pleasantly surprised. third Shot is DS from inside frame rai03 12 15 Bumper Bracket Bolts DS.jpgl.Nice and Straight. Yeah. Thanks Team for the help. Only cost me $60 in drill bits.
 
Success, I was able to find a short shanked 3/8" drill bit and with my old trusty corded Black and Decker drill was able to attack from the inside of the frame rails. The drill just fit and I mean just fit. Actually with a sharp drill drilling from the inside I was able to keep things level and straight and enlarge the existing hole from 1/4" to 3/8" without much of an issue. When I came to the broken bolt that was lodged in there at the end on both the front and rear bolts my drill powered through and things worked out fine. DE not an issue, absolutely straight and with my 1/2 Corded DeWalt felt like going through butter. always helps to have a pilot hole I have learned. I may add a few hits with the MIG on the PS Front Bolt to clean up the bottom right side but overall after the start I had on this I am pleasantly surprised.
 
03 11 15 Bumper Bracket Bolts.jpgOops, deleted the pics. Here is the problem.
Here is the fix PS
03 12 15 Bumper Bracket Bolts PS .jpg
DS Came out better from the inside frame rail.
03 12 15 Bumper Bracket Bolts DS.jpg
I may use the welder to close up the bottom of the front hole on PS. $60 in drill bits later, I have won this battle. Thanks for the help team. Front tilt bonnet is now possible.
 
Back
Top