• Hi Guest!
    If you appreciate British Car Forum and our 25 years of supporting British car enthusiasts with technical and anicdotal information, collected from our thousands of great members, please support us with a low-cost subscription. You can become a supporting member for less than the dues of most car clubs.

    There are some perks with a member upgrade!
    **Upgrade Now**
    (PS: Subscribers don't see this gawd-aweful banner
Tips
Tips

Bugsy II - Bulkhead Repair Questions

Jim_Gruber

Yoda
Country flag
Offline
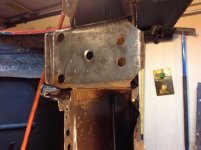
Got some more time today in the garage with Bugsy II. Got the Shop Vac out and uncovered a few questions I need some help with re. repairs done to rear bulkhead.

1) A partial repair to left side of rear bulkhead was completed and remainder painted with the 1985 equivalent of POR 15. The green is aircraft preservation primer. Thinking I need to clean up and weld in some additional metal to strengthen floorboard to rear bulkhead connection. Opinions ? 10 31 13 Rear Bulkhead repair addition bracing needed.JPG

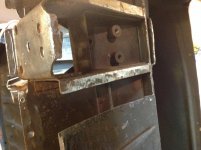
2)Reinforcement plate has a gap and welds aren't completed here. Does the plate need to be welded or simply bolted in place. Gap to be closed up?10 31 13 PS Rear Bulkhead Additional welding needed.JPG
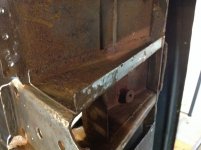
3) Floorboard and reinforcement stringer are not fully welded back here. Do they need to be? Also Reinforcement plate is partially welded up top. Should I weld to floor stringer Y/N. 10 31 13 DS Bulkhead Repair Additional Welding needed.JPG

4) Used some EvapoRust and SOS Pad on some surface rust. There is indeed shiny metal under there that was revealed with just a little bit of rubbing.
10 31 13 Shiny under surface rust.JPG

Overall after getting a closer look lots of new metal was welded in in 1985. No rust other than surface rust I need to deal with. Will take some time to sand and fill. Will add POR-15 for all interior and underneath metal. Time to get back and do some more cleanup. Thanks in advance for your help.
 
Guys any idea on my welding questions?
 
Jim:

Maybe before you take action on those spots you should confirm the condition of the inside of the spring boxes. Pull the springs to see whether the front of the boxes are intact, If they aren't water can enter the areas you have identified on the top. It's hard to tell from the pictures what metal has already been replaced.

Jim
 
Jim,

The springboxes are both new. Bulkhead has been repaired. Not an issue there. Partial repair on both sides. This was fixed correctly by a Jag Body Guy and done on a frame table. Right Rear Spring and Shock 1.jpgLR Suspension repair 2.jpg
 
I haven't pulled the rear end out but floors were replaced on PS and on DS. Here's a picture of the DS repair from underneath. New Floorboard and bulkhead repair as well. I think this was done correctly. It just never got put back together since 1985. PO spent > $3k in 1985 he told me getting metal work done on Bugsy II. As I get into cleaning this one I keep finding more and more panels that were replaced. Trunk Floor, Inner and Outer Rockers, A post replacement both sides, bonnet, '58 front grille area and valence grafted on, rear quarters, rear valence, footwells both sides. Yes lot's of metal was welded in and lots of bodywork repairs including filling of rear seams with brass. Door Gaps are great. This BE lived in Quebec and Toronto and was a driver for many years including winters but all of the rust was cut out and fixed. Surface rust only as paint was partially stripped but never repainted. Those areas are coming off clean underneath. 28 years stored inside nestled between two Porsches.
Drivers Side - New Floorpan and Bulkhead Repair.jpgFloorboad Repair - DS Underneath.jpg
 
Jim,
I went thru this repair and had to remove the plates on the bottom when I replaced the floors, floor strengthers, bulkhead strengthers, and bulkhead patch pieces (cut from a full width piece). Everything is cut and bolted into place and measured carefully, then you weld thru the bottom plate thru the floor pan into the spring hanger. Everything else must be welded once its in its proper place and I used self taping screws to hold everything in place during this process. While the spring boxes are accessable on the inside make sure the welds are nice and strong before you weld them to the bulkhead and shut plate. The bolts are there to help position everything for welding and to add a little extra strength, but NOT to provide the only connection between all of these parts. I've put everything together with bolts several times and always find something that needs correcting. Good luck, Rut
 
Rut

How about picture one where there is a gap with rear bulkhead and floor by the PS Spring Hanger. I'm thinking in need to add some extra strength there.
 
Looks like pretty good work has been done on it to me. I personally don't like to see overlapped sheet's and would get some seam sealer to cover some of the seams. Do more welding if you feel it needs it but no car will last for ever if its driven!
Have fun!:joyous:

Kurt.
 
Jim,
These were taken today after I took it apart again. I'm debating using a flanger to make a good joint between the bulkhead and repair panel with a spot welder or doing a butt weld. The car will be dipped and stripped and E-coated so I'm going for the strongest weld. I may even fabricate an additional piece to go between the shut panel and bulkhead for added strength. I don't ever want the spring hangers to get weak since it's a difficult job to replace them correctly so they will be beefed up.
Rut
 

Attachments

  • image.jpg
    image.jpg
    190.2 KB · Views: 117
  • image.jpg
    image.jpg
    195.7 KB · Views: 113
  • image.jpg
    image.jpg
    195 KB · Views: 109
Since you have solid metal throughout, I'd suggest just welding those gaps closed. As Rut says, that sandwich of metal parts from the bottom spring plates up needs to be welded through. If the bottom spring plate does not fall off when the 4 bolts are removed, the prior restorer must have done that. There should be a circle of spot (probably plug) welds around the big hole in the bottom plate. You can just see the traces where they were drilled out in Rut's first picture, above.

Use seam sealer. It will be solid and safe. Once the carpet is in it will never be seen again. My two cents.

Jim
 
Thanks guys,

got it to get over to HF and pick up 2 engine stands so I can take Bugsy sideways while they are still on sale tomorrow morning. Rut I like your solution for mounting the front to the radiator stanchions. Guessing a piece of 3/4" plywood would work as well. Thoughts?
 
Jim,
Yes, a 3/4" piece of plywood works great and I used my side engine mount for my 1275 as the adapter, but you can block it out to prevent interference with the front frame rails. A 2x6 in the rear bolted thru the light holes and sandwiched between big rubber and metal washers where it passes thru. When you assemble the HF engine stands only use the cross piece, not the 3rd wheel that goes in the front. Use a piece of pipe, 2x2, something to tie the bases together to keep them from spreading apart and keep it low so you the car won't hit as it rotates. You will need to shim everything after you put it together to make sure the engine stands are aligned, if not it will try to bind as you rotate. Good luck, Rut
 
Thanks Rut, a trip to HF tomorrow morning will be in order. And need to get my neighbor over here to borrow his hoist to pull the engine and tranny.
 
Back
Top