• Hi Guest!
    You can help ensure that British Car Forum (BCF) continues to provide a great place to engage in the British car hobby! If you find BCF a beneficial community, please consider supporting our efforts with a subscription.

    There are some perks with a member upgrade!
    **Upgrade Now**
    (PS: Subscribers don't see this gawd-aweful banner
Tips
Tips

Brake switch 1, Drew 0

drooartz

Moderator
Staff member
Gold
Country flag
Offline
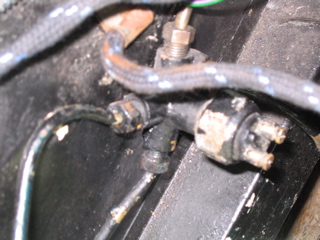
My first stumble (of many, I'm sure) came today. Trying to replace the brake light switch, a pressure switch on the Bugeye. Couldn't get the old one off to save my life. To top it off, I think I may have kinked one of the lines to the front brakes when I was trying to get it to budge. Bummer. Now I'm thinking I'll have to bring the car in to someone to get the switch off, and maybe a new front brake line? We'll see. I don't like messing around with brakes. No experience, and that's not an area I want an amateur like me making a fatal mistake.
 
The brake union should be bolted to the inner fender.
But it only has 1 bolt so it may tend to move if you wrench real hard on the stop light switch.
Hold back on the union with a pair of channel lock pliers while turning the switch out with a wrench.
They should not be that tight, just snug but maybe 45 years has taken it's toll on the threads.
 
One preson to hold the union with a big cresent wrench and another to turn the switch.

Old stuff can be a pain, gota be careful indeed.

Now you are going to have to disconnect all the break lines from that union, remove the mounting bolt and then remove the switch. All the breaks are going to have to be blead real good after you put it back but then flushing old brake fluid is a good idea anyway. See a previous thread for a bicycle intertube trick for doing that by your self.
 
Do I need any special tools to work on the brake lines? I don't have anything in particular that is brake specific.
 
Drew, this is a minor setback. You've all the necessary skills to LEARN the brake system. And think: MoreTools.

As Jack said, it's pro'lly time to remove the lines from that union and bench it to unwind the switch. You ~need~ a bench vise /ubbthreads/images/graemlins/grin.gif to hold it well. And some "line wrenches" (a 7/16" IIRC) to undo the lines. Six point wrenches only, please. Undo the lines while the union is still bolted to the fender. Brake fluid WILL eat paint, so be advised. Wipe it up immediately, and water will rinse what you can't wipe up. You should have NO problem conquering the braking system, and be more independent for the knowledge. Depending on which pipe you 'kinked' you may "get away clean" if it's one of the front ones (shorter, easier to replace), too... Photos?
 
If you are replacing the metal brake lines you have to have the right fittings and flares on the tubing. If you're just unbolting brake lines, you should invest in a set (or at least a couple) of flare nut wrenches. The home center will have them but Harbor Freight and Northern Tool will be less expensive. If you're not familiar with flare nut wrenches, they are like a heavy box end wrench where a section of the box/ring has been cut out. This allows you to put the wrench over/around a tube and still have contact with most of the outside of the nut you're loosening. They are a must have tool for brake line work.

The pressure switch you're dealing with was also used on early Minis. It has a tendency to die when used with DOT-5 fluid (even if the switch is new). A number of us in the Mini world have resorted to wiring a pedal actuated switch (as used on later cars) in parallel to the hydraulic switch. This works very well and can be desirable when the hydraulic switch is hard to get to.
 
Thanks all for the encouragement. Here's what the union looks like. I think I kinked the line to the right front wheel, and maybe the one to the left front. Rear line is okay I think, as is the one to the master cylinder.

brake_union_1.jpg
brake_union_2.jpg


If I had to replace a line, does something like this:

https://www.mossmotors.com/Shop/ViewProducts.aspx?PlateIndexID=29539

work? Do these replace the pipes, or just some parts of the lines? I've used stainless lines on motorcycles before, to good effect. Looks like I need to get some more tools. /ubbthreads/images/graemlins/grin.gif
 
The braided lines are for the ends at the wheels. The tubing you see at the union is steel, running to the flexible ones at the "corners"... technically there are only three flexi's. The rear has one between the chassis and the diff. They allow for the movement of the steering (two flex lines) and diff (one).

As for the "kink"... I've seen MUCH worse. It would be prudent to replace the bent one (work-hardening embrittles the tubing) but it *appears* to be useable from the photos. If it were MY car I'd chance it... but not being there and it being YOUR car I will advise replacement. Same as if it were a client's car: err on the side of safety.

Have you a manual yet? It will give the proceedure, step-by-each.
 
[ QUOTE ]
wiring a pedal actuated switch (as used on later cars) in parallel to the hydraulic switch.

[/ QUOTE ]

You wouldn't happen to have a link to how to do this, would you? I might consider this as a possibility for the future.
 
Oh shoot, take the lines loose from the brass union, should not be a big deal as all is brass but for the end of the lines where it touches the brass inside. I see no kinks in your photos worth talking about. Take the union off then remove the switch, remember your local machine shop has a big vice to hold the union while the switch is removed if necessary.

Fifteen min job, tops.
 
I'll give it a go tonight, and let y'all know how it goes. Maybe I'll get over my fear of brake systems yet.
 
Yessir! Keep in mind you're dealing with "Yestertech" here: No ABS, no balance valve, nothing to make it more complex than it needs to be. It's just another Bonding Experience! /ubbthreads/images/graemlins/grin.gif

A good manual and this place, you'll be intimately familiar with the ways of LBC brakes in no time.
 
Sorry, no links on the pedal switch. On mine I used a high-amp rated micro-switch and bolted it to a through hole drilled into the pedal box. I bent the switch arm to contact the top of the pedal. Others I know have bought the plastic brake pedal switches used on later TRs (perhaps these were used on later MGBs also?) To mount those might take a little more creativity. As far as wiring, you just want to set the switch so it's held "open" when the pedal is up and closes when the pedal is slightly depressed. (Obviously this means mounting the switch in a position where the pedal is moving AWAY from the switch, not towards it, when the pedal is depressed). The two wires coming from the switch are wired in parallel to those on the old hydraulic switch.
 
Drew, get a line wrench set before you start trying to take it apart. You will thank yourself for buying them over and over in the years to come. Doug called it a flare nut wrench and that is probably the correct terminology. It looks like this but I would probably get something with a little more quality. Hand tools like this will be in your family forever, if you don't leave it on a wheel well during you test drive...lol. See the hyperlink for a picture of what you are looking for. Sears sells them, I'm positive as my set is a Craftsman set. https://www.harborfreight.com/cpi/ctaf/displayitem.taf?Itemnumber=5125
JC
 
*Ahem*....
 
Doc mentioned those as well. I'm going to swing by the local Depot and see if they carry them. Not that many tool buying options up here in the mountains, at least not on my way home from work.
 
Sorry Dr. Your initial post above was entered while I was typing mine! I wasn't trying to repeat/copy what you said.
 
I know, Doug. /ubbthreads/images/graemlins/wink.gif

It happens a lot on a ~high participation~ forum with 6000 members! /ubbthreads/images/graemlins/grin.gif
 
I just wish there were more Bugeye pics.
 
I'll add some more Bugeye pics one of these days...
 
Back
Top