Hey Guest!

 Hey - did you know if you click on the title of a thread it will take you to the first unread post since you last visited that thread?
 but were afraid to ask:
  STOP!! Never post your email address in open forums. Bots can "harvest" your email! If you must share your email use a Private Message or use the
  smilie in place of the real @
 Pretty Please - add it to our Events forum(s) and add to the calendar! >>
roscoe
Jedi Knight
Offline
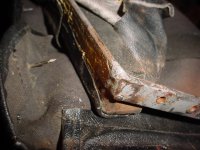
I'm in the process of installing a vynl top. I had a wood worker friend cut me a new header piece out of maple and I've got the frame and latches working well. I have the old top and I can see how it was installed, but the "hide-em" strip that goes in front was torn off. My problem is that in all of the Healey books I have plus Norman Knock's detail photos, and a whole CD of photos showing some BN-2 restorations, there is not a good close-up of the way the top wraps around the forward frame member. The old top has a separate piece of vynl that was glued and stapled, to cover only the wood header, the wood was then screwed onto the "L" shaped forward frame member. Then the top was pulled forward over the vynl wraped wood, and stapled to the wood along the bottom forward edge of the bow. I assume the hide-em strip was attached so it covered the staples attaching the top to the wood. This left the "L" shaped metal frame member exposed along where it meets the wind screen frame, and required that the very bottom edge of the wood be used to hold the staples (where most of them had split the wood on the old piece). If anyone can post a description or some photos of this area from the inside and outside I'd be most grateful. The top need not be up, in fact it might be better if it is not. I'm hoping that Dave R. has not gone anywhere for Thanksgiving yet. Once again, thank you all and have a safe holiday.
Jon Robbins
1956 BN-2
Jon Robbins
1956 BN-2