• Hey Guest!
    British Car Forum has been supporting enthusiasts for over 25 years by providing a great place to share our love for British cars. You can support our efforts by upgrading your membership for less than the dues of most car clubs. There are some perks with a member upgrade!

    **Upgrade Now**
    (PS: Upgraded members don't see this banner, nor will you see the Google ads that appear on the site.)
Tips
Tips

Block pics prior 2 and after offering up the crank

2wrench

Luke Skywalker
Country flag
Offline
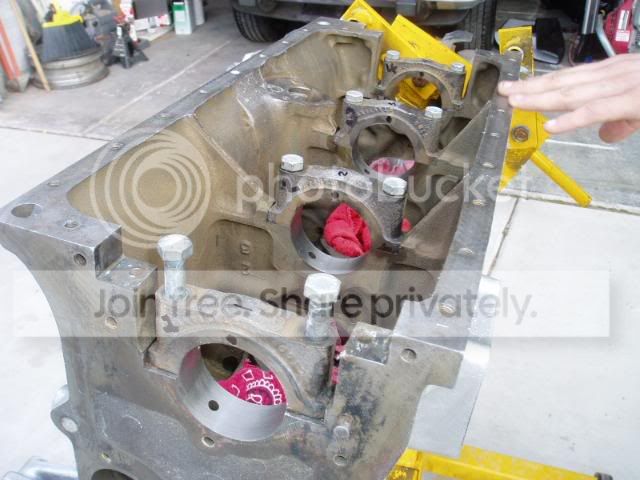
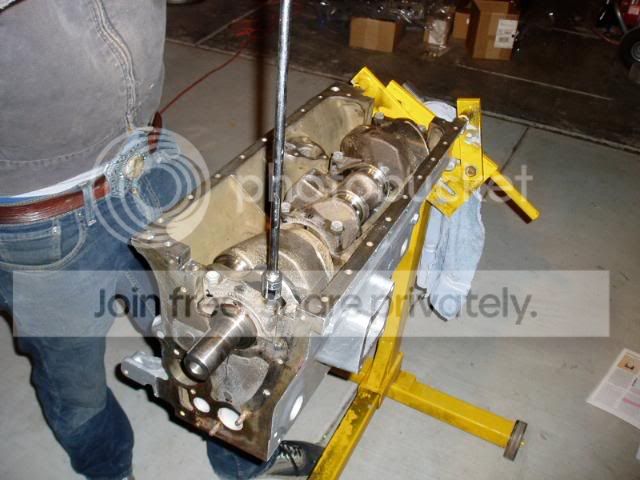
Block pic showing the placement and marking of the four
main bearing caps. After crank placement, she spins
freely so I think all is good. If anybody sees anything
glaringly wrong, please advise. Now the pic:

P1010001-21.jpg


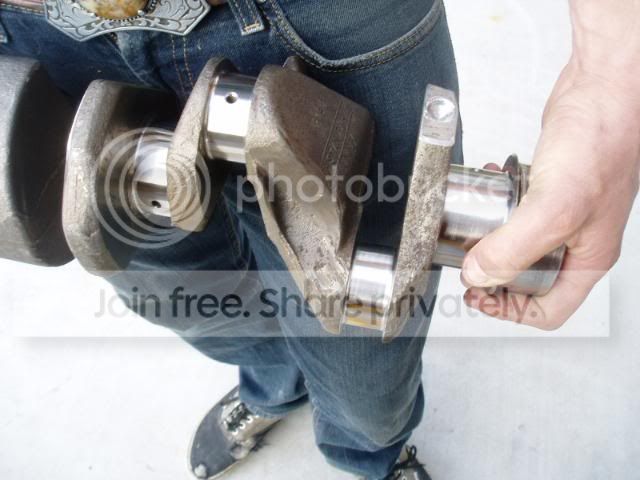
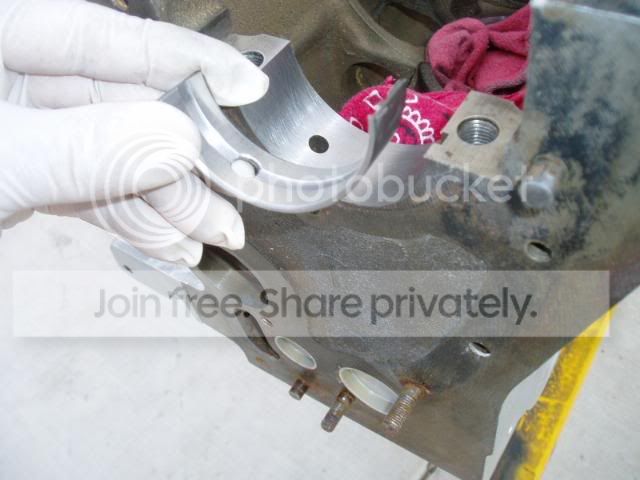
Here is a main bearing held showing proper orientation
as it will be placed into the block. Notice the hole
in the bearing will match the hole in the block. There is
a tab, as well, on the bearing that will fit into a small
notch in the block to further verify it is a proper fit:

P1010005-18.jpg


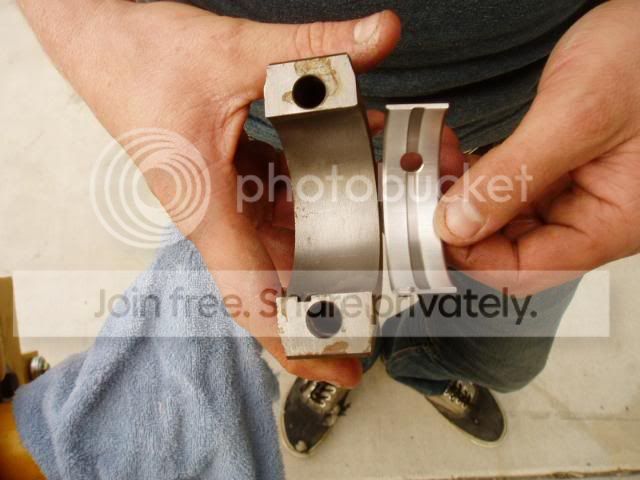
The other main bearing is being held here to show how I
placed it. I made sure the tab met the notch in the
bearing cap, but note that here, we do not see a corresponding
oil feed hole, as is shown in the block. If this is
an incorrect install, please advise. Now the pic:

P1010012-15.jpg


Finally, a pic of my son Tommy turning down the last bolt
to marry the crank to the block. All bolts are not
torqued down pending two questions and approval of work.

First question: Do the main bearing caps bolts require
split washers? Same question regarding rod bearing cap bolts.

Second question: Anybody know the foot pounds to torque
these puppies?

P1010014-13.jpg


Thanks for looking in and best wishes to all,
 
Awesome photos, D.

Could you post one of the crank shaft itself?
I've never seen a Triumph crankshaft.

Also- Doc Bill has a mess with his camshaft.
Where in the engine is the camshaft located?
Or are cams simply bumps on the crank shaft?

I'm the stupid kid on the block, remember?

regards,

dale
 
I bought new main bearing cap bolts from Richard Good. Recommended torque (with 30wt oil) was 66 lb.ft.

Dale - the camshaft is a separate shaft. It fits in the hole at the end of the little finger in the second picture. Both shafts get a sprocket and are joined with a timing chain. The chain takes approximately 3 weeks to set to acceptable timing. At least mine did! The sprocket for the camshaft has twice as many teeth as the crank sprocket so the cam turns at half the speed of the crank, by the way.

Hope that helps
Alistair
 
Sure looks clean ... and dry?

Make sure that you've pre-lubed the bearings. I can't see a drop of oil in the pics.
 
I have to agree with Peter, put some oil or break in lube in there before you spin anything.You can't use too much!! Please don't spin the crank in new bearings without oil.

Also, I don't recall anything being said about plastiguage. You need to check clearances of bearing to crank and rods to crank with it to ensure your crank was turned correctly.

I had a crank turned and one journal was off and it had to go back. Was not happy that day.
Gordo
 
Yes you should be using assembly oil. You can get this at any NAPA store Also, I would check to see if Loctite - blue is recommended on the bearing cap bolts. As for plastigauge - I am sure whoever ground your crankshaft was involved in deciding the proper sizing of the new bearings. However, not a bad idea to check clearance. You don't want to do this again! Good luck.
 
This is what was placed between the bearing and
the crank:

P1010008-16.jpg


Dale: This is my son holding one end of the crank.
It is like more of the same, running the depth
in its length, of the engine.

P1010010-15.jpg


I do have engine building lube. Do I slather the
entire inside of the engine block? I'm looking at
rods and pistons, of course, if crank checks out okay.
 
Notice how in Tommy's left hand and somewhere near his
left pants pocket that there is the beginning of a
machined hole. It's shiny. That is not stock, Dale.
That was done, if you can believe it, to remove metal
material from the overall crank in order to balance
it.

I never knew what balancing was, but it is literally
making sure that every part weighs the same, and I
glean, that the weight of the part is evenly distributed.
If I misspeak here, I invite correction to be most
succinct. I am happy that I paid the price to have this
done, because I only imagine the amount of stresses
created on other engine parts with the high
revolutions engines turn.
 
About that 4th Pic, what is that extra long wrench extension all about? Is a special tool like that needed? I don't think I've seen bearings being tightened before. thx
 
I've never been this far into an engine,...but it seems like (Though not TR Specific)I read that the inside of the engine could be painted gloss black to aid oil return to the crankshaft.
Is this "Racer" stuff, did I remmber incorrctly, or am I just "full of it"?
It's great that you're doing this with your son! Maybe he's "catch the bug".
Take care Bob
 
2wrench said:
I never knew what balancing was, but it is literally making sure that every part weighs the same, and I
glean, that the weight of the part is evenly distributed.

Yes, each piston, connecting rod,pin, etc combination, by cylinder is weighed on a gram scale and the heaviest group is identified. Then an attempt is made to remove unnecessary material from the heavier groups with a goal for everything to be the same. Here's some trivia. As you know these TR engines are basically 1930's era technology. The same basic block, crank, etc, were used in many cars. The amount of time spent assembling engines was directly proportional to the car's price and performance claims. So, a Standard Vanguard engine for example, may have been "thrown together" compared to some very basic sorting done on the TR range. All of this to insure enhanced performance. The higher state of tune on the TR's required more attention to reducing vibration. However, they were never "balanced". Anyone who drives a TR with a professionally assembled and balanced engine will agree that there is a significant difference in performance.
 
I hate using Plastigage. I ccnnot get it to sit on the crank. I tried to put it on the cap and had better luck, but it still was a pain. It was cold in the garage and the Plastigage was brittle. It was also a couple of years old.
 
Good assembly lube - you're just more tidy than I am when I assemble an engine.

Make sure to NOT use the extension when you torque the caps. It makes the reading somewhat inaccurate.

As far as balancing, something I didn't know as far as con rods, is that it is important not to take weight of certain areas. I thought anywhere there was a casting was OK to remove weight. But I recently saw this from the Moss UK Triumph Performance&Tuning pdf:
 

Attachments

  • 10263.jpg
    10263.jpg
    53.7 KB · Views: 213
Kentvillehound said:
About that 4th Pic, what is that extra long wrench extension all about? Is a special tool like that needed? I don't think I've seen bearings being tightened before. thx

Kentville: Really no particular wrenchdom/scientific approach here. When I
began the project, I advised Forum members that I had a son who studied mechanics
just about enough to make him/us dangerous.

This was his wepon of choice and I had no reason to balk. Wish I could tell you
it was some sophisticated/elaborate approach for high-end reasons or some such
thing.

We are actually loose fitting everything for now because I hadn't researched
the requisite tolerances for torquing...and now, I have been advised it would
be a good idea to plastigage parts for proper specs, which I will do, which means
all bolts have to come out again.

By the way, this tool's use did seem to fill the need, in any case, for the
moment.
 
BobSands said:
I've never been this far into an engine,...but it seems like (Though not TR Specific)I read that the inside of the engine could be painted gloss black to aid oil return to the crankshaft.
Is this "Racer" stuff, did I remmber incorrctly, or am I just "full of it"?
It's great that you're doing this with your son! Maybe he's "catch the bug".
Take care Bob

Bob: We really are down to nearly bare bones startup, I think. I mean, with a
block (shell) empty, what's left to take apart. (For brevity I will leave out one
small item that comes to mind).

Bob, again, I'm really not the expert. The experts here have uplifted me to reach
for this experience in rebuild. With what mechanical experience I have been
exposed to, my first gut reaction is to stay away from putting any kind of a paint
product into the engine block for fear that paint chips/pieces could slough off
and get sucked through the oil somehow causing blockages in oil passages that
are rather small; therefore, the benefit would not outweigh the risk, in my
view.

Maybe another more experienced mechanic, whom we are blessed to hear from,
could elaborate or correct me, but that would be my first gut.

Thanks,
 
Re: Block pics prior 2 and after offering up the c

Never done a block before but AFAIK nothing coated is cheap.My local place doesn't list blocks per se but almost all the parts inside so maybe the block can't be done
 
Re: Block pics prior 2 and after offering up the c

There is no inside surface of an engine that requires coating of any kind, except for engine oil.

Repeat again and again.
 
Back
Top