• Hi Guest!
    You can help ensure that British Car Forum (BCF) continues to provide a great place to engage in the British car hobby! If you find BCF a beneficial community, please consider supporting our efforts with a subscription.

    There are some perks with a member upgrade!
    **Upgrade Now**
    (PS: Subscribers don't see this gawd-aweful banner
Tips
Tips

Blind Moose Lives.......Finally

BobbyD

Jedi Knight
Offline
Cross post time.........

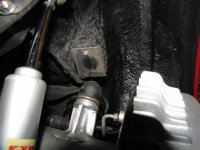
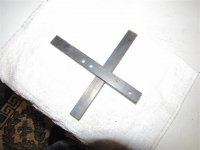
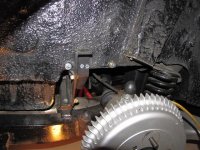
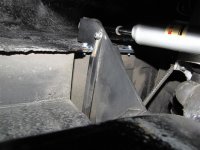
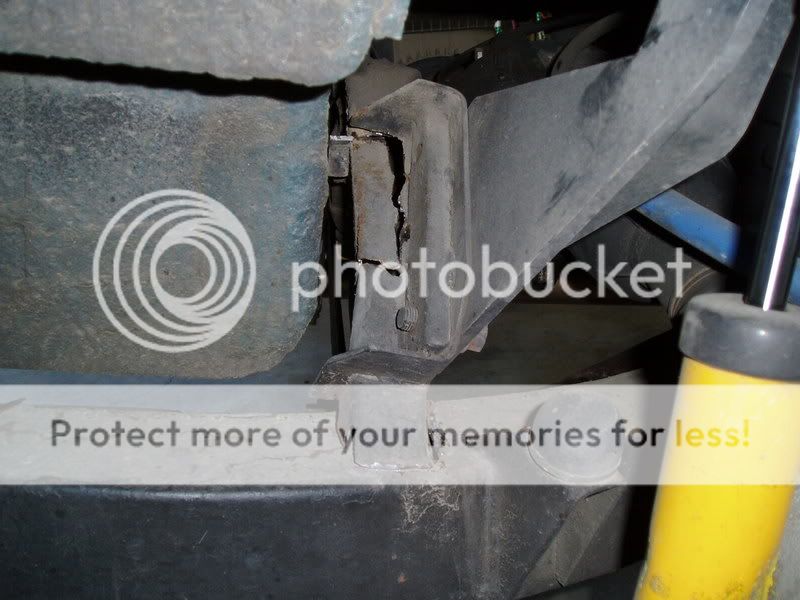
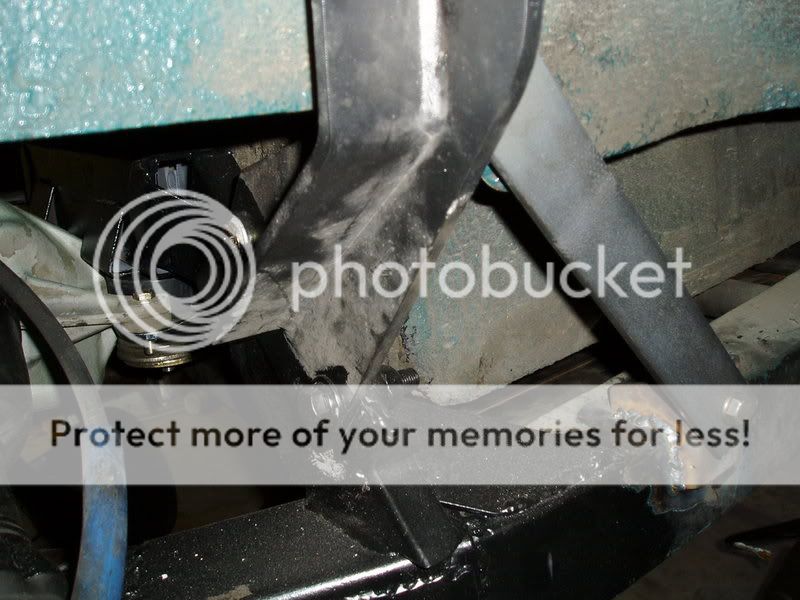
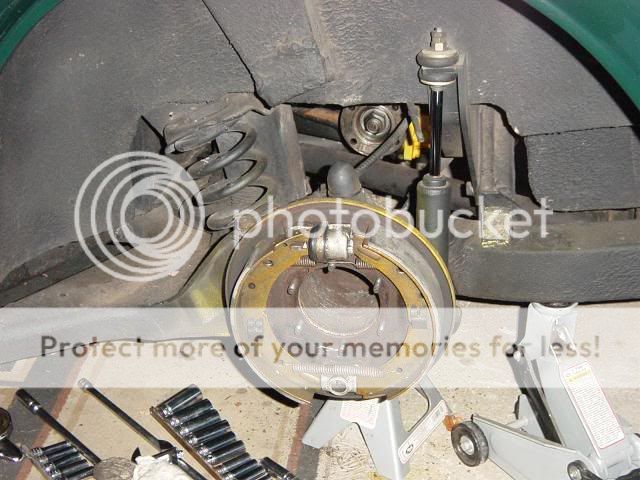
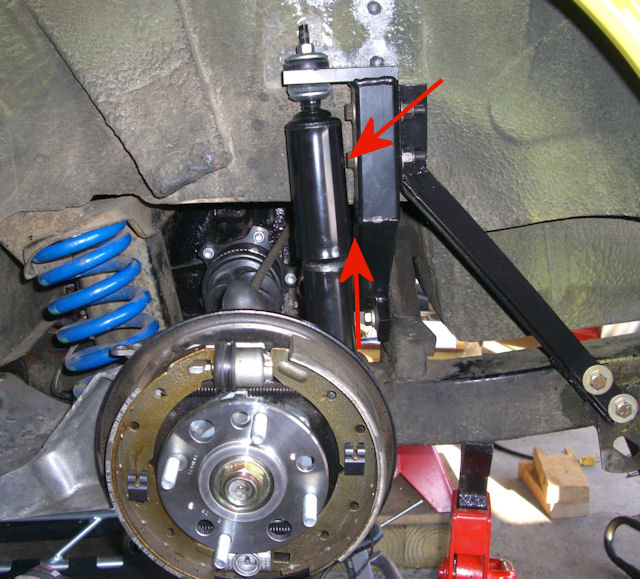
The Blind Moose brace is done and the moose looking around his new home and getting used to have a shock absorber poking him in the eye and an added brace sticking in his ribs. Total material cost for the brace was about $6 for the angle iron. I had plenty of bolts, washers and nuts and I got to practice my welding "skills". I guess time will tell how effective the brace is. :driving:

BMFinished.jpg
 
nice job Bob. also your documentation on your site is awesome. I was basically doing the same thing today, except I have the BPNW setup. Mainly because Greg is closer to Canada than Blind Moose.I went over my setup today to make sure all was well after putting on about 7000 miles on them.This is how I secured the top to stay away from any lateral movement.
Picture one shows my shock travel. The "O"ring slides up the shaft and stops when the bump stop kicks in. Tube shock cannot be suspension stop.
picture two shows bump stop is doing it's job (shiney)
picture three shows braces...3/4x1/4x7inches long
picture four shows brace installed, braces are threaded for 1/4x 1 1/4 thru shock brace and 1/4x1 inch. either end.
picture five shows inner mount and cross brace between shock mounts which was ther since initial installation
 

Attachments

  • 15302.jpg
    15302.jpg
    47.9 KB · Views: 291
  • 15303.jpg
    15303.jpg
    33.2 KB · Views: 286
  • 15304.jpg
    15304.jpg
    73.5 KB · Views: 292
  • 15305.jpg
    15305.jpg
    46.7 KB · Views: 297
OPA
Just what I was thinking of. Is there any room to place a support bracket on the front side too between the wheel house and the shock mount? I was thinking of welding the bracket to the front side and backing it up with a plate behind it. I like the way you tucked it behind edge.
 
Tr3ATR250 on my car there is no room on the front side (facing tire) however there are no two cars the same. I had a bugeer of a time lining up the mounting holes as they are tight to the body. Some cars will have a 1/8 or 1/16 clearence on one side or the other.When I removed the brackets this morning there was absolutly no signs of lateral movement,but just for piece of mind i fastened them as i did.
Two things with this style of conversion to avoid....at all cost IMO
1)Make certain your bump stop bottoms the suspension..NOT the shock
2) Don't tighten the liven bejeesters out of the rubbers on the shock
They must be able to move back and forth as the trailing arm goes thru it's arc or it will twist the shock mount back and forth.
Picture two shows the shimming I did on the T/A plus the plate on the upper stop.
I hope to go to San luis obispo for VTR/Triumphest Should tell after that if it's an improvement, mind you I 7000 miles on the original setup.
 
kodanja said:
YIPES Bill!

Yep, ripped it right out, both sides! I replaced the cross member with the RATCO unit, then added the rearward brace to a bracket I welded to the frame, rather than drill more holes in the frame. The brace is welded to the BPNW shock tower and will come out as one unit, if need arises. I have a nut welded inside the frame bracket and used a real (not Lowes) grade-8 3/8" bolt with backup nut. When I rapped the shock tower with a hammer before the brace was added, I could detect a definite vibration. With the brace, it is like hitting a brick wall. Note how the RATCO brace came with thick frame stiffeners as well as a rear triangle brace, all welded up tight. It ain't going nowhere now.
 
kodanja said:
ok i see it now
very impressive !!!! Now I may have to do something to that effect

Bill.....I think you mean to say..."Now I HAVE TO do......" Between BCF and 6-Pack there's too many horror stories about this bracket breaking the frame mount. But I've yet to hear of anyone who added the brace as having a problem. It looks like the BPNW bracket is just angle iron versus the square tube that Blind Moose uses but it should be still an easy fix. Like I said before, it cost me $6 for the angle iron at Lowes. The biggest expense will be the Grade 5/8 nuts and bolts. It'll be a lot cheaper then repairing your frame! If you need a hand, let me know. :driving:
 
BobbyD said:
It looks like the BPNW bracket is just angle iron versus the square tube that Blind Moose uses but it should be still an easy fix.

Bobby, the BPNW shock tower is not "just angle iron." It is made from different sections of 1/4" steel plate, each fully welded to the other to form an extremely stout piece of hardware. I had to set my MIG to a pretty high setting just to get penetration. It is quite strong.
 
tr3a 250
yes it is.I used the washers in conjunction with the O ring as an indicater for travel.Now that I have a safe suspension travel setting,after many miles of travel and conditions,I will machine a solid aluminum spacer to the height of the washers.I also put a plate on the bump stop to square it off.
 
Back
Top