• Hi Guest!
    You can help ensure that British Car Forum (BCF) continues to provide a great place to engage in the British car hobby! If you find BCF a beneficial community, please consider supporting our efforts with a subscription.

    There are some perks with a member upgrade!
    **Upgrade Now**
    (PS: Subscribers don't see this gawd-aweful banner
Tips
Tips

BJ8 radiator bottom hose

mmgwhite

Member
Silver
Country flag
Offline
1967 BJ8
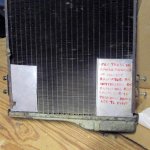
Need to pull the existing original radiator from the car. Bad leak
On first inspection the unfastening of the bottom radiator hose seems to be a near impossibility. Mirror and light shows a hose clamp around the hose
behind/under a sturdy frame cross member. essentially unreachable with clutsy fingers. Not to mention trying to re-attach upon re-assemble.
It would appear that the radiator cannot be "rocked" far enough foreward to help much because of airway deflecting shields in front of the radiator and fan behind.
I have been searching for a how-to thread to no avail
Anybody have an answer as to how to attack the removal/re-installation of the bottom radiator hose??
Other tips before I start??
Thanks in advance.
Mat
 
Hi Mat, I'm not trying to be smart, there is no trick ya just have to look at it this way, if Man put it together, another Man (you) can take it apart. I know it is a bear to get at, just find the right tool to help. Also after you get the clamp loose, you should be able to push the hose off from the front of the car. Your shields maybe why you have the problem, I don't have those shields.
Just wait till you try to take the carbs off someday! :smile:
 
If you are removing the radiator anyway, take off the front deflectors. If the hose is going to be replaced, cut it just beyond the lower outlet.
Bob
 
Did you look to see is the screw was tightened up from the underside? With a reasonably long screwdriver, I can usually get to the clamp from either the top or bottom. If the screwclamp has a hex-head, that opens up the possibility of using a 1/4"-drive socket, and either a long extension or close-quarter ratchet to loosen the clamp.

You can see the clamp between the xmbr and radiator.

IMG_2420.jpg


Here's a shot taken while I was repairing the swaybar mount, you can see the head of the clamp between the petcock and hose itself.

IMG_1394.jpg


In the shot above, I was just about to weld in these plates; take that, parking curb!

IMG_1389.jpg


IMG_1396.jpg


IMG_1403.jpg
 
My hose clip has a hex head and you get at it from below. If yours has a screwdriver slot, it might still be easier from underneath on a 1/4" drive ratchet.
 
I usually yank the radiator at least once a year to do a valve adjustment (to get access to the dog nut on the crankshaft for turning the engine). I remove the lower hose by removing the bottom radiator attaching screws (two on each side), loosening the screws at the top (one on each side), then swinging the bottom of the radiator forward enough to gain access to the lower hose clamp screw from below (mine has a slotted head)

The sharp corners of the air deflector can gouge the radiator core if you're not careful. To avoid that and to avoid having to remove the deflector when I remove and install the radiator, I made some shields out of scrap aluminum sheet and tuck them into the front side lower corners of the radiator before pulling it up and out. It doesn't simply come out (what does?), but you have to make sure the fan blades are turned to the proper position to clear the bottom hose connection of the radiator as it comes up (I have a Texas Kooler). You'll probably have to shift the rad up and down and back and forth as you try to figure out what's holding it. Probably would be better to have another set of hands to help, but I typically do it alone. Reinstallation is a reverse of removal. Make sure the lower hose clamp screw is oriented so you can get at it next time from below, and don't tighten any of the radiator attach screws until all are in place, as well as the lower hose connected.
 

Attachments

  • IMG_2438.jpg
    IMG_2438.jpg
    55.2 KB · Views: 141
  • IMG_2439.jpg
    IMG_2439.jpg
    74.3 KB · Views: 150
I usually yank the radiator at least once a year to do a valve adjustment (to get access to the dog nut on the crankshaft for turning the engine). I remove the lower hose by removing the bottom radiator attaching screws (two on each side), loosening the screws at the top (one on each side), then swinging the bottom of the radiator forward enough to gain access to the lower hose clamp screw from below (mine has a slotted head)

The sharp corners of the air deflector can gouge the radiator core if you're not careful. To avoid that and to avoid having to remove the deflector when I remove and install the radiator, I made some shields out of scrap aluminum sheet and tuck them into the front side lower corners of the radiator before pulling it up and out. It doesn't simply come out (what does?), but you have to make sure the fan blades are turned to the proper position to clear the bottom hose connection of the radiator as it comes up (I have a Texas Kooler). You'll probably have to shift the rad up and down and back and forth as you try to figure out what's holding it. Probably would be better to have another set of hands to help, but I typically do it alone. Reinstallation is a reverse of removal. Make sure the lower hose clamp screw is oriented so you can get at it next time from below, and don't tighten any of the radiator attach screws until all are in place, as well as the lower hose connected.
Steve, you know...

With all (6) sparkplugs out, and the car in 4th gear, you only have to roll it a few feet to get each cylinder in position to check/adjust the valves. A lot less involved than pulling the radiator__unless you just like doing that...
 
Steve, you know...

With all (6) sparkplugs out, and the car in 4th gear, you only have to roll it a few feet to get each cylinder in position to check/adjust the valves. A lot less involved than pulling the radiator__unless you justSteve, you know...

With all (6) sparkplugs out, and the car in 4th gear, you only have to roll it a few feet to get each cylinder in position to check/adjust the valves. A lot less involved than pulling the radiator_

OR:
He can be lazy like me and use a remote starter button, ignition off and car in Neutral.----:applause:
 
Nah, I've tried it that way. I have to do it that way to adjust the valves in my Midget since it has no other way to turn the engine, and I think it's a hassle, although it has 4 less valves to deal with.
I'm too much of an engineer to do it by rolling the rear wheels. I like to see exactly when the valves are transitioning from all the way open to closing.
Anyway, I've done it enough that I can have the radiator out in about 10 minutes, then adjusting the valves is a whiz. I like to go back through the adjusting sequence again just to check to make sure everything is right. I once had a burned valve because I didn't keep a close check on the clearances. That'll make you more careful.
 
Ten minutes - that is fast.

Is it not possible to disconnect the upper radiator hose and the top end of the lower radiator hose, then remove the bolts holding the radiator, and then raise the radiator up enough for easier access to the lower clamp?

Regarding turning the engine when setting the valves, with the spark plugs out, one can grab the fan blades and turn the engine that way - providing the fan belt is tight enough to do this. I have tried various ways to turn the engine and various sequences for setting the valves. It doesn't hurt to double check the valve settings using several methods.
 
I have to do it that way to adjust the valves in my Midget since it has no other way to turn the engine, and I think it's a hassle,

Steve !!
You mean you that midget thing ain't got no starter ???-----:playful:
 
Keoke, it ain't got no remote starter, nor a button on the relay, either.
 
Keoke, it ain't got no remote starter, nor a button on the relay, either.

PEP BOY's ,Riley's Etc:sell em remotes CHEEP,Steve-:highly_amused:

They are just a heavy duty switch encased in rubber which you can hold in your hand and have 4' insulate leads with insulated Aligator clips on the ends of the leads.

You just clip one lead to the normally excited connection on the starter solenoid and the other to a hot 12V source in the car. Now whenever you press the switch she gonna turn over.
 
I just roll the car via the right-front tire, and with the multiplication of the final drive, I have very good resolution of the valve moving to the top of its dwell. But I suspect we all have our way to do things, and we're quite set in them too!
 
I just roll the car via the right-front tire, and with the multiplication of the final drive, I have very good resolution of the valve moving to the top of its dwell. But I suspect we all have our way to do things, and we're quite set in them too!
My experience is the most accurate valve setting is doing this way. The fomula EOIC
Is still the best for me to get the valves adjusted when they are in the correct position. Howevet, this doesn't apply to radical cams.
 
A balloon is an accurate way of finding TDC on a given cylinder. I glued a pressure hose into a spark plug body and fastened a finger from a latex glove onto the end with a rubber band. (Sorry no pix)
When the balloon stops inflating and begins to deflate, you can determine TDC. It also helps to have a timing disc on the distributor:
TimingDisc.jpg
 
Back
Top