• Hi Guest!
    You can help ensure that British Car Forum (BCF) continues to provide a great place to engage in the British car hobby! If you find BCF a beneficial community, please consider supporting our efforts with a subscription.

    There are some perks with a member upgrade!
    **Upgrade Now**
    (PS: Subscribers don't see this gawd-aweful banner
Tips
Tips

BJ8 boot rubber strip

James A

Freshman Member
Offline
Hi guys,

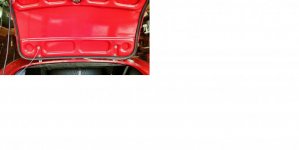
The rubber boot seal on my BJ8 was incorrectly fitted to the body of the car, instead of the boot itself which I see from pictures is the correct placement.

I am in the middle of the job of gently removing the old glue and rubber from the body of the car which is slow going but seemingly successful!

I have bought a new strip as the old was past it's best.

Does anyone have any advice of what type of adhesive to use and what the correct placement of the rubber is around the boot lid as it is not obvious to me.

Thanks for your help.

James
 
James, I've found that 3M Black Super Weatherstrip and Gasket Adhesive works great for rubber seals. When the directions are followed, it holds tight yet allows you some time to work. I would definitely recommend removing the boot lid from the car to do the job properly. I just kept the seal tight to the edges all the way around. Have a rag or paper towels and mineral spirits handy to clean off the 'stringers' that get on the paint.
 
The best adhesive, in my experience, is 3M Super Weatherstrip Adhesive:

https://www.zoro.com/3m-super-weatherstrip-adhesive-8008/i/G0605701/?gclid=CIKM3c6t-dECFYhufgod4yQJAg

(this is the black version of the famous 'gorilla snot')

The best adhesive remover, again in my experience, is 3M Adhesive Remover:

https://www.amazon.com/3M-General-P...486311604&sr=8-2&keywords=3m+adhesive+remover

(the remover isn't available in California, so you know it's good ;) and, no, I don't work for 3M but find their products usually work well)

As for installation, AFAIK, the groove should face down, with the smaller lip on the inside. I always put the joint/seam--whatever you call where the two ends meet--at the very bottom of the lid, but I think I read somewhere the factory put them on the side.
 
My technique only works if you're agile enough to get into the boot and close the lid (it helps to have the fuel tank removed), or have someone small enough to do it for you, but this is how I did it and it saves a lot of trial and error:
Temporarily secure (at intervals, with masking tape) the new seal to the flange of the rear shroud that it mates with. I don't know where the factory put the ends of the seal, but having it at the bottom makes the most sense to me. Get into the boot with a flashlight and pencil, have someone close the lid. Check to make sure that the seal is fitting properly all around the shroud flange with no gaps. Mark the inner edge of the seal all around the inner surface of the boot lid with the pencil.
Now you know where the inner edge of the seal should be, so you can get out of the boot. Remove the tape and work your way around the seal with adhesive (I agree about the 3M Weatherstrip Adhesive -- and adhesive remover if necessary), using the pencil mark as a guide.
 
One of the last places I would want to find myself is in the boot of a BJ8. Well, maybe a Sprite boot would be worse!
 
One of the last places I would want to find myself is in the boot of a BJ8. Well, maybe a Sprite boot would be worse!

Yeah and I feel the last place I would want the boot seal ends to join is at the bottom where all the water collets
 
Yeah and I feel the last place I would want the boot seal ends to join is at the bottom where all the water collets

If the seal is installed properly so that it seals all around the rear shroud flange of the boot opening, then the lower edge of the seal is at least a half inch above the low point of the drain channel. And the butt ends are also sealed with the weatherstrip adhesive. Any water that collects in the channel here is going to run out the first time you accelerate. However, the argument could also be made that if the butt ends are sealed correctly, then it doesn't matter where the butt is located.
 
Got my seal installed on the dining-room table, using 3M Black Weatherstrip adhesive. $12.49 vs $12.99 for the Super version (couldn't find any difference on the packaging).
For cleanup, I used Bestine Thinner and Solvent, available at art supply stores (California, too):

BootLid_orig.jpg
screenshot.933.jpg
 

Attachments

  • BootLid_2.jpg
    BootLid_2.jpg
    21 KB · Views: 97
Last edited:
The 3M General Purpose Adhesive Remover, formulated to remove 3M adhesives--and others--works pretty good on 3M adhesives as well. Can't buy it, at least off-the-shelf, in California though (so you know it's good).
 
I used Bestine Thinner and Solvent, available at art supply stores:

View attachment 50104

Boy, does this stuff bring back memories. In years gone by when I was a newspaper reporter in the pre word-processor stories, you'd edit your copy and change the order of paragraphs by cutting them out and pasting them on a different sheet of paper. Every reporter had a pot of rubber glue on their desk that would invariably harden up and you'd pour the Bestine in the pot to thin it out. Of course, everyone smoked so it's amazing the whole newsroom didn't explode as the stuff wafted through the air.
 
Back
Top